Best Selling Products

Adobe Photoshop Copyright - Full App
120 USD

Capcut Pro 1 Year
39 USD

ChatGPT Plus Account (GPT-4)
16 USD

Upgrade Duolingo Super
29 USD

Freepik Premium Account
59 USD

Windows 10 & 11 Pro Key
36 USD

Adobe Premiere Pro Account
99 USD

Copyright Adobe Lightroom Account
59 USD

Genuine Adobe Illustrator account
99 USD

Plugin Retouch4me
69 USD

Genuine Cheap Canva Pro
39 USD

Upgrade Genuine Office 365
49 USD

MidJourney Account
29 USD

Autodesk All App Account Copyright
120 USD

Upgrade genuine Capture One account
120 USD
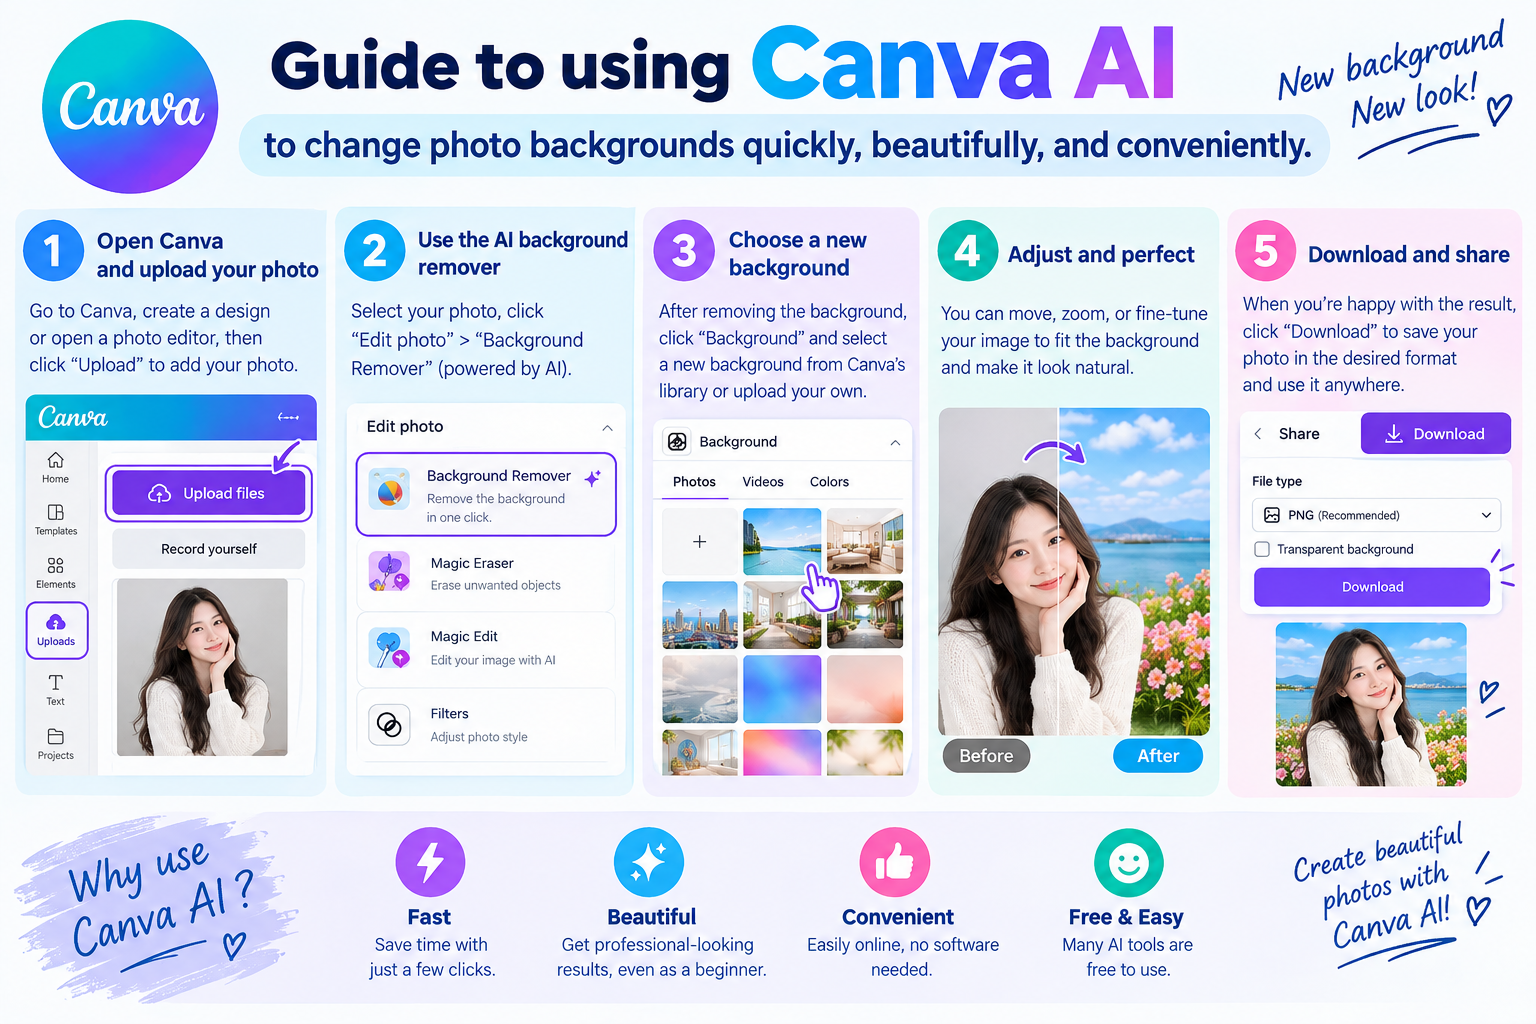
Guide to using Canva AI to change photo backgrounds quickly, beautifully, and conveniently.
Nội dung
- 1. What is the background creation feature in Canva?
- 2. Why should you change your photo background using AI on Canva?
- 3. Detailed guide on changing backgrounds in Canva using AI.
- Step 1: Open Canva and upload the image you want to change the background of.
- Step 2: Open the image editing tool in Canva.
- Step 3: Enter a description of the background you want to create.
- Step 4: Choose a suitable AI background.
- Step 5: Edit the image after changing the background.
- 4. Tips for changing photo backgrounds in Canva using AI for beautiful and natural results.
- 5. Common mistakes when using Canva AI to change backgrounds
- 6. Conclusion
Simply upload your image, enter a description of your desired space, and wait a few moments—you''ll have a new background that perfectly matches your idea without having to manually separate each detail. This tool is especially useful for online sellers, content creators, marketing staff, or anyone who frequently needs to edit images. From product photos and portraits to video thumbnails, you can transform the background to make your images stand out and look more professional. Let''s explore how to change backgrounds on Canva using AI below to make the most of this tool!
1. What is the background creation feature in Canva?
Canva's background creation feature uses AI to help users change the background space behind a subject in an image. Instead of using manual selection, cropping, or background removal tools, Canva can identify the subject and create a new background based on your description. This is a convenient feature that makes the photo editing process faster and more efficient, especially for those with little design experience. The interesting aspect lies in its ability to transform ideas into visually appealing images. You can request a background in a studio, cafe, office, nature, or artistic style. Canva AI will use your description to suggest suitable options, allowing you to choose a design you like or recreate it if the result isn't what you wanted. Some background styles you can try on Canva AI include:
-
Minimalist studio: Suitable for portraits, fashion photography, or product promotional images.
-
Natural setting: You can choose a beach, a garden, mountains, forests, or other outdoor scenery.
-
Modern office: Suitable for personal photos, work files, or business-related content.
-
Retail space: You can create a background that suits cosmetics, fashion, accessories, or household goods.
-
Artistic style: Suitable for posters, thumbnails, social media images, or designs that need to create a focal point.
2. Why should you change your photo background using AI on Canva?
Replacing the background with AI isn't simply about changing the part behind the subject. When used correctly, you can transform a familiar image into something completely new, tailored to your specific needs. This is why AI tools on Canva are becoming increasingly useful for those who frequently create image content. A readily apparent advantage is its ease of use. You don't need to memorize a multitude of tools like you would with professional editing software. Instead, AI handles most of the work, allowing users to focus on selecting ideas and refining the design.
The notable benefits of using AI to change image backgrounds in Canva include:
-
Easy to use: Canva's interface is intuitive and suitable even for beginners.
-
Time saving: AI helps process backgrounds much faster than manual editing.
-
No advanced design skills are required: Users simply need to describe their ideas using natural language.
-
Many styles to choose from: You can try different locations for the same photo.
-
Versatile application: Suitable for sales photos, avatars, banners, posters, thumbnails, and social media content.
-
Easy to edit: If the initial background isn't suitable, you can change the description and create another option.
3. Detailed guide on changing backgrounds in Canva using AI.
Step 1: Open Canva and upload the image you want to change the background of.
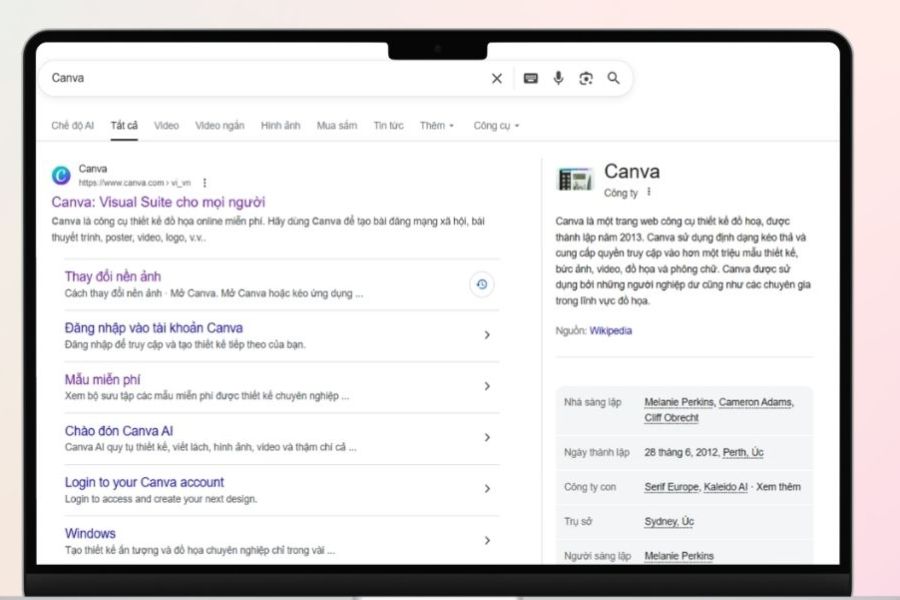
First, go to Canva and log in to your account. On the main interface, you can create a new design in your desired size or open a design you are working on. If your purpose is to create an image for social media, choose a size that is appropriate for the platform you intend to use.
Next, upload the image you want to edit to Canva via the file upload section. Once the image appears in the design library, simply drag and drop it into the workspace. It's best to prioritize images with a relatively clear subject, sufficient lighting, and that aren't overly blended into the original background. This can help the AI recognize the subject more easily.
Step 2: Open the image editing tool in Canva.
Once the image has been imported into the design, click on the image to bring up the editing tools. From the toolbar, find the Magic Studio area or the AI tool group related to image editing. Depending on the interface and version of Canva you are using, the name or location of the feature may be displayed differently.
Next, find the tool to create or change the background. When activated, Canva AI will analyze the photo and determine which parts of the subject to retain. Then, the system prepares the space behind to create the new background. You should check the subject after AI processing to ensure that hair, hands, clothing, or other important details are still preserved relatively accurately.
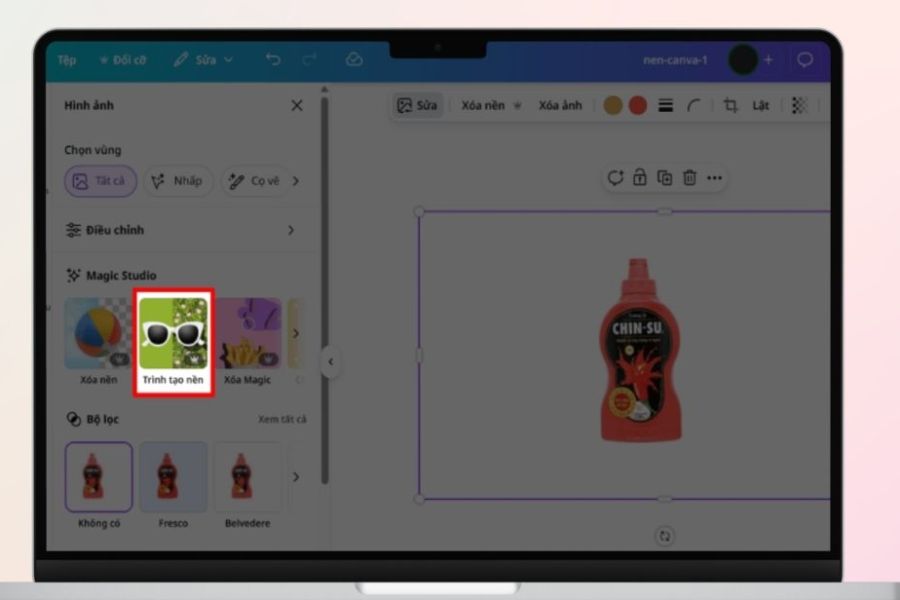
Step 3: Enter a description of the background you want to create.
This step is crucial to the final result. In the description box, enter your idea for the background you want to replace. Instead of writing a generic phrase like "beautiful background," clearly describe the space, style, lighting, and overall feel you desire.
For example, with fashion product photos, you could try describing it as "a minimalist fashion studio, soft lighting, bright tones." If you're editing photos for social media, you could try "a modern cafe, natural lighting, youthful style." The more specific the description, the more data the AI has to visualize the space it needs to create.
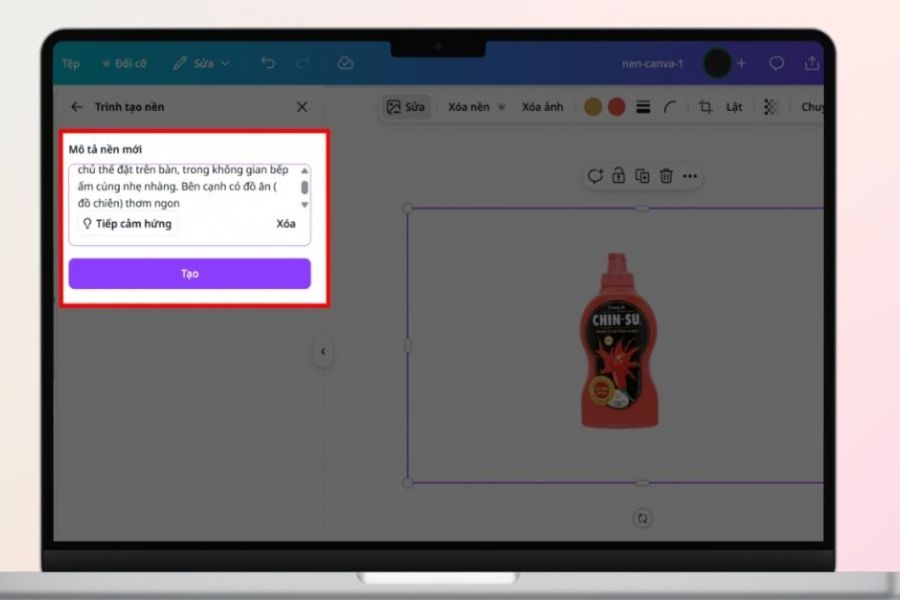
Step 4: Choose a suitable AI background.
After you enter your description, Canva AI will process your request and suggest background options for you to choose from. Carefully review each result instead of choosing the first one. A beautiful background may not be suitable if the lighting, colors, or viewing angle are inconsistent with the subject.
Once you find a suitable background, you can apply it to your design and continue editing. If the result isn't quite right, don't hesitate to recreate it. You can change the description, add details about color, space, or style, and Canva AI will generate new options. This is a fairly effective way to find a suitable background without starting from scratch.
Step 5: Edit the image after changing the background.
After applying the new background, take some time to check the overall result. Observe whether the subject's color is mismatched with the background, if the edges look natural, and if the lighting between the two areas is consistent. These are small details, but they can significantly affect the authenticity of the photograph.
You can also use Canva's additional editing tools to balance brightness, contrast, or color. If needed, add some shadows to the subject to create a sense of depth. Finally, review the layout, add text or design elements if necessary, and then download the image in the appropriate format.

4. Tips for changing photo backgrounds in Canva using AI for beautiful and natural results.
AI can help you change backgrounds very quickly, but for the final image to look convincing, selection and refinement are still crucial. A beautifully created background may not necessarily suit the subject. If the two parts are inconsistent in lighting, color, or perspective, viewers may still perceive the image as a composite. When creating a composite, you should observe the overall picture rather than just focusing on the background. Try different options and prioritize those that create the feeling that the subject is truly in that space.
-
Choose a background with similar lighting: If the subject is photographed outdoors in bright light, prioritize a background with similar lighting conditions. For indoor photos, a background with soft lighting will usually blend in better.
-
Color coordination: An overly vibrant background can overshadow the subject. Conversely, a background that's too dark can make the overall scene look lifeless. Choose a background color that complements the subject rather than competing for attention.
-
Pay attention to the shooting angle: A person photographed head-on will have difficulty blending in with a background that has an overly oblique angle or unusual perspective.
-
Add subtle shadows: Shadows can help the subject feel like they are standing or lying in real space instead of being placed against the background.
-
Avoid vague descriptions: Instead of just entering "beautiful room," describe it more specifically as "modern living room, cream color scheme, natural light, minimalist style."
-
Try multiple versions: If the first result isn't satisfactory, adjust the prompt and recreate it. A few small changes in the description can sometimes produce a significantly different result.
-
Keep the background just right: For sales photos or portraits, a background with too much detail can cause the subject to lose focus.
5. Common mistakes when using Canva AI to change backgrounds
Although the process is quite simple, the results of AI-generated backgrounds are sometimes imperfect. Some photos with complex subjects like long hair, small accessories, transparent objects, or many details may cause the AI to misidentify them. Therefore, don't be surprised if the first few versions don't meet your expectations. Additionally, entering overly short descriptions can also result in backgrounds that don't match your vision. AI needs information to visualize the space, so a specific description is often much more helpful than a few general keywords.
-
The input image is too blurry: Low image quality can make it difficult to identify the subject.
-
The subject and background have very similar colors: This makes it easy for the edges to become difficult to distinguish.
-
The prompt lacks information: A description that is too short may create background information that is not intended to be useful.
-
Too much background detail: This can overwhelm the subject or make the design look cluttered.
-
Don't skip checking the edges: A few small details around the hair, hands, or clothing may need further adjustments.
-
Failure to adjust color accuracy after changing the background: This is a common reason why photos look unnatural.
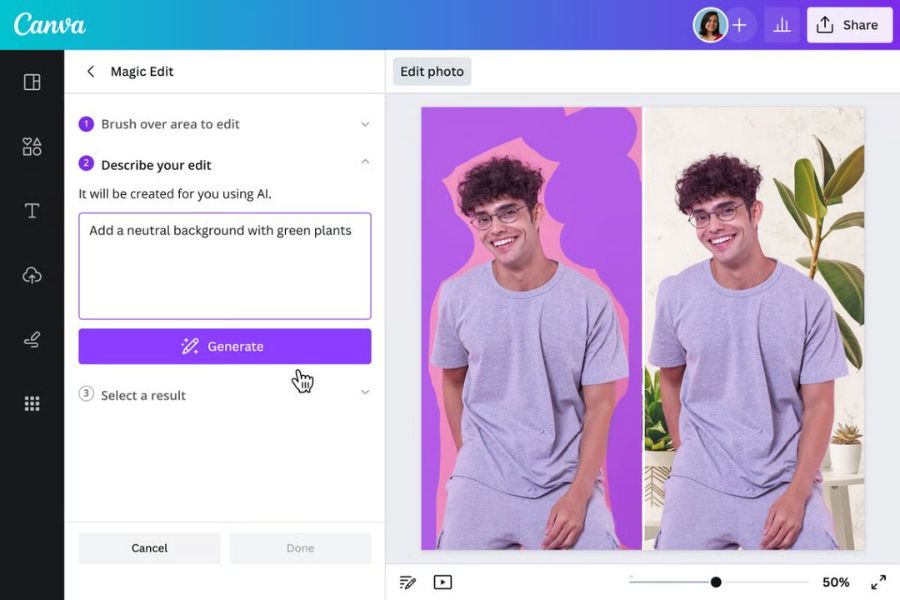
6. Conclusion
Changing the background on Canva using AI is a quick way to refresh images without too many complicated steps. From uploading photos, selecting the AI tool, entering a description, to choosing a background, the entire process is quite intuitive and suitable for beginners. For beautiful results, you should prioritize clear input images, provide a specific background description, and pay attention to lighting, color, and perspective. Combining this with a few final editing steps will make the image more harmonious and professional. If you frequently create content, sell online, or need to edit photos quickly, Canva AI is definitely a tool worth trying.





















VIP Products








Best Selling Products
Adobe Photoshop Copyright - Full App
120 USD
Capcut Pro 1 Year
39 USD
ChatGPT Plus Account (GPT-4)
16 USD
Upgrade Duolingo Super
29 USD
Freepik Premium Account
59 USD
Windows 10 & 11 Pro Key
36 USD
Adobe Premiere Pro Account
99 USD
Copyright Adobe Lightroom Account
59 USD
Genuine Adobe Illustrator account
99 USD
Plugin Retouch4me
69 USD
Genuine Cheap Canva Pro
39 USD
Upgrade Genuine Office 365
49 USD
MidJourney Account
29 USD
Autodesk All App Account Copyright
120 USD
Upgrade genuine Capture One account
120 USD