Best Selling Products

Autodesk All App Account Copyright
120 USD

Upgrade genuine Capture One account
120 USD

Upgrade Genuine Office 365
49 USD

Adobe Premiere Pro Account
99 USD

Genuine Cheap Canva Pro
39 USD

ChatGPT Plus Account (GPT-4)
16 USD

Adobe Photoshop Copyright - Full App
120 USD

MidJourney Account
29 USD

Capcut Pro 1 Year
39 USD

Copyright Adobe Lightroom Account
59 USD

Freepik Premium Account
59 USD

Windows 10 & 11 Pro Key
36 USD

Plugin Retouch4me
69 USD

Upgrade Duolingo Super
29 USD

Genuine Adobe Illustrator account
99 USD
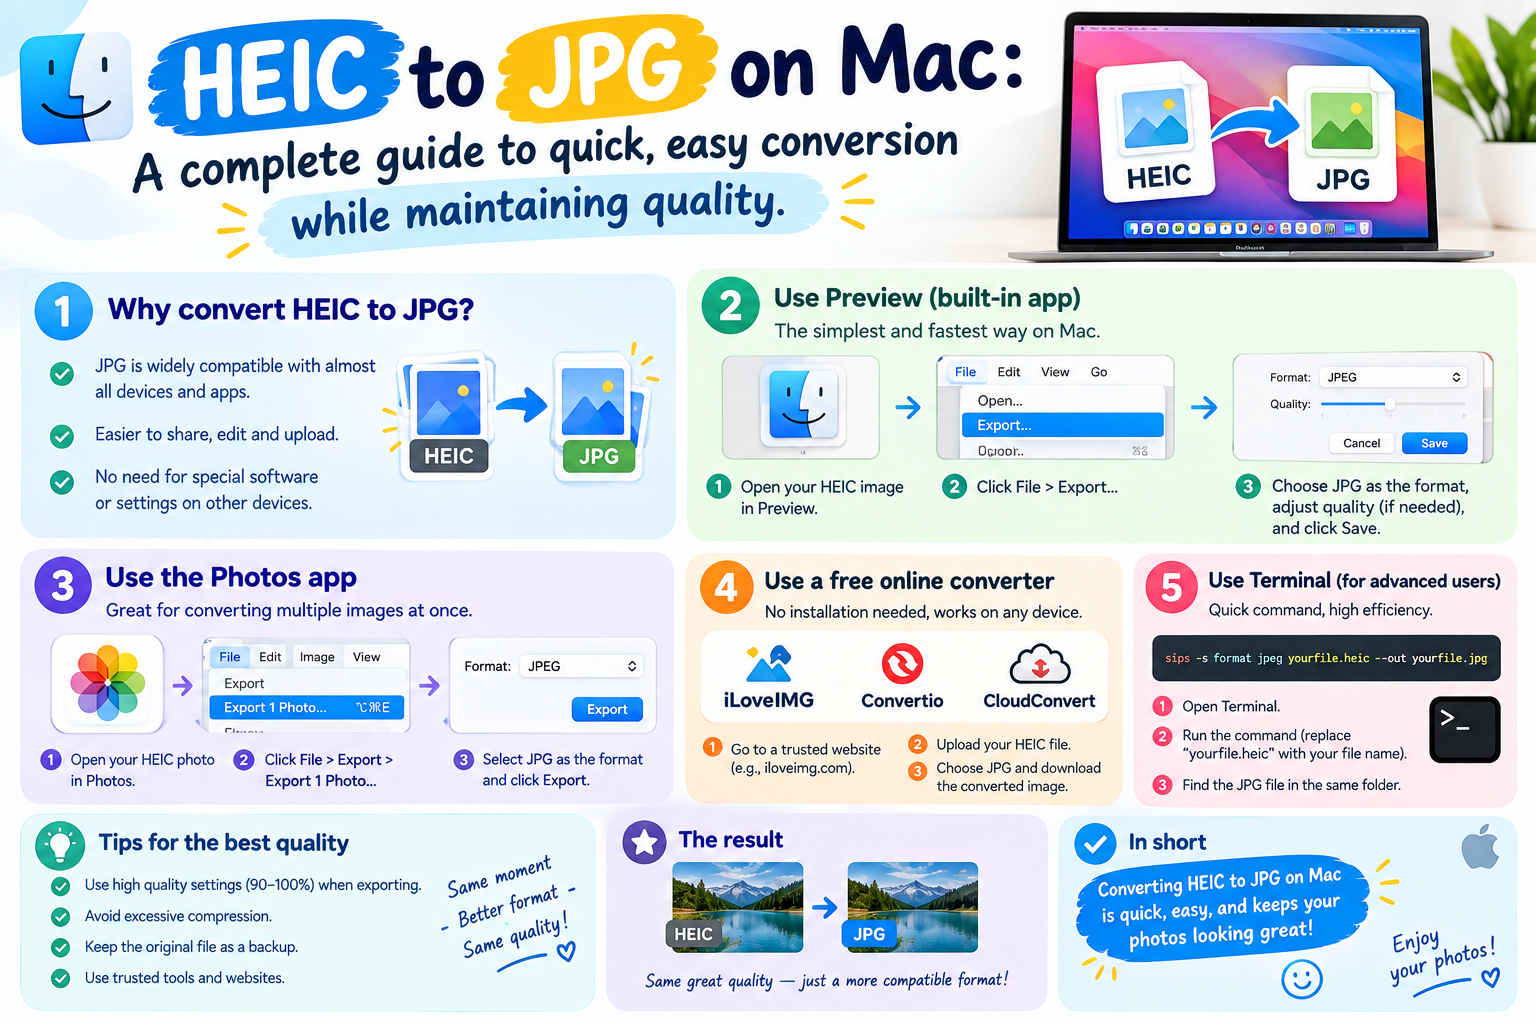
HEIC to JPG on Mac: A complete guide to quick, easy conversion while maintaining quality.
Nội dung
- 1. HEIC, a compact image format but with many limitations.
- 2. Preview - A powerful conversion tool hidden right on your Mac.
- 3. Photos app: The ideal choice for syncing your library with iCloud.
- 4. Use free third-party apps to handle large volumes of images.
- 5. Choose the right method and take complete control of your photo library.
You''ve just transferred a bunch of photos from your iPhone to your Mac, and everything looks fine until you need to upload them to a job site, send them to a Windows colleague, or open them with an old editing software. Then the familiar message appears: file format not supported. The culprit is usually the HEIC file extension, a technically clever format but not yet widely used outside the Apple ecosystem.
1. HEIC, a compact image format but with many limitations.
HEIC stands for High Efficiency Image Container, an image packaging format based on the HEIF compression standard developed by the MPEG group. Apple started using this format as the default for cameras starting with iOS 11, meaning that almost every iPhone and iPad currently in use saves photos as files with the .heic extension.
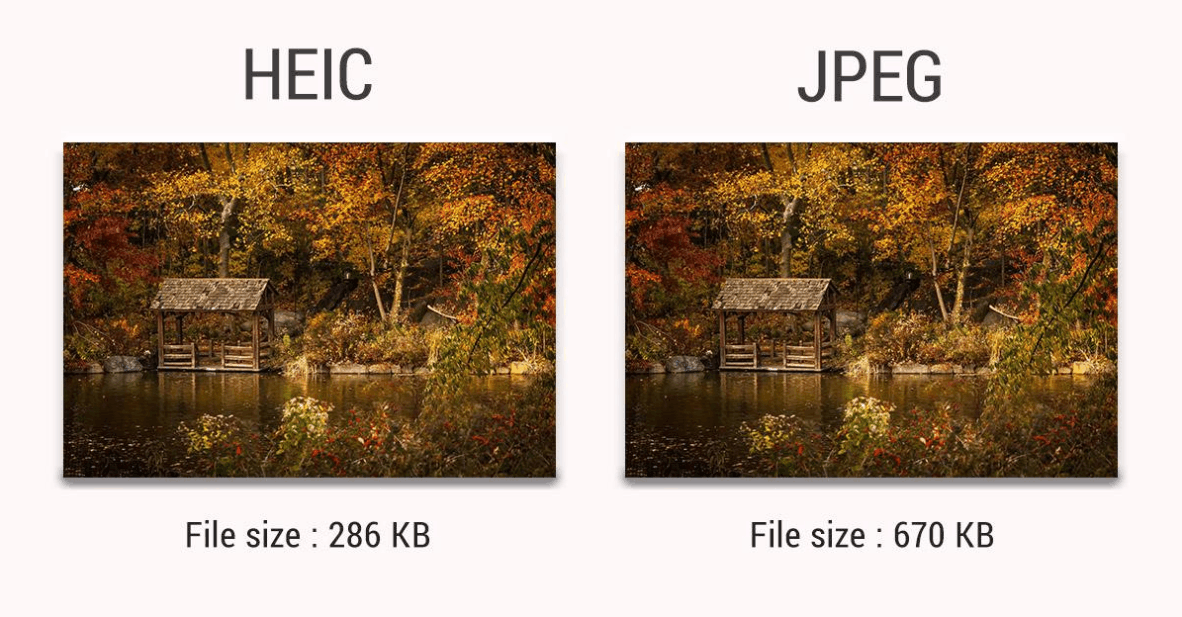
Apple's reason for switching to HEIC is easy to understand. With the same level of visual quality, a HEIC image typically takes up only about half the storage space of an equivalent JPG. If your photo library is 60 GB in JPG format, that number can be reduced to around 30 GB with HEIC, a significant saving on both device storage and iCloud space. Additionally, HEIC supports 16-bit color instead of 8-bit like JPG, preserves transparency, contains multiple frames in a single file for Live Photos, and retains editing layers without destroying the original image.
The problem lies in compatibility. HEIC is tied to proprietary codecs, so many platforms outside of Apple either only partially support it, require additional extensions, or refuse to use it at all. Windows needs a separate codec to view the images, many photo printers in stores don't accept this file type, online filing systems for banks and government agencies often only accept JPG or PNG, and some older design software versions are also unsupported. Meanwhile, JPG has been around for over three decades and is readable by almost every device, browser, and software.
In other words, HEIC is the ideal format for storage, while JPG remains the most secure format for sharing. The conversion, therefore, doesn't mean abandoning HEIC, but rather creating a more user-friendly copy for sending images externally.
A little tip before we continue: if you frequently encounter problems with HEIC, open Settings on your iPhone, go to Camera, select Format, and switch to Most Compatible. From then on, all new photos will be saved directly as JPG. This comes at the cost of more storage space, so consider your actual needs.
2. Preview - A powerful conversion tool hidden right on your Mac.
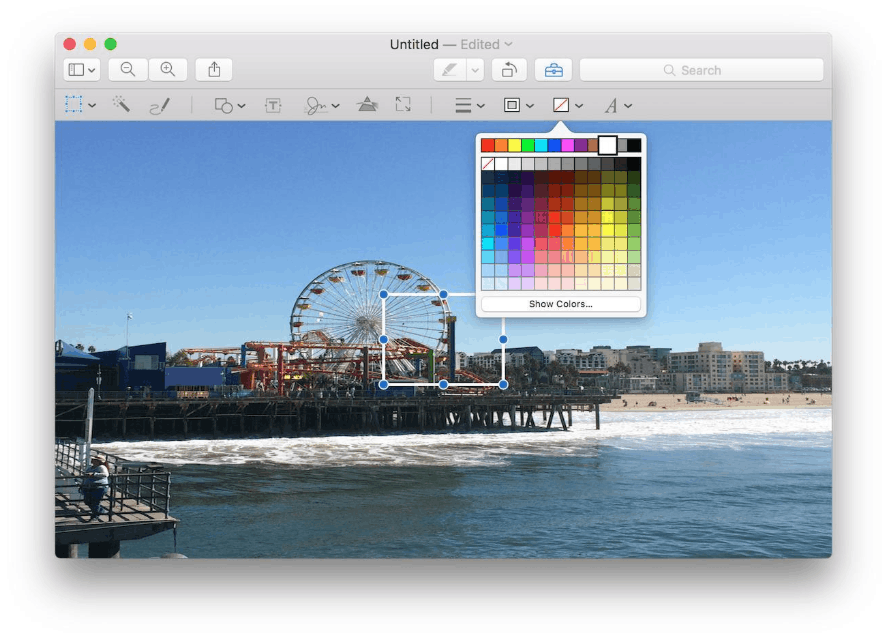
Preview, or "Xem trước" in Vietnamese, is an application that most users only consider an image and PDF viewer. In reality, it's a fairly complete image processing tool, allowing you to crop, adjust colors, resize, and especially export images to many different formats without needing to install anything extra.
How to convert a single image:
- Open the folder containing the image in Finder, right-click the HEIC file, select Open with, and then select Preview. If Preview is the default application, simply double-click the image.
- Once the image is displayed, move your cursor to the menu bar at the top, select File, and then select Export.
- In the dialog box that opens, click on the Format list and select JPEG. Here you will see a Quality slider; drag it towards Best if you want to retain maximum detail, or drag it to the middle if you want a smaller file size for emailing. The preview always shows the estimated size of the final file, which is very convenient for you to consider.
- Name the file, choose a save location, and then click Save. The original image will remain, and the new JPG version will be placed next to it.
Preview's real strength lies in its batch processing capabilities, something many long-time users are still unaware of. If you have dozens of photos to process, do the following:
- Select all HEIC files in Finder, right-click, and open them all with Preview. They will appear as a minimized strip in the left-hand column of the window.
- Press Command and A to select all images in that column.
- Go to the menu bar, select File, and then select Export selected items.
- Click the Options button in the dialog box, select JPEG format, adjust the quality, then select the destination folder and click Select. Preview will automatically process everything; the original filename will be preserved.
Besides Preview, macOS also has an even faster shortcut right in Finder. Select one or more images, right-click, point to Quick Actions, and select Convert Image. A small panel will appear allowing you to choose the JPEG format, select the output image size in four levels from small to full size, and check the box to retain metadata if you want to preserve the time, location, and shooting parameters. Press the convert button, and the JPG image will appear in the same folder in just a few seconds. This is the fastest way when you only need the result and don't care about adjusting the quality.
3. Photos app: The ideal choice for syncing your library with iCloud.
If you enable iCloud Photos, all photos taken with your iPhone and iPad will automatically appear in the Photos app on your Mac without needing a cable or AirDrop. In this case, opening Finder to locate the HEIC file is unnecessary, as the photos are in a separate, managed library. The most logical approach is to export directly from the Photos app.
Steps to follow:
- Open the Photos app and find the photo or album you need. You can select multiple photos at once by holding down the Command key and clicking them one by one, or hold down Shift to select a continuous range.
- On the menu bar, select File, point to Export, and then select Export Image. Note that the option below labeled Export Unmodified Original will return the original HEIC file, which is not what you need right now.
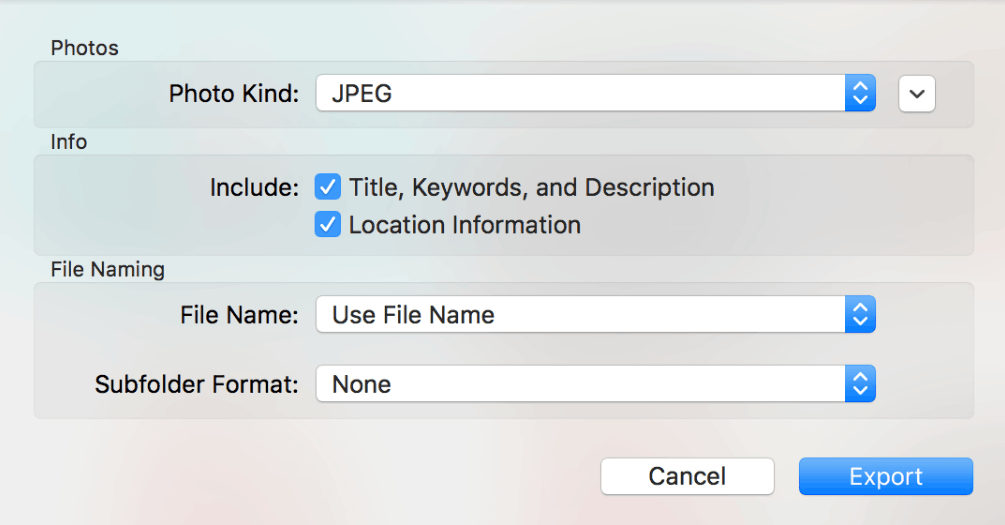
- In the options panel, set the Image Type to JPEG. The Quality section allows you to select from low to maximum, and the Size section allows you to reduce the image length along one side or maintain its original size.
If you plan to post photos on social media or send them to strangers, consider unchecking the location information to avoid revealing where the photos were taken. Conversely, photographers should retain all metadata and keywords.
For the file name, you can choose to use the original name, title, or sequential numbering, which is very convenient when exporting a large album. Press Export, select the destination folder, and wait for the application to complete.
There's also a quick trick for when you only need a single photo: click and hold the photo in the Photos app and drag it to your desktop or any folder in Finder. macOS will automatically convert the image to JPG during the drag-and-drop process. This method saves considerable effort, but the drawback is that you don't control the compression quality.
An important note when using the Photos app: if you've edited a photo using built-in tools like brightness adjustment, cropping, or applying filters, the resulting JPG will retain all those edits. This is a significant advantage over using the original file from your library, as you get exactly the version of the photo you're seeing on your screen.
4. Use free third-party apps to handle large volumes of images.
The two methods above are sufficient for most daily needs. However, when you have to process hundreds or thousands of images, need to control metadata details, or want a routine that repeats regularly every week, specialized applications will save you significantly more time.
iMazing HEIC Converter is the most talked-about and completely free app on the Mac App Store. The application has a minimalist interface, consisting of just a large frame where you can drag and drop images, along with a few options below.
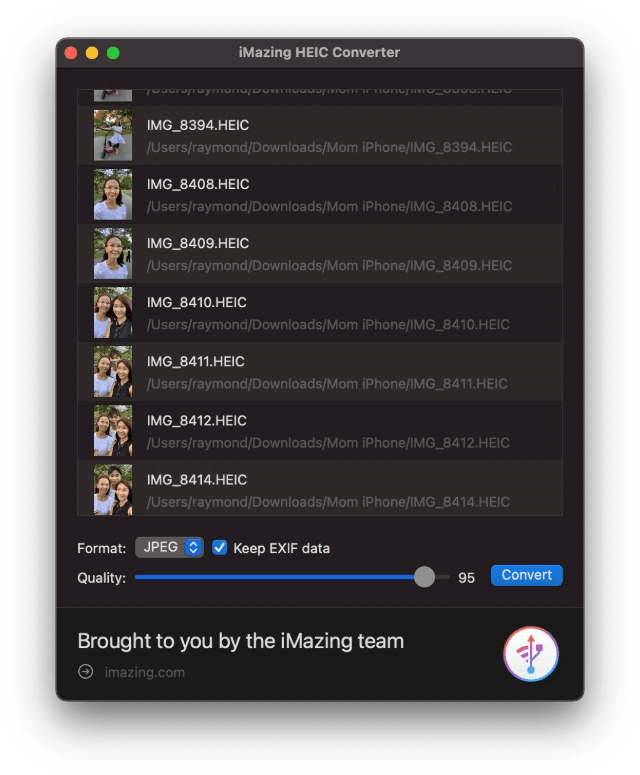
Here's how to use it:
- Download and install iMazing HEIC Converter from the Mac App Store.
- Open the application and drag all HEIC images, or the entire folder containing the images, into the program window.
- In the Format section, select JPEG or PNG as needed. Check the Keep EXIF data box if you want to retain the date, time, device used for shooting, and exposure settings.
- Drag the Quality slider to select the appropriate compression level; typically, around 85 percent is a good balance between quality and capacity.
- Click Convert, choose a folder to save the results, and wait a few seconds. When finished, click Show Files to open the folder containing the new images.
In addition, you can consider a few other options depending on your workflow. Permute and Adapter are versatile conversion tools that handle images, videos, and audio in a single drag-and-drop interface. ImageOptim is suitable if you want to compress images optimally for your website after converting them to JPG. For command-line users, macOS also includes the built-in SIPs tool; simply open Terminal, navigate to the folder containing your images, and run a batch conversion command in less than a minute.
If you repeat this task frequently, consider creating your own Quick Action using Automator. Open Automator, create a new Quick Action document, set the input to an image file, drag the Copy Finder Items action to keep the original, then drag the Change Type of Images action and set the target type to JPEG. Save it with an easy-to-remember name, and from now on you can simply right-click on the image to get your own conversion option.
Regarding online conversion websites, the advice is to minimize their use. They are convenient when you're using an unfamiliar computer, but this means your personal photos are uploaded to a server you don't control, along with privacy risks and storage limitations. When Macs already have free and faster tools available, there's no reason to compromise.
5. Choose the right method and take complete control of your photo library.
Converting photos from HEIC to JPG on a Mac is a simple process; the key is choosing the right tool for the situation. If you need to convert a few photos already in Finder, Quick Actions is the quickest way. If you want control over output quality and size, Preview offers the best balance between speed and customization. If your photos are synced via iCloud and have already been edited, the Photos app is the right choice. And for large or repetitive workloads, a dedicated app along with a custom Quick Action will save you a lot of time.
Remember that you don't have to give up HEIC. Just let your iPhone continue shooting in this format to save storage, and only create JPGs when you really need to send photos outside the Apple ecosystem. With a few routine steps, you'll never be confused by the "format not supported" message again.





















VIP Products








Best Selling Products
Autodesk All App Account Copyright
120 USD
Upgrade genuine Capture One account
120 USD
Upgrade Genuine Office 365
49 USD
Adobe Premiere Pro Account
99 USD
Genuine Cheap Canva Pro
39 USD
ChatGPT Plus Account (GPT-4)
16 USD
Adobe Photoshop Copyright - Full App
120 USD
MidJourney Account
29 USD
Capcut Pro 1 Year
39 USD
Copyright Adobe Lightroom Account
59 USD
Freepik Premium Account
59 USD
Windows 10 & 11 Pro Key
36 USD
Plugin Retouch4me
69 USD
Upgrade Duolingo Super
29 USD
Genuine Adobe Illustrator account
99 USD