Best Selling Products

Upgrade genuine Capture One account
120 USD

MidJourney Account
29 USD

ChatGPT Plus Account (GPT-4)
16 USD

Genuine Cheap Canva Pro
39 USD

Windows 10 & 11 Pro Key
36 USD

Autodesk All App Account Copyright
120 USD

Copyright Adobe Lightroom Account
59 USD

Freepik Premium Account
59 USD

Adobe Premiere Pro Account
99 USD

Upgrade Genuine Office 365
49 USD

Plugin Retouch4me
69 USD

Capcut Pro 1 Year
39 USD

Genuine Adobe Illustrator account
99 USD

Upgrade Duolingo Super
29 USD

Adobe Photoshop Copyright - Full App
120 USD
How to Create a Beautiful Broken Glass Effect in Photoshop
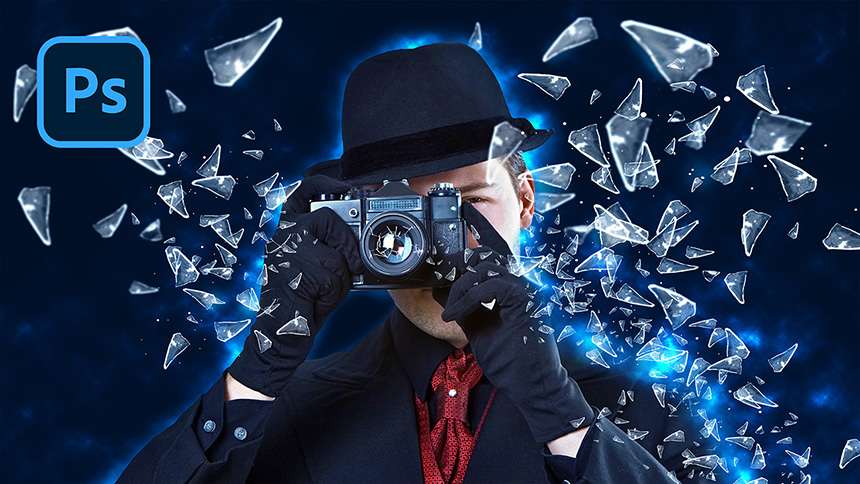
(1) .Hi guys, this is SaDesign channel, today I’m going to show you how to create a stunning broken glass effect in Photoshop.
First, I already separated the model and the background layer, create a new adjustment layer > Levels, increase black to 5. Use new background with dark navy color, to do that, create a new adjustment layer > Solid color and set the color code #000d18, then click OK. Put it under the man layer to show the new background color.

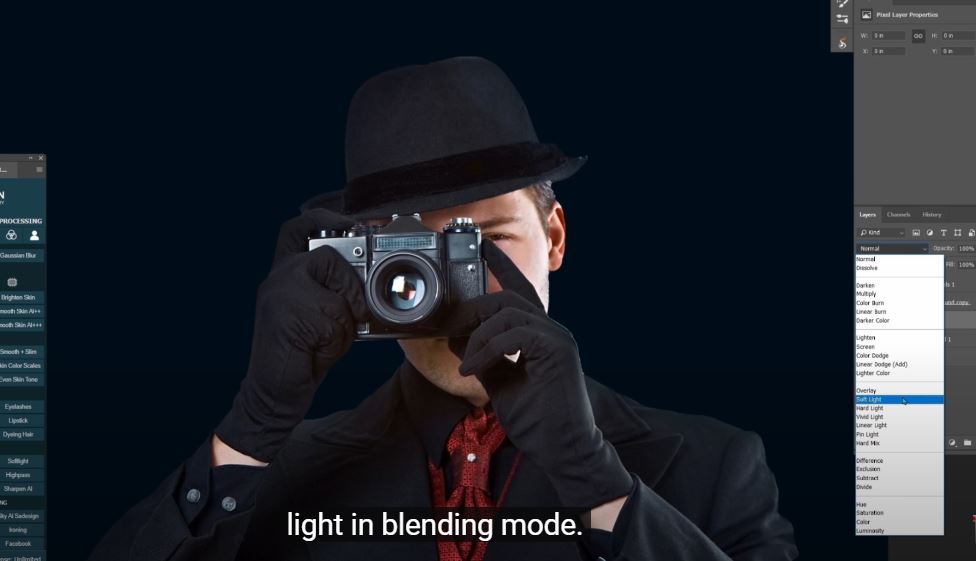
(2) .Next, we will add a bit of light to the border of the subject, create a new layer with soft light in blending mode. Use brush, white color in foreground, make sure the opacity and flow are 100%. Now, paint slightly on the edges of the man to add color cast to it.
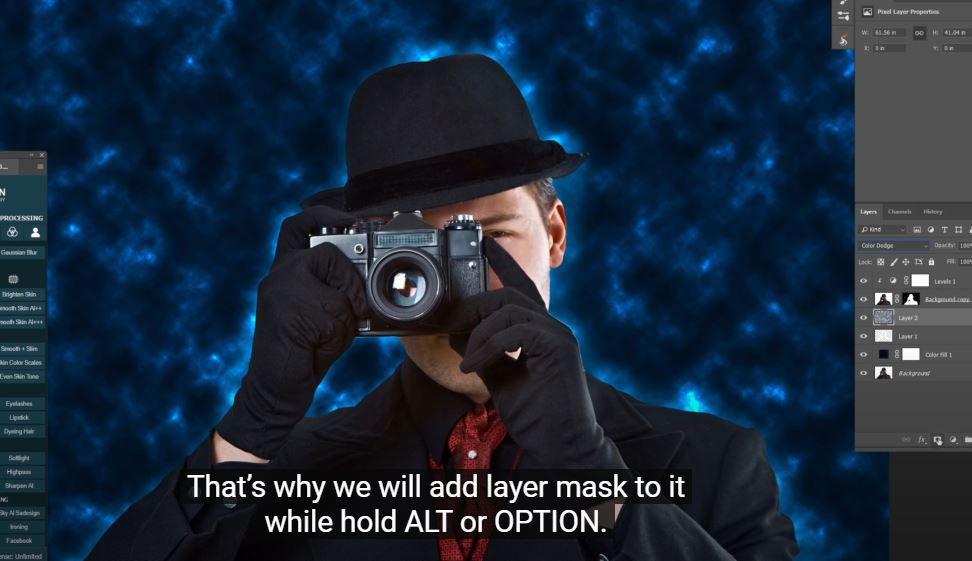
(3) .After that, we will add another layer of light, just make him look like on fire in blue. Create a new layer, click to the foreground color and change black to the color of background with color code is #000d18. Go to Filter > Render > Clouds, change normal to color dodge in blending mode.

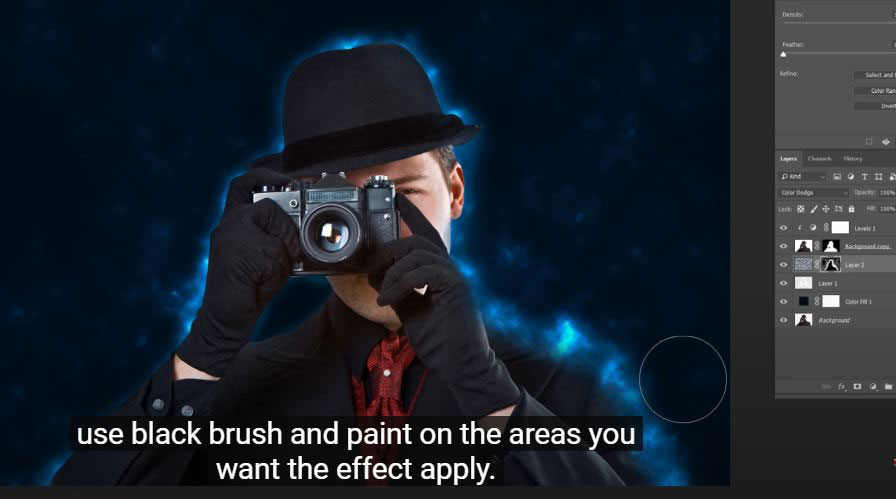
(4). Now, you can see the background just like the heavy blue clouds, we only need to fill this to the edge of subject. That’s why we will add layer mask to it while hold ALT or OPTION. Use brush with big size and paint over the light around the man to apply the effect. Then, change the opacity to around 20% to add some small effect to the background.
(5). If you want the effect that cast on his cloth, choose the layer mask of background copy, use black brush and paint on the areas you want the effect apply.
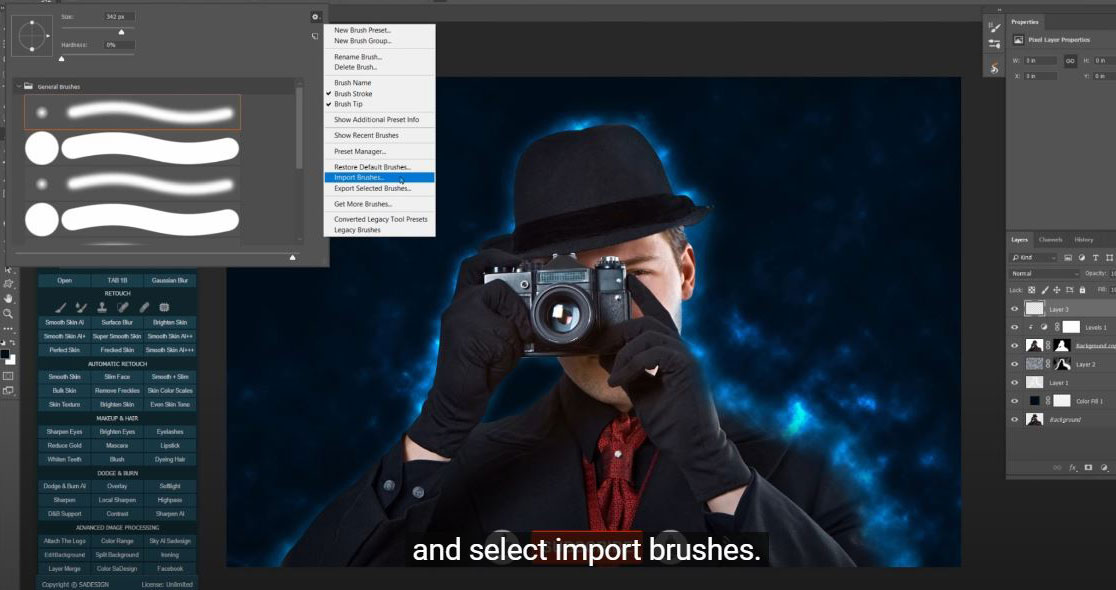
(6). Moving on the broken glass, to create broke glass, now we will import the broken glass brushes first, to do that. Create a new layer, choose brush tool > click to small arrow icon, choose the wheel icon and select import brushes. You can download these brushes at the link on the description. There are 2 brushes files, select one by one and load it.
(7). When you are done, there are 2 new folders that you’ve just loaded. Drop down the Glass brush set free and select the third brush.
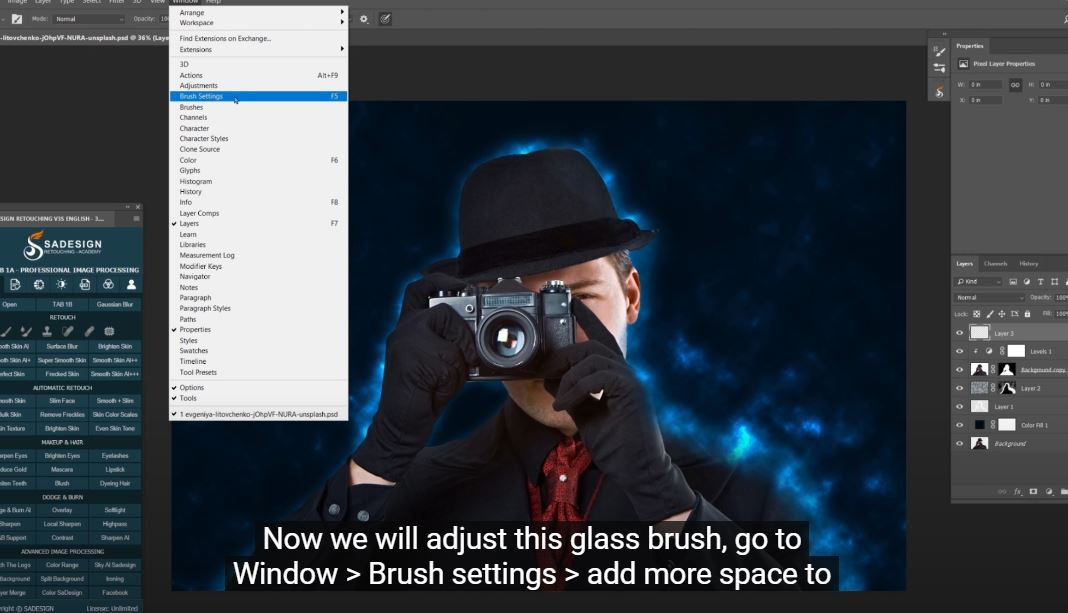
(8). Now we will adjust this glass brush, go to Window > Brush settings > add more space to the stroke at 100.
(9). Choose Shape Dynamics > set size jitter to 30%, angle jitter to 50. Click to the icon that lower right corner to save this brush, put the name whatever you want to remember for using it later and OK.
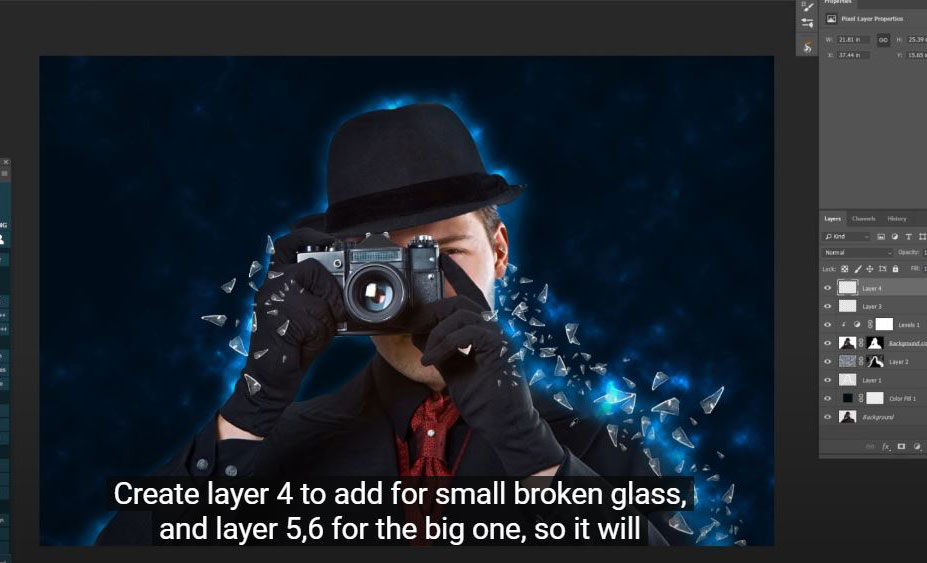
Now we will add this broken glass brush to layer 3. While adding strokes, use bracket {} to increase or decrease the size or brush.
Create layer 4 to add for small broken glass, and layer 5,6 for the big one, so it will help to manage after all.
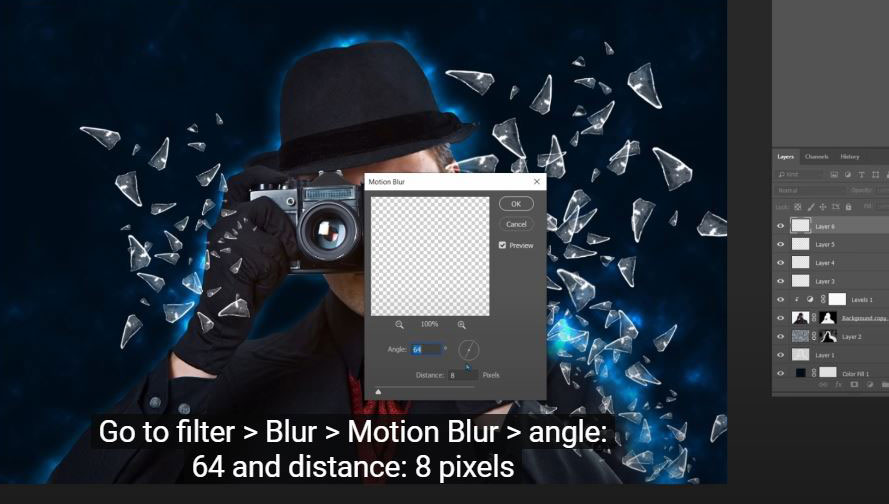
Go to filter > Blur > Motion Blur > angle: 64 and distance: 8 pixels
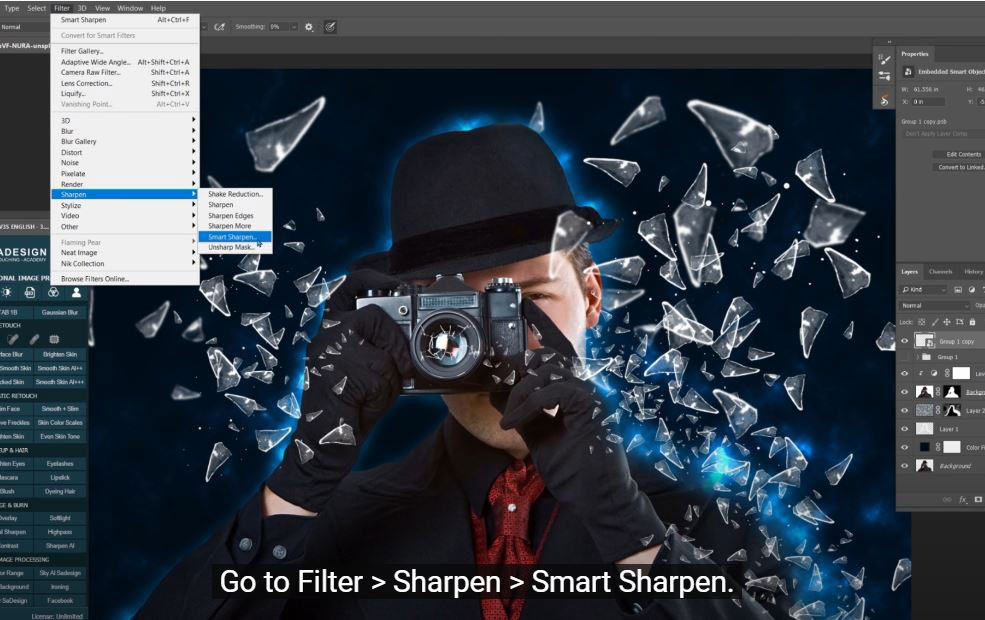
(10). You can use CTLR or CMD + T to resize, rotate the brush as you see fit, then add a bit of blur by going to Filter > Blur > Gaussian Blur > 5 pixels. Repeat these steps until you see it’s enough. Now we will crash the camera’s lens, create a new layer for this step, right click to the photo and move the other broken glass brush that we’ve just imported. There are many kinds of crack glass brushes, choose yours and add it to the mirror lens.

(11). Create a new layer under group 1, use crack glass brush to add more into the glass areas. This will help to make the image looks natural. Ensure to clipping mask it to the man layer below with CTRL + ALT + G or CMD + OPTION + G.

(12).
Create a color lookup and select “Crisp_winter.look” in 3DLut file, reduce the opacity to 60%.
Create a new layer with blending mode is soft light, use brush with soft round, and paint on the glass to brighten it.
That’s it. Enjoy your result!
If you think this video is helpful, hit like, subscribe and ring the bell for any guide videos later on. See ya!
Watch the video right here:
Watch the video here:
REGISTER FOR FREE PHOTOSHOP LEARNING
============================
The most powerful Retouch tool processor
DOWNLOAD:
✅ SADESIGN PANEL ENGLISH: https://sadesign.ai/retouching/
✅ SADESIGN PANEL VIETNAM: https://www.retouching.vn/


VIP Products


Best Selling Products
Upgrade genuine Capture One account
120 USD
MidJourney Account
29 USD
ChatGPT Plus Account (GPT-4)
16 USD
Genuine Cheap Canva Pro
39 USD
Windows 10 & 11 Pro Key
36 USD
Autodesk All App Account Copyright
120 USD
Copyright Adobe Lightroom Account
59 USD
Freepik Premium Account
59 USD
Adobe Premiere Pro Account
99 USD
Upgrade Genuine Office 365
49 USD
Plugin Retouch4me
69 USD
Capcut Pro 1 Year
39 USD
Genuine Adobe Illustrator account
99 USD
Upgrade Duolingo Super
29 USD
Adobe Photoshop Copyright - Full App
120 USD