Best Selling Products

Upgrade genuine Capture One account
120 USD

Genuine Cheap Canva Pro
39 USD

Adobe Premiere Pro Account
99 USD

Windows 10 & 11 Pro Key
36 USD

Autodesk All App Account Copyright
120 USD

Genuine Adobe Illustrator account
99 USD

MidJourney Account
29 USD

Plugin Retouch4me
69 USD

ChatGPT Plus Account (GPT-4)
16 USD

Upgrade Duolingo Super
29 USD

Freepik Premium Account
59 USD

Adobe Photoshop Copyright - Full App
120 USD

Copyright Adobe Lightroom Account
59 USD

Upgrade Genuine Office 365
49 USD

Capcut Pro 1 Year
39 USD
How to create a trend of objects flying around using AI - extremely simple and quick.
Nội dung
- 1. How can AI be used to create a trend of objects flying around?
- 2. What preparations are needed before creating a trend of AI-powered flying objects?
- 3. Detailed instructions on how to create a trend of objects flying around using AI.
- Step 1: Download the Dola: Smart AI Assistant app.
- Step 2: Log in to your account
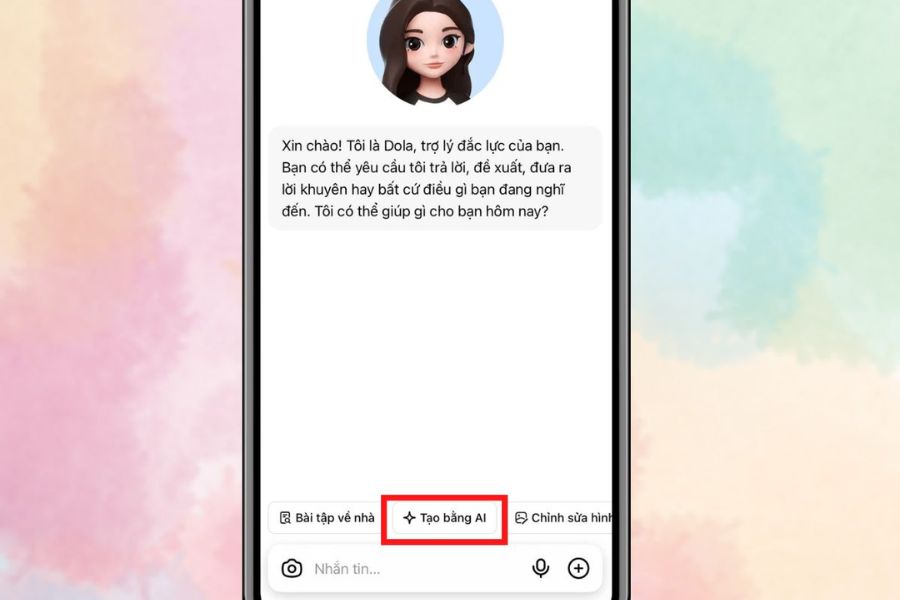
- Step 3: Select the Create with AI feature.
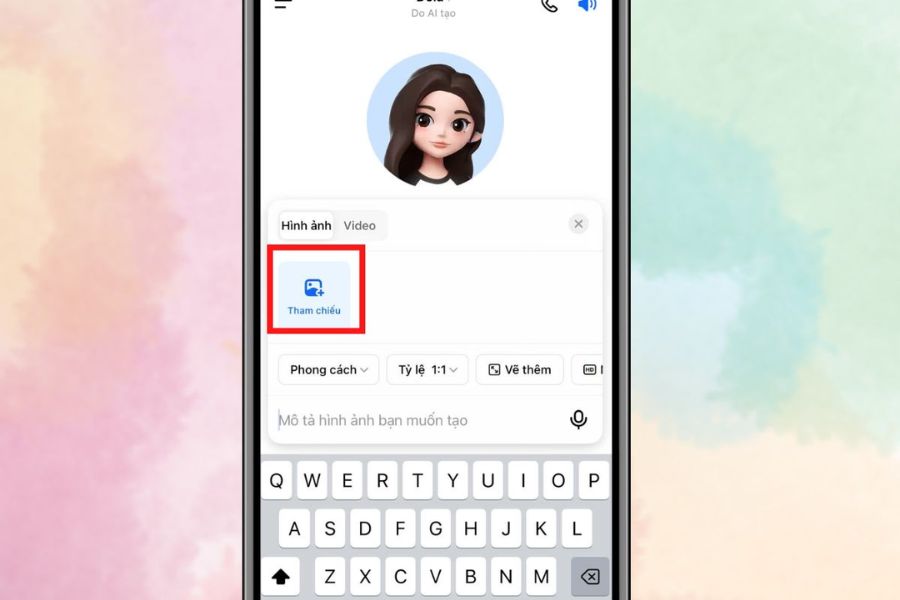
- Step 4: Select Reference to upload the image.
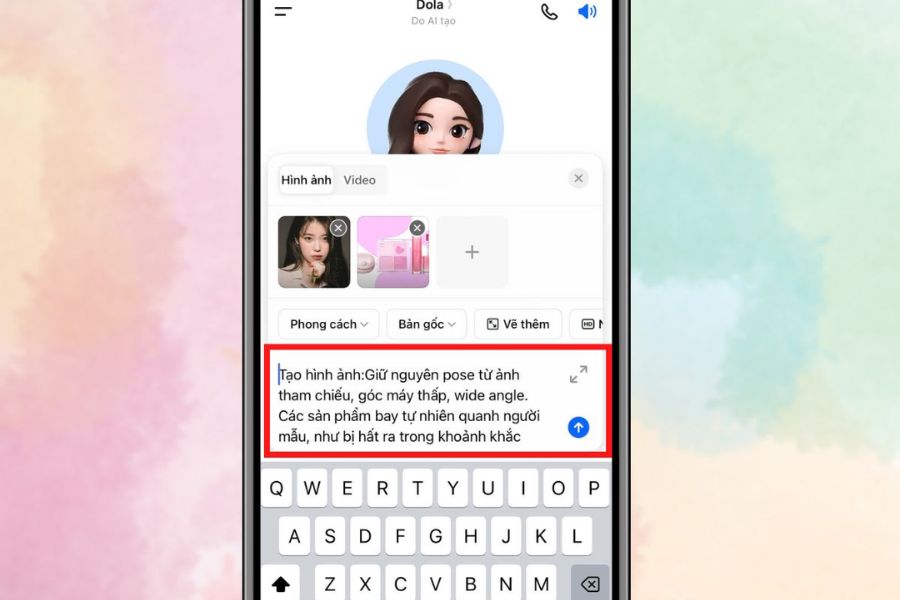
- Step 5: Enter the prompt to create the effect of objects flying around.
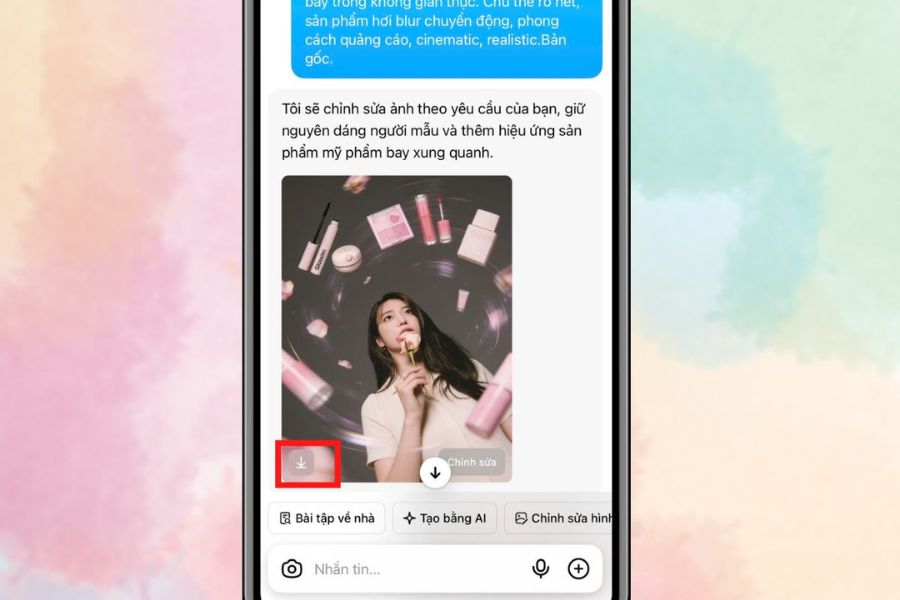
- Step 6: Check the results and download the image to your computer.
- 4. Tips to make the AI-powered flying object trend look more beautiful and professional.
- 5. Common mistakes when creating AI-powered flying object trends.
- 6. Conclusion
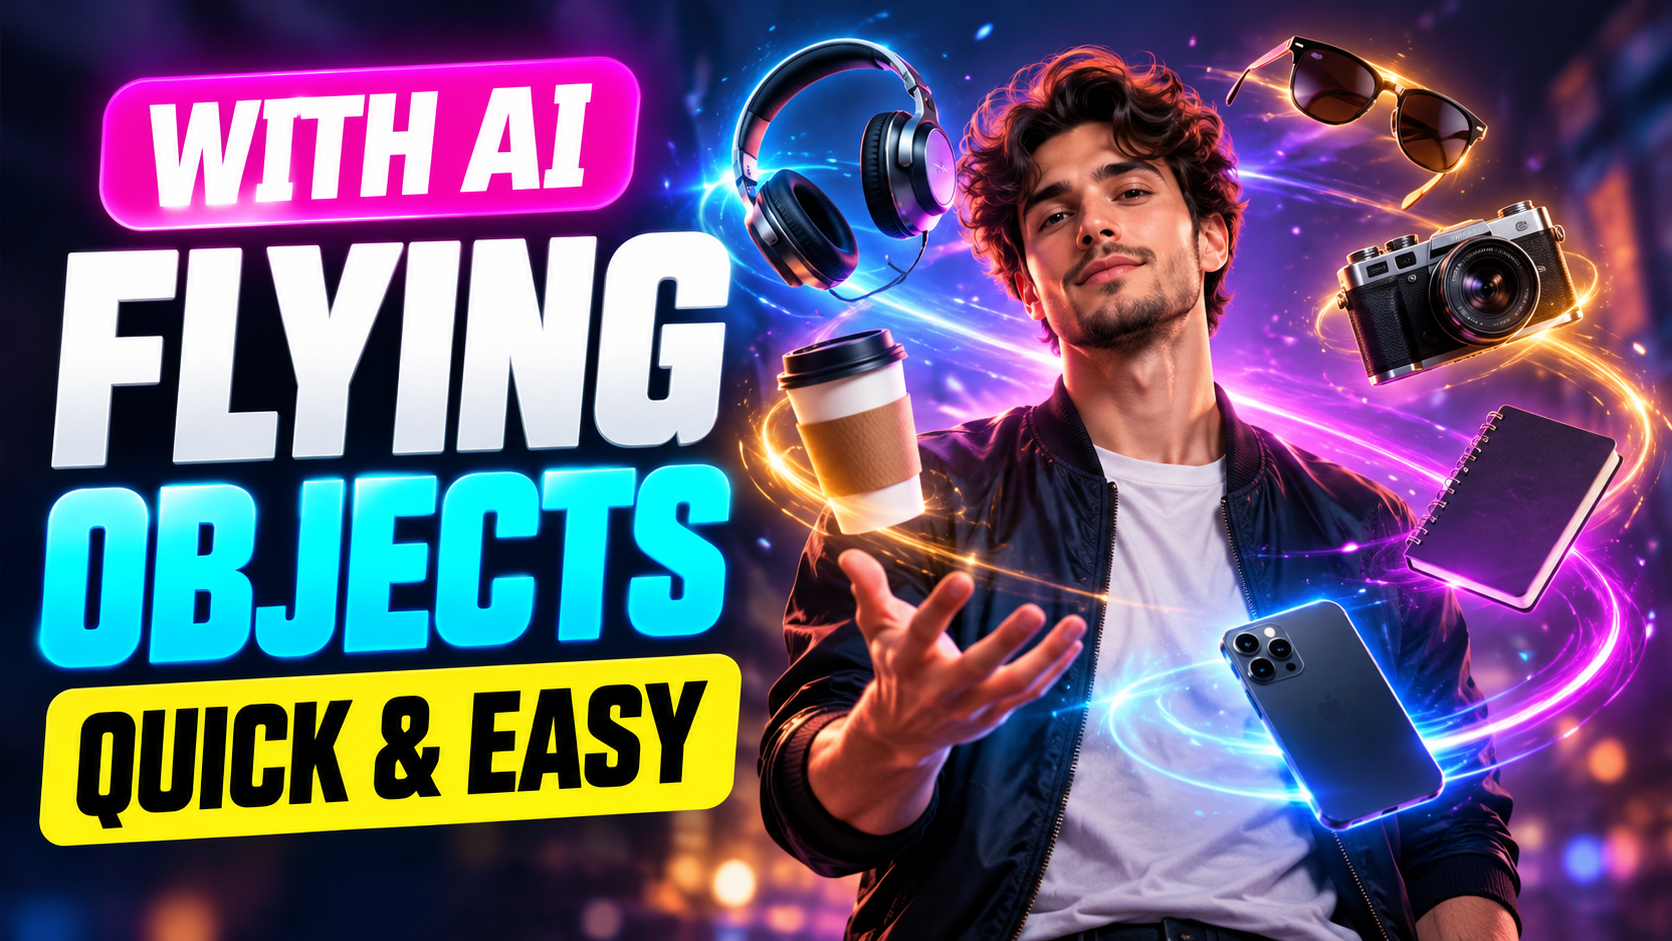
Photos featuring numerous objects floating or flying around a subject are becoming one of the most popular AI-powered image trends on TikTok, Instagram, and Facebook. From phones, headphones, books, and cosmetics to handbags and accessories, familiar items can be transformed into eye-catching moving details. The interesting thing is that you don''t need Photoshop skills or professional image editing abilities to follow this trend. With just a suitable photo, an AI application, and the right command, you can create advertising-style images in just a few steps. If you''re curious how to do it, let Sadesign guide you through creating the AI-powered floating object trend below.
1. How can AI be used to create a trend of objects flying around?
The trend of objects flying around using AI is a way to use artificial intelligence technology to add objects to the space surrounding a person in a photo. Instead of manually cutting and pasting each item, users only need to provide a reference image and describe their desired arrangement using commands. The AI will then use that information to create a new layout with objects of varying sizes, distances, and flight directions.
The appeal of this style of photography lies in the sense of movement. Objects aren't static but are arranged as if they're flying out of the frame, rotating around the subject, or suspended in space. When combined with the right camera angle, motion effects, and lighting, an ordinary photograph can take on the appearance of a professional advertisement.

2. What preparations are needed before creating a trend of AI-powered flying objects?
Before you begin, you should prepare a relatively good quality photo. The clearer the image and the more easily recognizable the subject, the more data the AI will have to retain the original face, clothing, and pose. Shaky photos, those that are too dark, or those where the subject is heavily obscured can result in an unnatural final product. Besides the original photo, you should also determine beforehand which objects you want to appear around the subject. This is a small but important step because it makes the commands more specific, allowing the AI to better understand your ideas and create a composition that closely matches your vision.
-
A clear portrait or full-body photograph.
-
The phone has an internet connection.
-
Dola app: Smart AI Assistant.
-
A list of objects you want to include in the image.
-
A single command clearly describes the style, camera angle, and movement.
-
There is enough storage space to load the AI images after completion.
3. Detailed instructions on how to create a trend of objects flying around using AI.
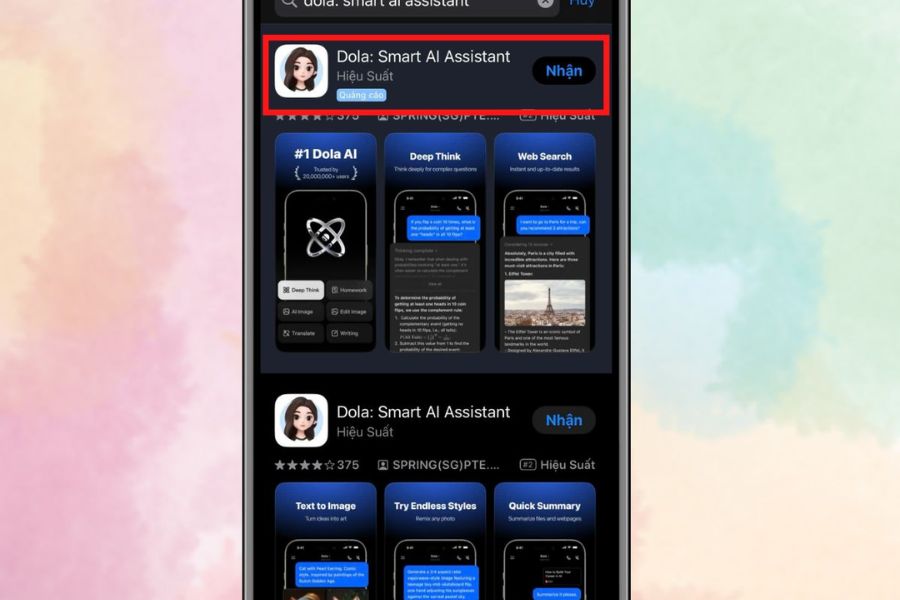
Step 1: Download the Dola: Smart AI Assistant app.
First, open the App Store on your iPhone and search for the app Dola: Smart AI Assistant. Once you find the app, double-check the name before downloading to avoid confusion with similar apps. Then, tap the Get button and wait for the installation to complete. If you have already installed the app, check if it's the latest version. Using the latest version can help you access all available AI features and avoid situations where the interface or operation differs from the instructions.
-
Open the App Store on your phone.
-
Search for Dollar: Smart AI Assistant .
-
Press Get to install.
-
Wait for the application to download and complete the installation process.
-
Open the app after installation is complete.
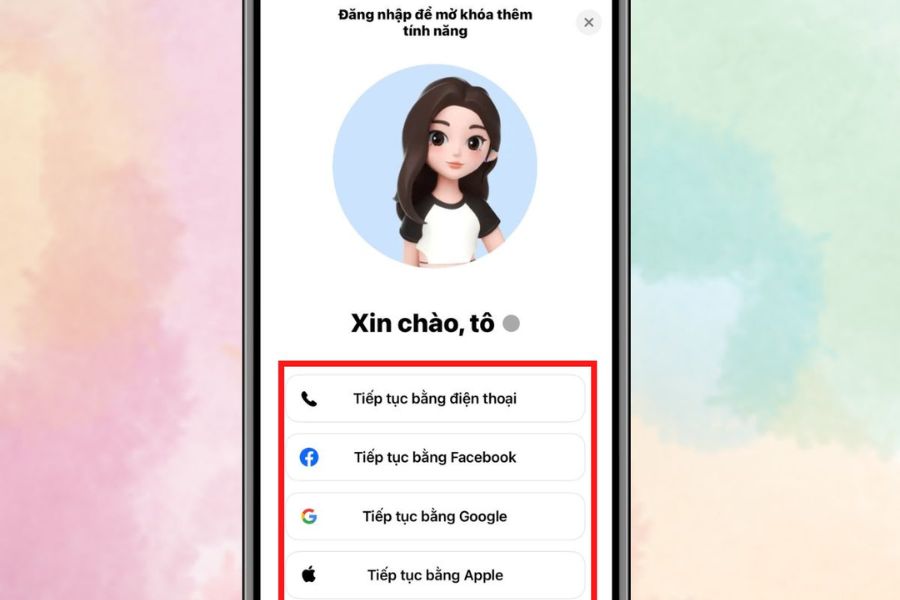
Step 2: Log in to your account
After opening Dola, the next step is to log in to your account to use the app's features. Depending on the options available on your version, you can choose the appropriate login method and follow the on-screen instructions. At this step, make sure your account is successfully logged in before moving on to the image creation section. If the app requests additional permissions, carefully review the displayed information and choose to grant them if necessary.
-
Open the Dollar app.
-
Choose a suitable login method.
-
Complete the required information.
-
Verify that the account has been successfully logged in.
-
Go to the main interface of the application.
Step 3: Select the Create with AI feature.
Once logged in, find and select the " Create with AI" option on the application interface. This is the area where you can use reference images and commands to create new images. For first-time users, simply observe the options displayed on the screen and select the correct feature. After opening the tool, take some time to check the interface before uploading images. Identifying the correct area for entering images and commands will speed up the process, especially if you want to try different versions.
-
Open Dollar: Smart AI Assistant.
-
Access the main interface.
-
Select Create with AI .
-
Wait for the image creation tool to open.
-
Check the options before you begin.
Step 4: Select Reference to upload the image.
Next, select the "Reference" option to import the photo you want to edit into the AI tool. Prioritize photos with good resolution, clearly visible subjects, and minimal obstruction. A well-composed photo also makes it easier for the AI to add surrounding objects. You can choose a photo already saved in your phone's gallery. After uploading the photo, double-check to ensure the image shows the correct person, the correct pose, and sufficient clarity. If the image is too dark or blurry, switch to a different photo before creating the AI to avoid wasting time trying multiple times.
-
Select Reference .
-
Open the photo library on your phone.
-
Choose the photo you want to use.
-
Double-check the character's face and posture.
-
Make sure the image isn't too blurry or pixelated.
Step 5: Enter the prompt to create the effect of objects flying around.
This step is crucial to the final image's appearance. After uploading the reference image, enter a command that clearly describes what you want the AI to create. Instead of simply writing something like "add flying objects," you should specify the camera angle, distance, direction of movement, sharpness, and image style.
You can use the following reference command:
“Maintain the pose from the reference photo, low-angle, wide-angle shot. The products fly naturally around the model as if they were tossed out in a moment of movement, not in a straight line and asymmetrical. The movement is random but rhythmic, some objects are close, some are far away, varying in size, with inertia and a slight drop. Add appropriate movement lines or effects while the products are flying in space. Keep the subject sharp, the products have a slight motion blur, in an advertising, cinematic, realistic style.”
After entering the prompt, you can adjust the command to suit your own ideas. For example, if you want to create an image with a cosmetics theme, specify lipstick, powder, perfume, or makeup brushes. If you want an image with a technology theme, you can replace them with phones, headphones, cameras, or other electronic devices.
-
Preserve important information about the character's posture.
-
Clearly describe the objects you want to appear.
-
Add camera angle requirements if you want to create depth.
-
Describes natural movement rather than symmetrical arrangement.
-
You can add keywords such as cinematic , realistic , and motion blur .
-
After entering the prompt, press the create image button to start the AI processing.
Step 6: Check the results and download the image to your computer.
After the AI completes the image creation process, you will receive the result based on the reference image and the commands you entered. Carefully observe the face, clothing, body shape, and the placement of objects. If the image meets your requirements, you can select Download to save the finished product to your phone. If the result is not as expected, you don't necessarily have to change the entire concept. Try adjusting the prompt, adding details about the object, or changing the composition requirements and creating it again. Sometimes just a few small changes in the command can help the AI create a more balanced and natural image.
-
Check the character's face and posture.
-
Check if the objects have appeared in accordance with the theme.
-
Check the size and distance between the objects.
-
Check if the motion effects are too strong.
-
Select Download if you are satisfied with the result.
-
Recreate the image if you want to try a different layout.
4. Tips to make the AI-powered flying object trend look more beautiful and professional.
Simply including lots of objects in an image doesn't guarantee an eye-catching result. A beautiful image usually requires a balance between the main subject, supporting objects, and empty space. Therefore, in addition to writing the prompt correctly, you should also pay attention to the quality of the input image and how you choose your objects. Some simple tips below can help your resulting image look more natural and have more depth:
-
Choose a clear, original image: Bright, low-noise, and high-resolution images usually help the AI identify the main character more easily.
-
Avoid including too many objects: A few well-arranged items often create a more visually appealing picture than one completely cluttered with objects.
-
Vary the sizes: Place some items close together and some further away to create a sense of space.
-
Create asymmetrical movement: Objects flying in multiple directions will make the image look more like a captured moment.
-
Choose items that are related to the theme: If the character is promoting cosmetics, prioritize lipstick, powder, perfume, or makeup brushes instead of including too many unrelated objects.
-
Maintain color harmony: The color of the object should match the clothing and the context so that the overall look is not disjointed.
-
Use motion blur moderately: Slightly blurring moving objects will create a more realistic feel, but it shouldn't cause them to lose all detail.
5. Common mistakes when creating AI-powered flying object trends.
Although the process is relatively simple, the results may sometimes not be as desired. This is often due to unsuitable input images or a prompt that is too short, leaving the AI with insufficient information to understand the user's desired composition. Therefore, if the first attempt at creating an image doesn't turn out well, don't worry too much. Instead of repeatedly recreating it with the same command, identify the problematic areas and adjust them accordingly. For example, if there are too many objects, request a more appropriate number. If an object is too close to the subject, add requirements for distance and depth.
-
The objects are appearing too densely: Reduce the number of objects in the prompt.
-
Unnatural composition: Additional requirements for objects with varying positions, distances, and flight paths.
-
Character's face altered: Use a clear reference image and emphasize the requirement to keep the character's face unchanged.
-
The object is too sharp: Add a slight motion blur to create a sense of movement.
-
Inconsistent colors: Add a description of the color tone or image style.
-
The photo lacks depth: This requires a wide-angle shot and objects at various distances.

6. Conclusion
Creating a trend of objects flying around using AI isn't as difficult as many people think. With just a clear photo, an AI-powered image creation app, and a sufficiently detailed prompt, you can transform familiar images into a creative concept. The most important thing is choosing the right input image and knowing how to depict movement, distance, and image style. If you want to try it right away, you can start with familiar items like phones, headphones, books, cosmetics, or accessories. Then, change the prompt, try different layouts, and choose the version you like best. In just a few minutes, you'll have another interesting AI photo to post on TikTok, Instagram, Facebook, or use for product promotion.





















VIP Products








Best Selling Products
Upgrade genuine Capture One account
120 USD
Genuine Cheap Canva Pro
39 USD
Adobe Premiere Pro Account
99 USD
Windows 10 & 11 Pro Key
36 USD
Autodesk All App Account Copyright
120 USD
Genuine Adobe Illustrator account
99 USD
MidJourney Account
29 USD
Plugin Retouch4me
69 USD
ChatGPT Plus Account (GPT-4)
16 USD
Upgrade Duolingo Super
29 USD
Freepik Premium Account
59 USD
Adobe Photoshop Copyright - Full App
120 USD
Copyright Adobe Lightroom Account
59 USD
Upgrade Genuine Office 365
49 USD
Capcut Pro 1 Year
39 USD