Best Selling Products

Upgrade Duolingo Super
29 USD

Capcut Pro 1 Year
39 USD

Genuine Adobe Illustrator account
99 USD

Plugin Retouch4me
69 USD

Autodesk All App Account Copyright
120 USD

Adobe Photoshop Copyright - Full App
120 USD

Upgrade Genuine Office 365
49 USD

Adobe Premiere Pro Account
99 USD

Upgrade genuine Capture One account
120 USD

ChatGPT Plus Account (GPT-4)
16 USD

MidJourney Account
29 USD

Copyright Adobe Lightroom Account
59 USD

Freepik Premium Account
59 USD

Genuine Cheap Canva Pro
39 USD

Windows 10 & 11 Pro Key
36 USD
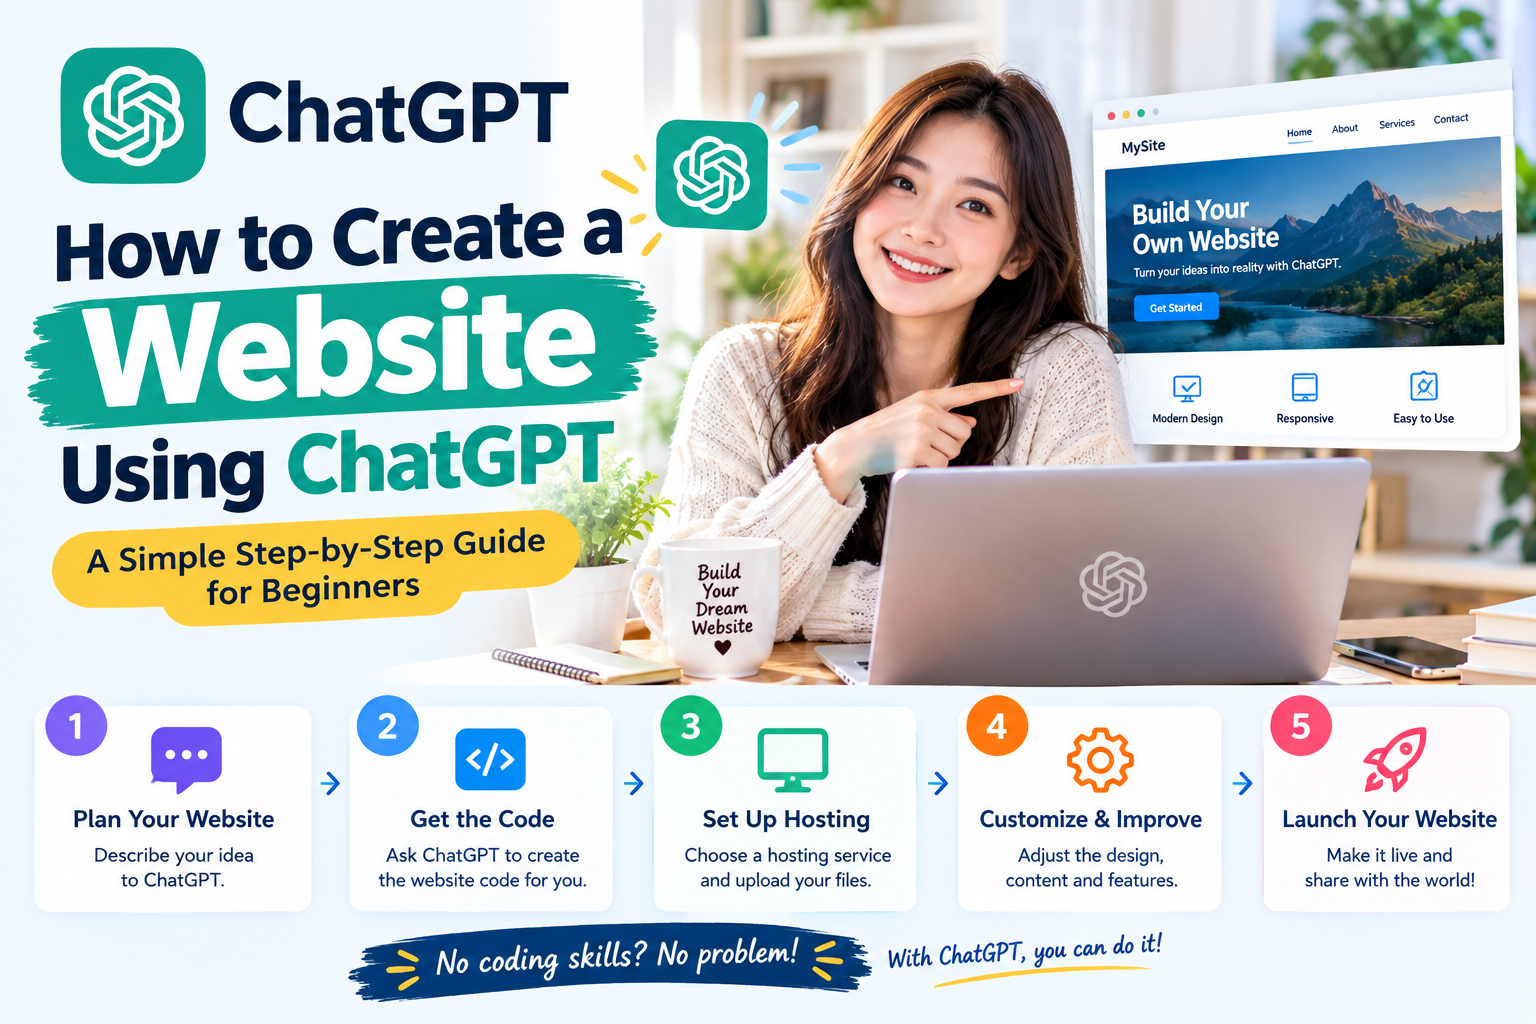
How to create a website using ChatGPT: A simple step-by-step guide for beginners.
Nội dung
- 1. What is creating a website using ChatGPT?
- 2. What preparations are needed before creating a website using ChatGPT?
- 3. A step-by-step guide on creating a website using ChatGPT.
- 3.1. Step 1: Access ChatGPT and determine how to create a website.
- 3.2. Step 2: Enter the command to describe the website you want to create.
- 3.3. Step 3: Preview and check the website layout
- 3.4. Step 4: Request ChatGPT to modify the interface
- 3.5. Step 5: Add necessary content and functions
- 3.6. Step 6: Publish the website and share the link.
- 4. Tips for writing prompts to help ChatGPT create beautiful and professional websites.
- 6. Conclusion
Do you want a website to introduce yourself, promote your products, or build your business brand, but don''t know how to program? ChatGPT can help you turn your ideas into a visually appealing website using simple commands. Instead of writing every line of code yourself or spending a lot of time learning complex design tools, you can describe your desires in natural language and let AI assist in building the structure, arranging content, and adjusting the interface. In this article, let''s explore how to create a website using ChatGPT from A to Z, with step-by-step instructions and helpful tips for beginners.
1. What is creating a website using ChatGPT?
Creating a website using ChatGPT leverages artificial intelligence to assist in brainstorming, layout design, content writing, and source code generation. Depending on the supported features, tools, and implementation methods, you can preview the product, request edits, or launch the website online. The advantage is that you don't need extensive knowledge of HTML, CSS, or JavaScript from the start. Simply clearly articulate your purpose, target audience, and desired style, and ChatGPT can guide you step-by-step in realizing your idea. Some notable benefits of using ChatGPT to create a website include:
-
Create an interface from a description: Transform ideas into a website structure with a title, images, content, and functional buttons.
-
Save time: It assists with content writing, color suggestions, category organization, and source code generation faster than doing it manually from scratch.
-
Easy to edit: You can request changes to the background color, font size, image position, or layout using the following commands.
-
Suitable for beginners: No programming skills are required to start building a personal profile page, a simple e-commerce website, or a service promotion page.
-
Optimized user experience: AI can be requested to tailor the interface for phones, tablets, and desktops.

2. What preparations are needed before creating a website using ChatGPT?
Before you begin, you should determine the purpose of the website and what content it needs. This preparation helps ChatGPT understand your requirements more precisely, minimizing the need for repeated revisions. You also don't need to prepare everything perfectly from the start. A short description of the idea, a few illustrative images, and a list of basic functions are sufficient to begin testing.
-
Purpose of building a website: Determine whether you want to create a personal website, a business website, a portfolio, a blog, or an online store.
-
Target audience: Clearly define who your visitors are, what information they need, and what action you want them to take.
-
Basic content: Prepare the brand name, introduction, product or service information, images, and contact information.
-
Design style: Choose the main color scheme, font style, layout, and a few reference websites if available.
-
Required accounts and tools: Log in to ChatGPT and determine the appropriate website creation method. Some features or support services may require a paid plan, while coding and deployment instructions can be done in other ways.
-
Domain name and hosting: If you want your website to operate with its own address, you can prepare a domain name and hosting service. This is a necessary step if your deployment method requires the use of external services.

3. A step-by-step guide on creating a website using ChatGPT.
3.1. Step 1: Access ChatGPT and determine how to create a website.
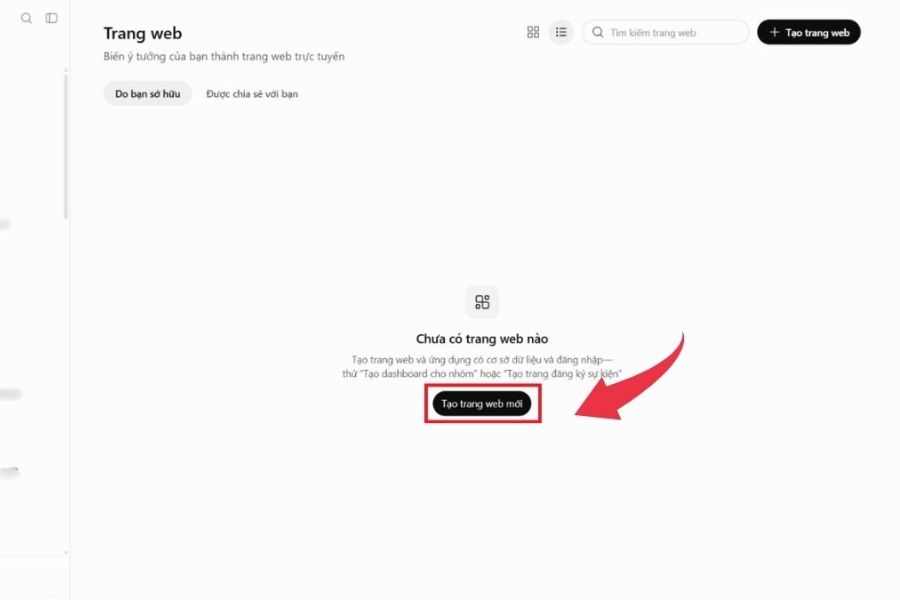
First, open ChatGPT on your computer's browser or device and log in to your account. You can start with a new chat, then describe the website you want to build. If your account has a suitable application or interactive interface creation tool, you can use it. If not, ask ChatGPT to write the source code and guide you on how to run the website using a web development environment.
The steps to be taken include:
-
Open ChatGPT and log in to your account.
-
Choose a new conversation to start a personal project.
-
Determine the implementation method: create the interface using AI-powered tools or request ChatGPT to generate the source code.
-
Clearly state the purpose of the website so that the AI can guide the appropriate structure.
-
Save important requirements for easier editing later.
You don't need to write a very long request right from the start. Begin with a general requirement, then add details once you have the initial design.
3.2. Step 2: Enter the command to describe the website you want to create.
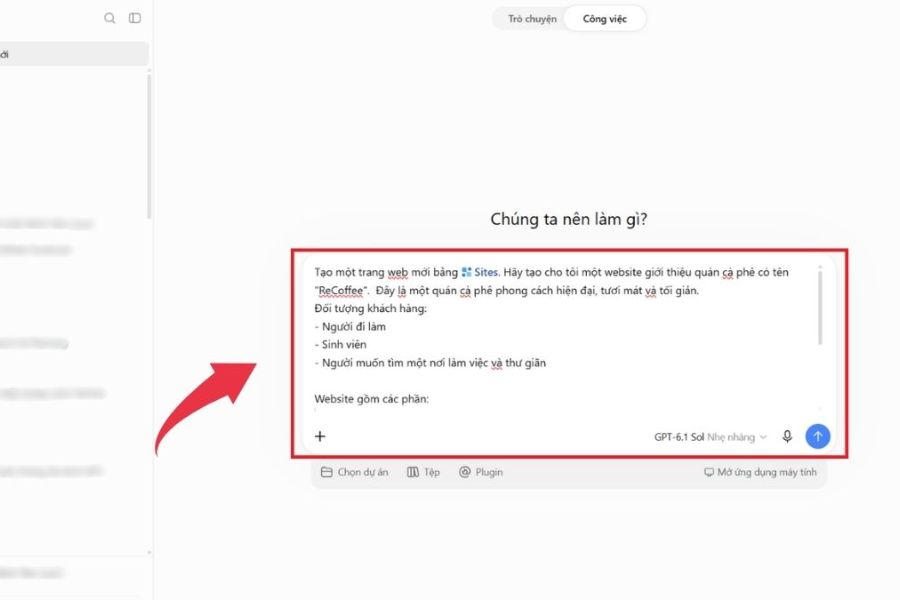
This step directly impacts the quality of the results. The more specific your request, the easier it is for ChatGPT to understand your needs. Instead of simply writing "Create a beautiful website for me," describe the type of website, colors, layout, content, and functionality you need. You should also request a user-friendly interface that displays well on mobile devices and is presented in a way that is suitable for your target audience.
You can refer to the following command:
Sample prompt:
“Create a website showcasing a fashion accessories brand targeting young customers. Use white, pastel pink, and a minimalist, modern style. The website should include sections: homepage, brand introduction, product categories, featured products, customer reviews, and contact information. Each product should have an image, name, suggested price, and a view details button. The interface should be user-friendly, with a clear layout and good display on both mobile phones and computers. Use natural-sounding Vietnamese, concise content, and a prominent call-to-action button.”
After submitting your request, you should review the results and add any missing details. If the website is for selling products, clearly state how customers can contact you or place orders. If it's just for self-introduction, you can include information about your experience, skills, and completed projects.
3.3. Step 3: Preview and check the website layout
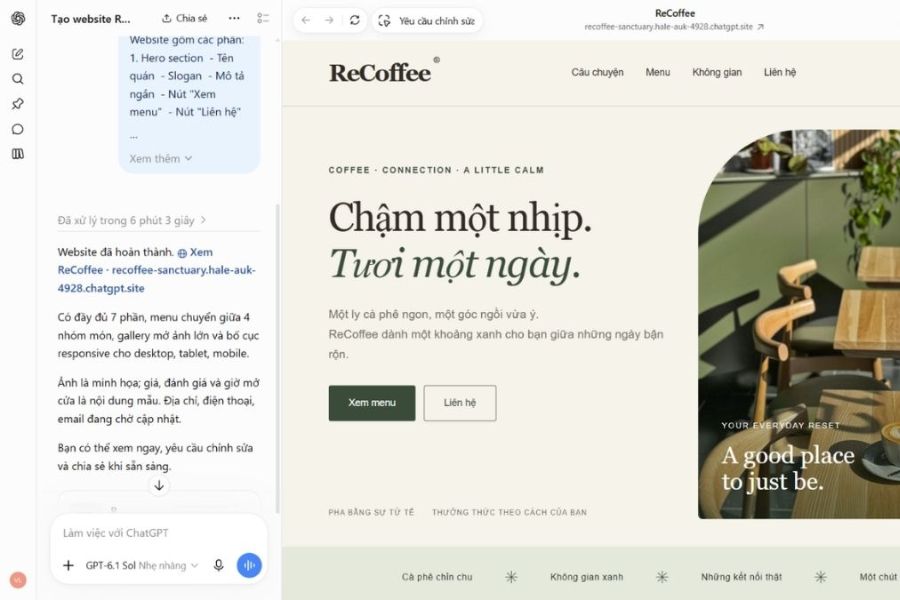
Once ChatGPT has created the design or source code, take the time to thoroughly check it before making any edits. A beautiful website not only needs harmonious colors but also needs to help visitors quickly find the necessary information. Observe whether the title stands out, whether the images are appropriate, whether the content sections are logically arranged, and whether the buttons are easily recognizable.
Factors to check include:
-
Header section: Are the brand name, logo, menu, and main message easily visible?
-
Content: Are the titles, introductions, and product information clear and easy to read?
-
Images: Are the images relevant to the topic, of sufficient quality, and free from distortion or cropping of important details?
-
Function buttons: Are the contact, product viewing, or learn more buttons clearly displayed?
-
Compatibility: Does the website display well on both computer and mobile phone screens?
If ChatGPT only provides the source code, you need to run the code in a suitable environment to see the actual interface. Don't rush to publish your website without checking for basic errors such as content overflowing the screen, images not loading, or links leading to incorrect addresses.
3.4. Step 4: Request ChatGPT to modify the interface
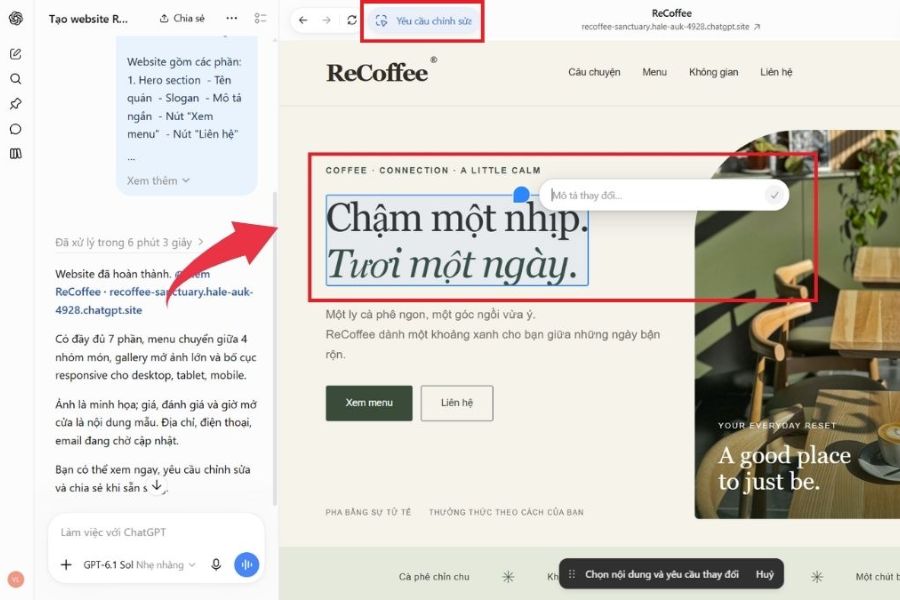
After previewing, you can ask the AI to adjust individual elements to make the website closer to your initial vision. The most effective approach is to clearly state the problem and desired outcome rather than requesting general changes. If too many elements are changed at once, it can be difficult to pinpoint the cause when interface errors occur.
Here are some useful editing commands:
-
"Change the header background color to white, keep the layout the same, and use pastel pink for the main buttons."
-
"Increase the size of the homepage header, shorten the description, and highlight the contact button."
-
"Organize the product catalog into three columns on the computer and one column on the phone."
-
"Adjust the spacing between sections to create a more spacious interface, avoiding placing text and images too close together."
-
"Check the buttons and connections, and fix any errors that are causing the functionality to malfunction."
After each edit, review the results to ensure that other parts are still working correctly. If the website already has source code, you should save a stable version before making major changes.
3.5. Step 5: Add necessary content and functions
An attractive website design is not enough if it lacks information or fails to meet the needs of visitors. At this stage, complete the content, images, and functionalities that are appropriate for the intended purpose. For a business website, you can add information about your brand, services, projects, and contact methods. For an e-commerce website, add product descriptions, prices, shipping policies, and ordering instructions.
You can request ChatGPT to assist with the following tasks:
-
Rewrite the brand introduction to be concise, easy to understand, and impactful.
-
Create product descriptions with clear information, avoiding vague content.
-
Please include a contact form with your full name, email address, and the topic of your consultation request.
-
Create navigation menus to help visitors quickly switch between categories.
-
Suggest page titles and short descriptions that align with SEO goals.
-
Instructions for testing the functionality of forms, links, and interactive buttons.
It's important to note that the form interface is only a visual element if it's not yet connected to a data processing system. Similarly, an order button doesn't automatically mean the website has payment functionality. Features like user accounts, order management, databases, or online payments may require external services and additional configuration.
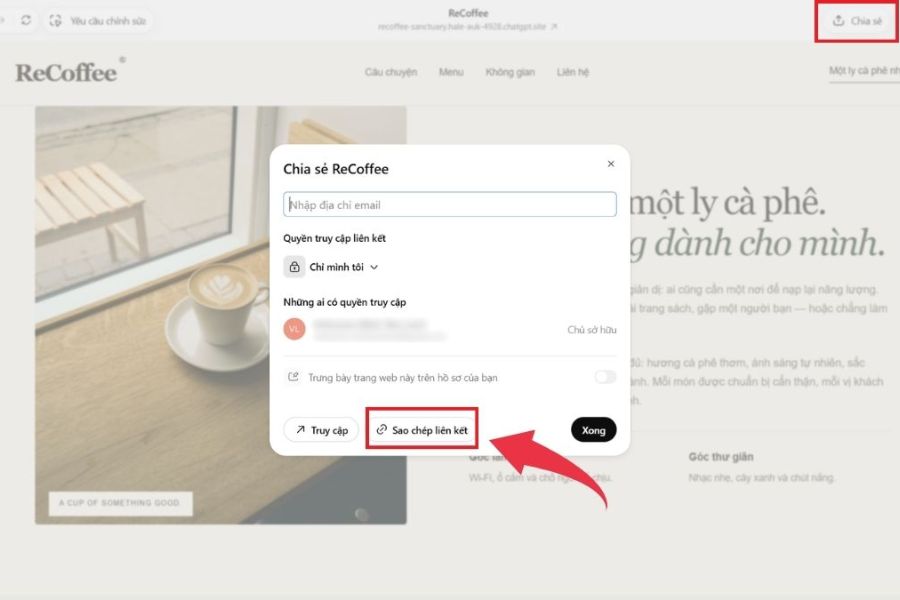
3.6. Step 6: Publish the website and share the link.
Once your website is complete, you need to put it online so others can access it. The publishing method depends on the tool used. If the platform has built-in publishing features, follow the platform's instructions. If ChatGPT generates the source code, you need to deploy it to a compatible hosting service or website hosting platform.
The basic process usually includes:
-
Review the content, images, links, and important functions.
-
Choose a hosting platform that suits your type of website.
-
Upload the source code or connect to the code repository according to the deployment service's instructions.
-
Set up a domain name if you want to use your own address.
-
Test the website after publishing and try accessing it using a different device.
-
Share the link via social media, email, or other appropriate promotional channels.
You shouldn't assume that ChatGPT will automatically provide a public website link. Some processes require separate implementation steps, domain name setup, or hosting configuration. Before publishing, ensure the website is reliably accessible and does not display experimental content.
4. Tips for writing prompts to help ChatGPT create beautiful and professional websites.
To achieve the desired results, you need to know how to delegate tasks to AI. An effective command should clearly define ChatGPT's role, website goals, target audience, design style, and the functionalities to be implemented. Instead of asking the AI to do everything at once, break the project down into smaller parts for easier quality control.
-
Be specific instead of using general terms: Instead of "beautiful design," clearly state the minimalist style, main color scheme, and content layout.
-
The AI task is to follow a phased approach: starting with page structure, followed by interface, content, and functionality.
-
For example: If you have a favorite website, describe the aspects you'd like to learn from, such as menu presentation or product layout.
-
Specify your target audience: Websites aimed at students, young customers, or businesses will have different presentation styles.
-
Pre-delivery testing required: ChatGPT is requested to review display errors, linking issues, mobile usability, and implemented functionalities.
You can also ask AI to act as a user interface designer or web programmer to guide problem-solving. However, the results generated by AI still need to be tested in practice, especially when the website has data collection or business functions.
6. Conclusion
Creating a website using ChatGPT isn't overly complicated if you know how to define your goals, write clear code, and follow the steps. From brainstorming ideas and creating the interface to editing content, adding functionality, and publishing, AI can significantly assist those with limited programming experience. However, you still need to proactively check quality, ensure data security, and choose a suitable deployment method to ensure the website runs smoothly. If you're just starting out, try creating a personal or brand introduction website with some basic content. Once you're familiar with writing prompts and editing results, you can expand the project with advanced features. Starting with a small website, experimenting step by step, and continuously improving will help you leverage ChatGPT more effectively in building your online presence.





















VIP Products








Best Selling Products
Upgrade Duolingo Super
29 USD
Capcut Pro 1 Year
39 USD
Genuine Adobe Illustrator account
99 USD
Plugin Retouch4me
69 USD
Autodesk All App Account Copyright
120 USD
Adobe Photoshop Copyright - Full App
120 USD
Upgrade Genuine Office 365
49 USD
Adobe Premiere Pro Account
99 USD
Upgrade genuine Capture One account
120 USD
ChatGPT Plus Account (GPT-4)
16 USD
MidJourney Account
29 USD
Copyright Adobe Lightroom Account
59 USD
Freepik Premium Account
59 USD
Genuine Cheap Canva Pro
39 USD
Windows 10 & 11 Pro Key
36 USD