Best Selling Products
How to create Cyberpunk effect in Photoshop
Nội dung
The Cyberpunk color effect uses 2 main tones, blue and pink. It is quite similar to Neon color, bringing a blurry feeling, very attractive to viewers. Let's refer to the steps to create a Cyberpunk effect in Photoshop with Sadesign in the following sharing section. How to create Action for Cyberpunk effect in Photoshop

The Cyberpunk effect has a science fiction style. Accordingly, this effect is often set in a future context with 2 main colors, pink and blue, mixed together like extremely attractive neon colors.
.jpg)
1. To create a Cyberpunk effect in Photoshop, we need Action.
Step 1: First, open the photo you want to create the Cyberpunk effect in Photoshop. Choose a photo with a lot of contrast, this will help create the cyberpunk vaporwave interface.
To open your photo, go to File => Open, select your photo and click Open. Before we begin, check a few things:
Your image must be in Color RGB, 8 Bit/Channel mode. To check this, go to Image => Mode.
For best results, your image size should be 2000–4500 px Wide/High. To check this, go to Image => Image Size.
The image you are using should be a background layer. If not, go to Layer => New => Background from Layer.
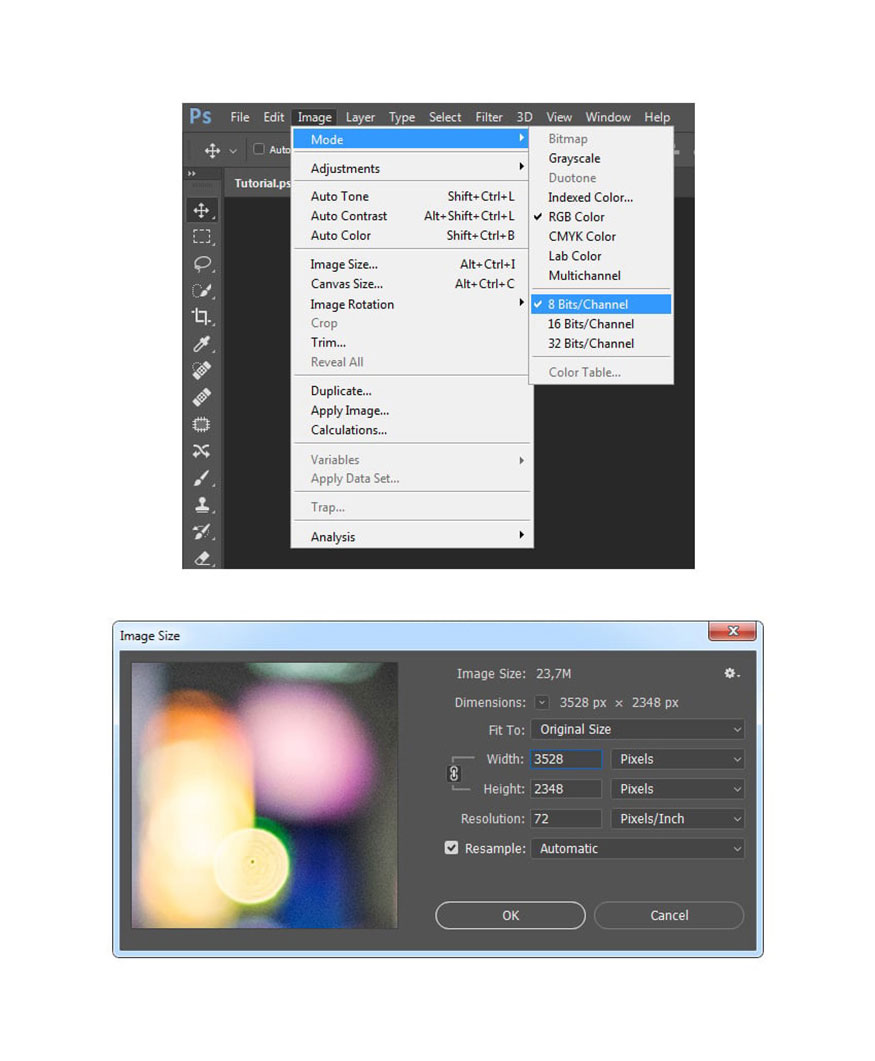
Step 2: Now on the menu bar go to Window => Actions. In the Actions panel, click on the menu icon in the upper right corner, select New Set to create a new set and name it Cyberpunk. Then, click on the same menu icon again, select New Action to create a new action and name it Cyberpunk.
.jpg)
2. How to Create a Cyberpunk Color Effect
In this section, we will create a cyberpunk color look in Photoshop.
Step 1: On the menu bar, go to Layer => New Adjustment Layer => Gradient Map to create a new gradient map adjustment layer and name it Color_Look_1.
.jpg)
Step 2: Double-click on the thumbnail of this layer, then in the Properties panel, click on the gradient to open the Gradient Editor panel and enter the left color stop as #0000ff and the right color stop as #ff00ff.
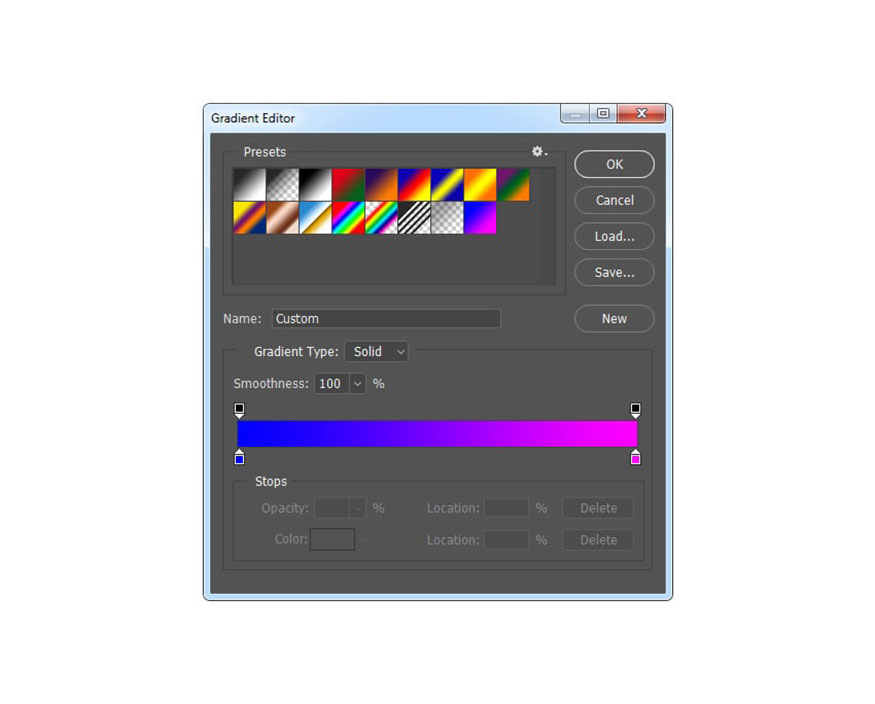
Step 3: We also need to adjust the cyberpunk light. Change the Blending Mode of this layer to Soft Light and set the Opacity to 70%. See the effect on the cyberpunk color.
.jpg)
Step 4: Now select the Background layer. On the menu bar go to Layer => New Adjustment Layer => Hue/Saturation to create a new Hue/Saturation adjustment layer and name it Color_Look_2.
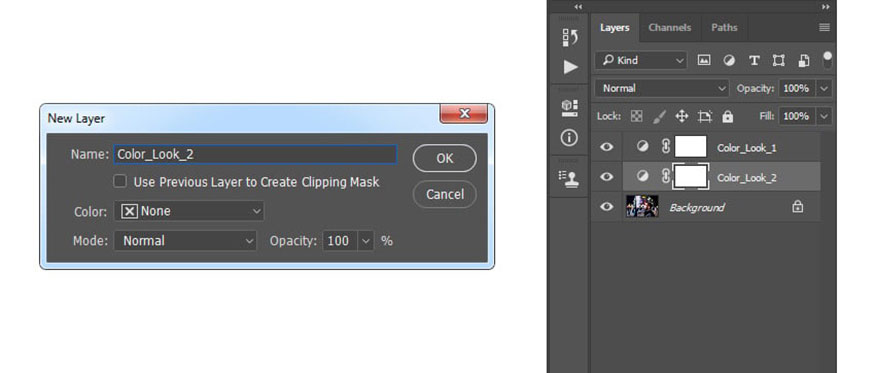
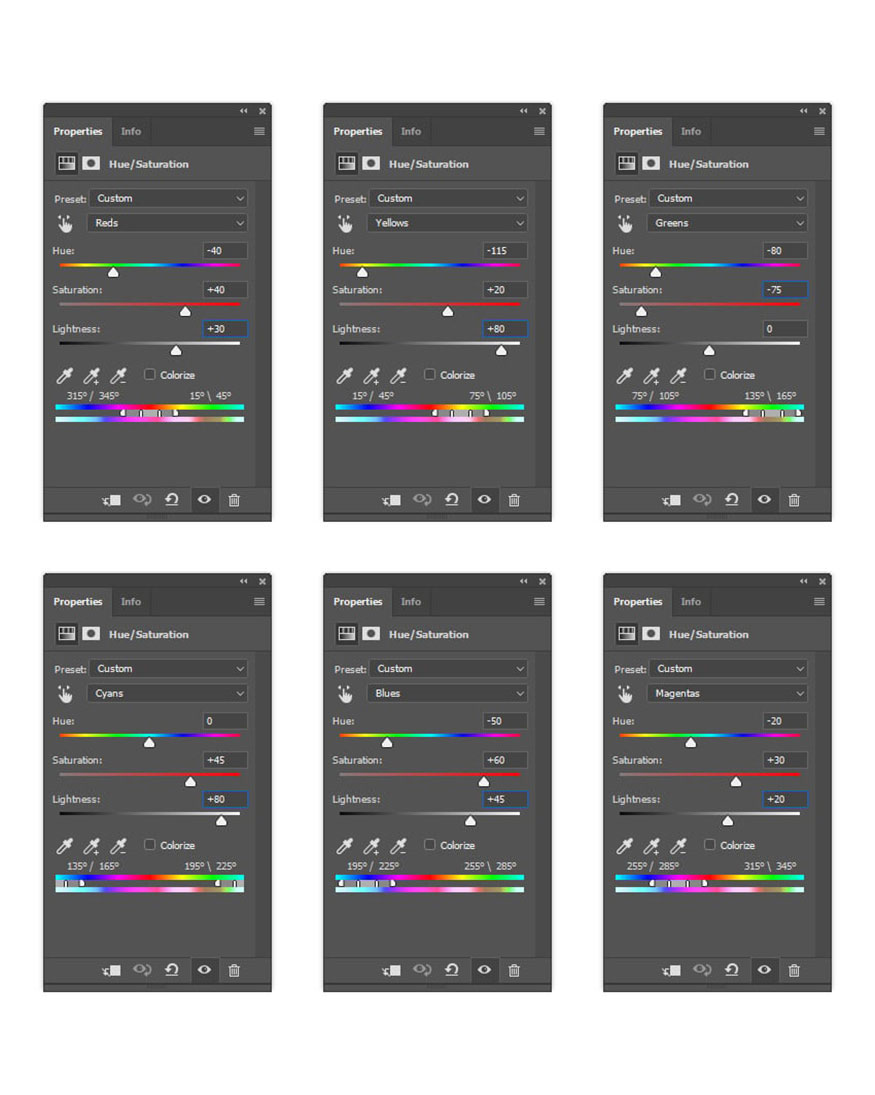
Step 5: Double-click on the thumbnail of this layer and enter the settings below in the Properties panel:
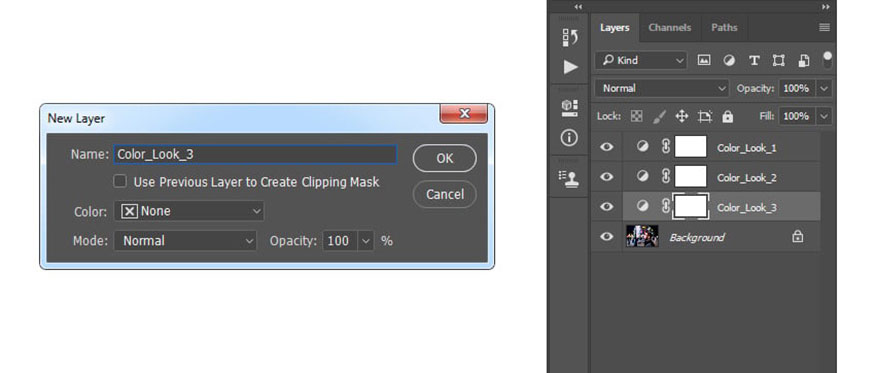
Step 6: Now select the Background layer. On the menu bar go to Layer => New Adjustment Layer => Photo Filter to create a new photo filter adjustment layer and name it Color_Look_3.
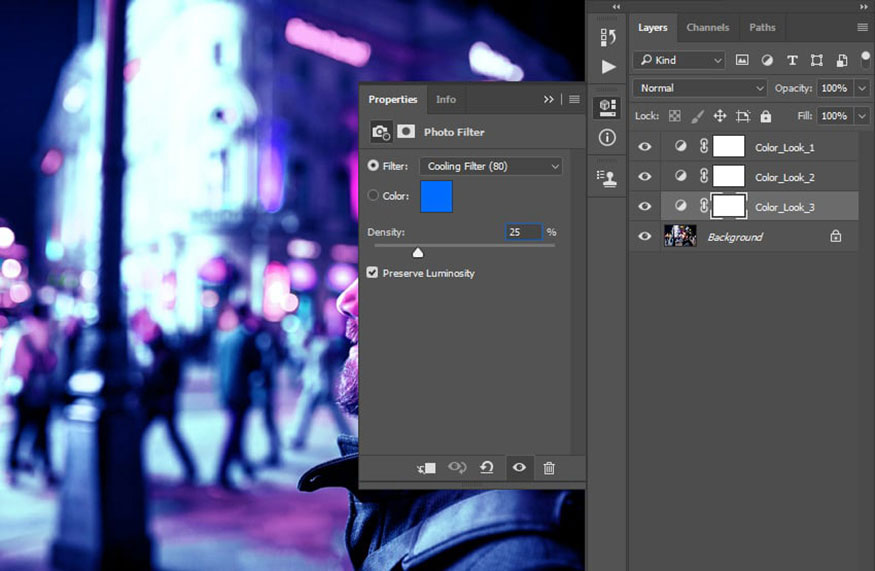
Step 7: Double-click on the thumbnail of this layer. In the Properties panel, set the Filter to Cooling Filter (80), Density to 25% and check the Preserve Luminosity option.
3. Making Final Adjustments to the Cyberpunk Effect in Photoshop
In this section, we will make some final adjustments to the cyberpunk graphic design.
Step 1: Select the Color_Look_1 layer and press D on the keyboard to reset the swatches. Then, on the menu bar go to Layer => New Adjustment Layer => Gradient Map to create a new gradient map adjustment layer and name it Overall Contrast.
.jpg)
Step 2: Now change the Blending mode of this layer to Luminosity and set the Opacity to 80%.
.jpg)
Step 3: On the menu bar go to Layer => New Adjustment Layer => Vibrance to create a new Vibrance adjustment layer and name it Overall Vibrance/Saturation.
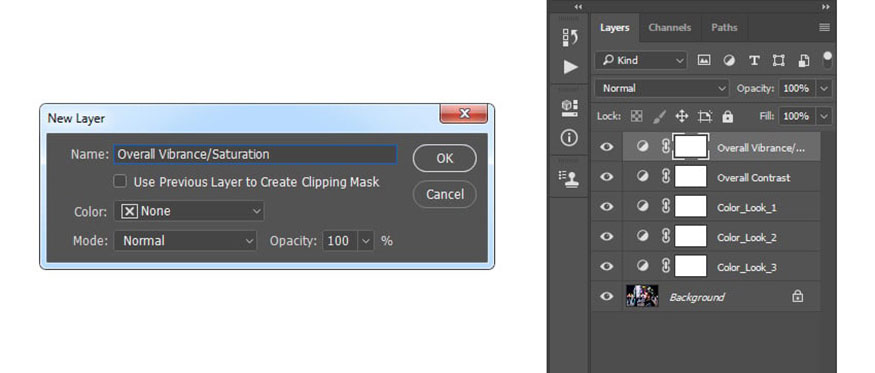
Step 4: Now double-click on the layer thumbnail. In the Properties panel, set Vibrance to +25 and Saturation to +10.
.jpg)
Step 5: Still on the menu bar, go to Layer => New Adjustment Layer => Levels to create a new Levels adjustment layer and name it Overall Brightness.
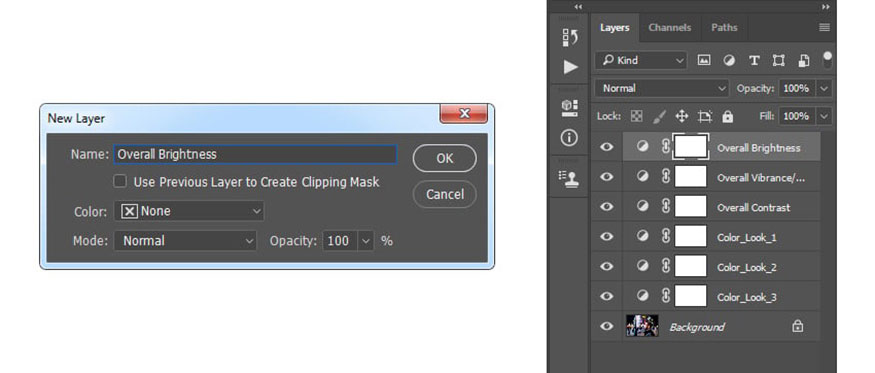
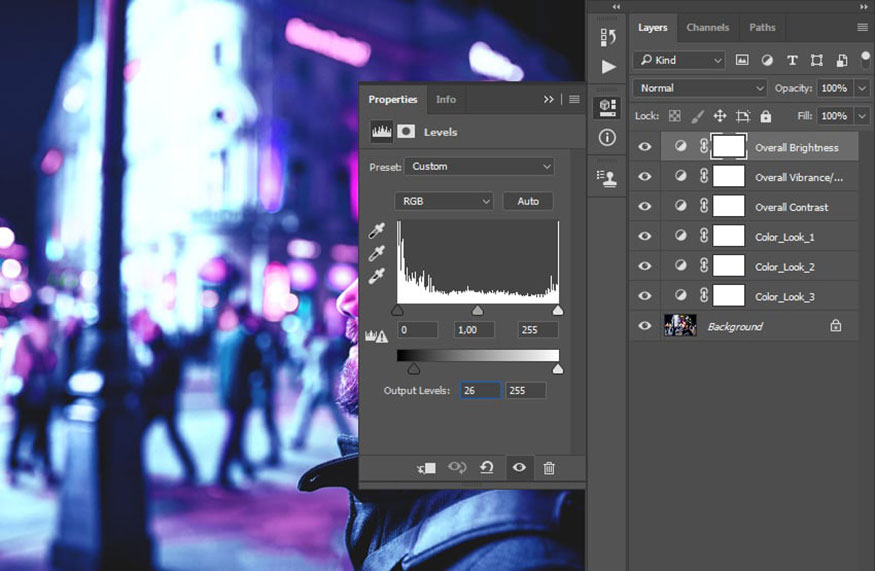
Step 6: Now double-click on the layer thumbnail. In the Properties panel, enter the settings below:
Step 7: Press Ctrl+Alt+Shift+E on your keyboard to take a screenshot, then press Ctrl+Shift+U to desaturate this layer. Then, go to Filter => Other => High Pass and set the Radius to 2 px.
.jpg)
Step 8: Change the Blending mode of this layer to Hard Light and set the Opacity to 80%. Name this layer Overall Sharpening.
.jpg)
So you have completed the steps to create a Cyberpunk effect in Photoshop. The man stands out with 2 tones of pink and blue, with a strong sci-fi vibe.
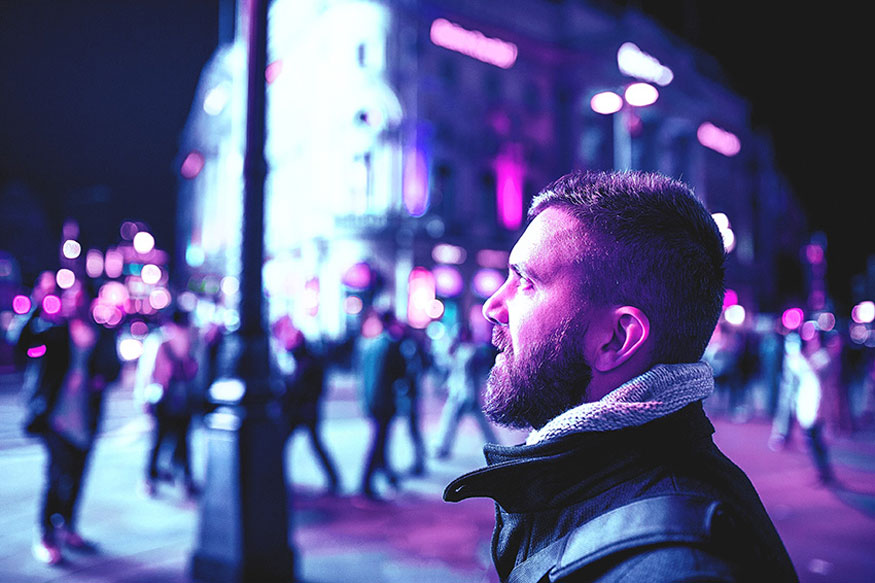
Don't forget to stop the Action, save it for faster editing later.
Above is a summary of how to create a Cyberpunk effect in Photoshop. The implementation is not too difficult but requires a combination of many different tools. Try doing it many times to get the most satisfactory results.

Installation and support contact information:
🏡 SADESIGN Software Company Limited
📨 Email: phamvansa@gmail.com
🌍 Website: https://sadesign.ai


.png)


