Best Selling Products
SIMPLE ways to separate hair in photoshop
Nội dung
- 1. Separate hair in Photoshop using Select Subject Cloud
- 2. Separate hair in Photoshop with the Select Menu tool
- 3. Separate hair using Object Selection Tool
- 4. Separate Hair in Photoshop with Action
- 5. Separate hair using select and mask
- 6. Separate hair with channel
- 7. Separate hair with Refine Edge
Separating hair in Photoshop is often a time-consuming task for editors. Refer to the following 7 quick and simple hair separations in Photoshop by Sadesign; you will surely be extremely surprised with the results!

1. Separate hair in Photoshop using Select Subject Cloud
With this method, you must use a licensed Photoshop with an internet connection.
First, open Photoshop, then click Open or press the shortcut Ctrl + O => select the Object Selection Tool or the shortcut W => click the arrow next to Select Subject. This method is effective for high-resolution photos with simple backgrounds.
To achieve high efficiency, you should select Select Subject Cloud. This operation lets Photoshop send the picture to the Adobe server using Machine Learning, which is especially effective when separating hair or performing complex details.
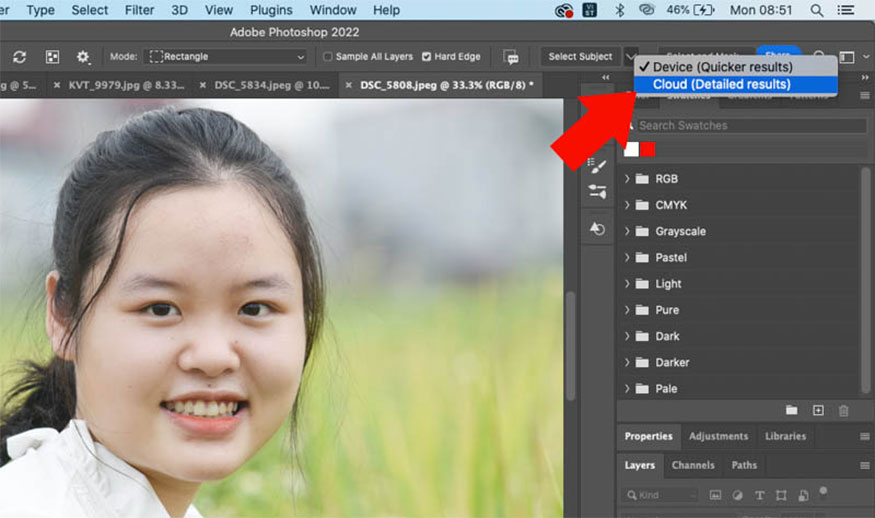
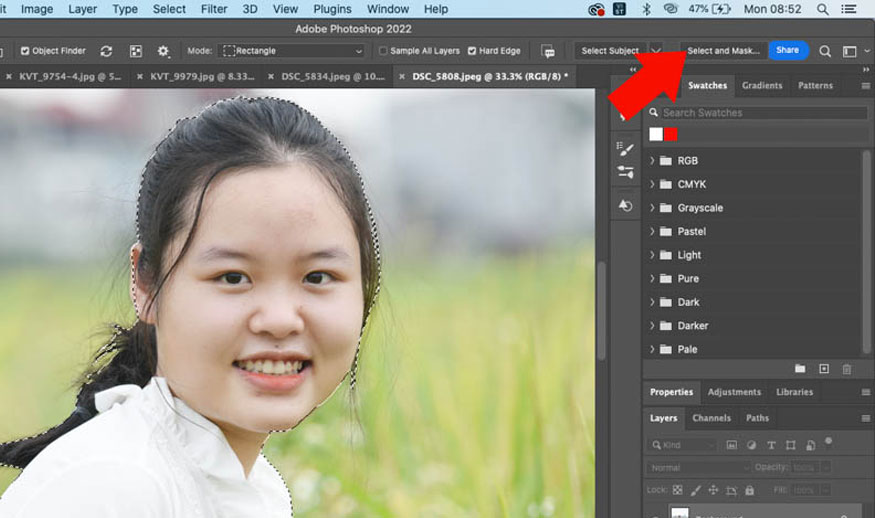
After selecting Cloud, click Select Subject. Photoshop will help you make an accurate selection of the hair around the subject. You can make further adjustments with Select and Mask.
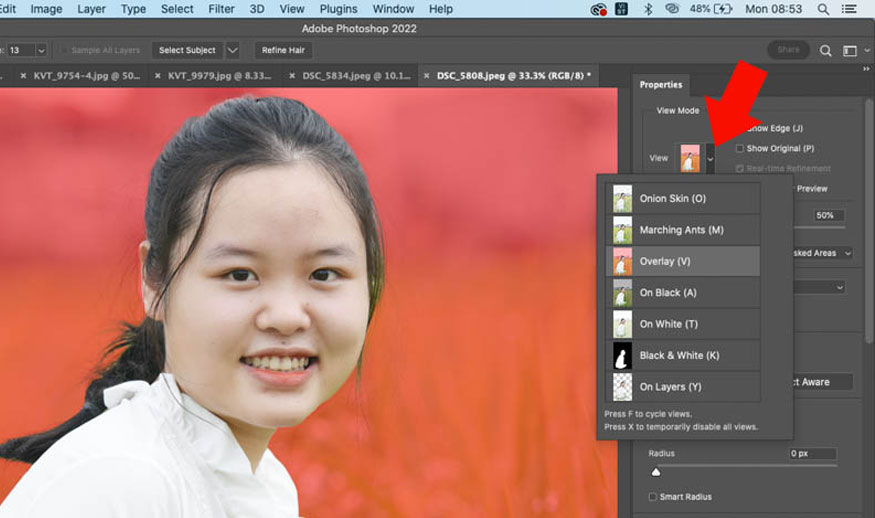
Next, click on View Mode to select the display mode that suits your needs. If you choose Overlay, you can press the F key to switch display modes or press the X key to turn off display modes.
You can see that Photoshop has separated the hair almost perfectly. If you feel that any part is not good, you can press Refine Hair => select Refine Edge Brush Tool or press the [ ] key to increase or decrease the size. Paint the Brush in the area you want to edit so that Photoshop can adjust it to achieve the best results.
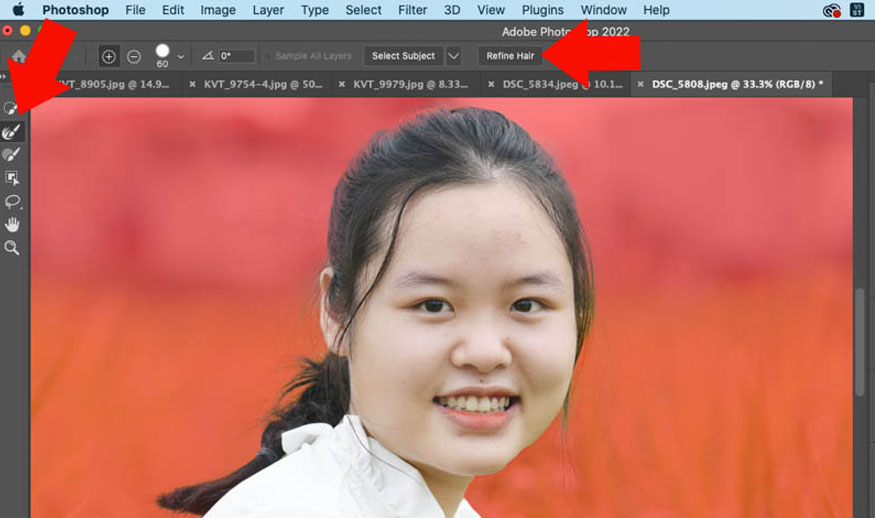
You can select Black & White in View Mode to see the effective hair separation.
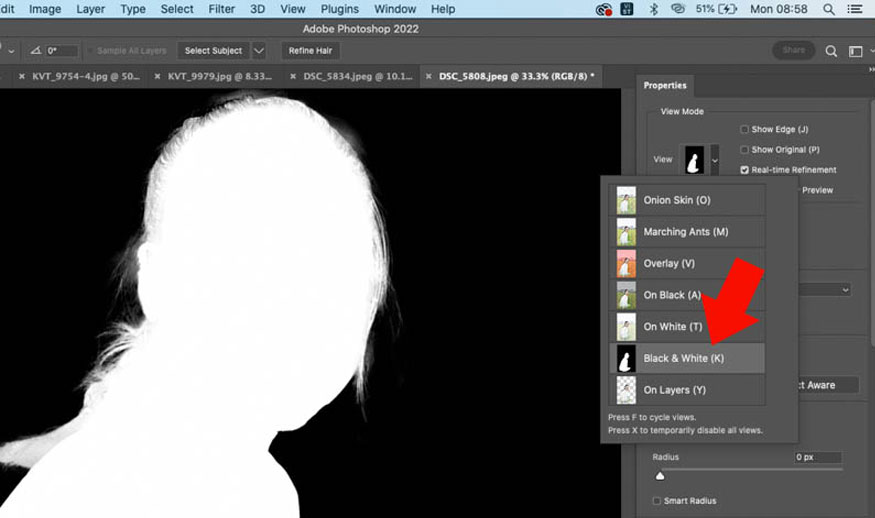
You can preview by switching to On Layers before you finish. You can see that the model's hair has been done much better than if you did it manually.
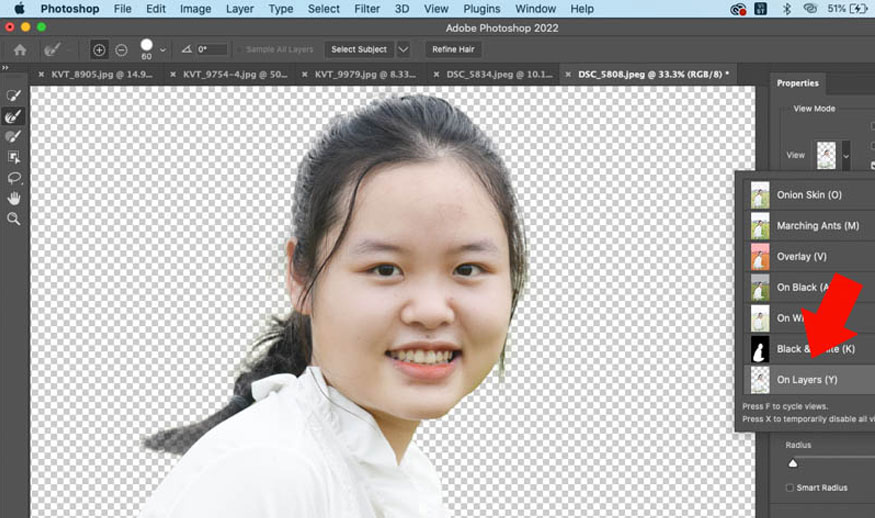
Adjust it with Refine Hair, then select Output => New Layer with Layer Mask => OK. This action is to create a new Layer with Layer Mask instead of applying it to the original image to help you easily return to the previous step.
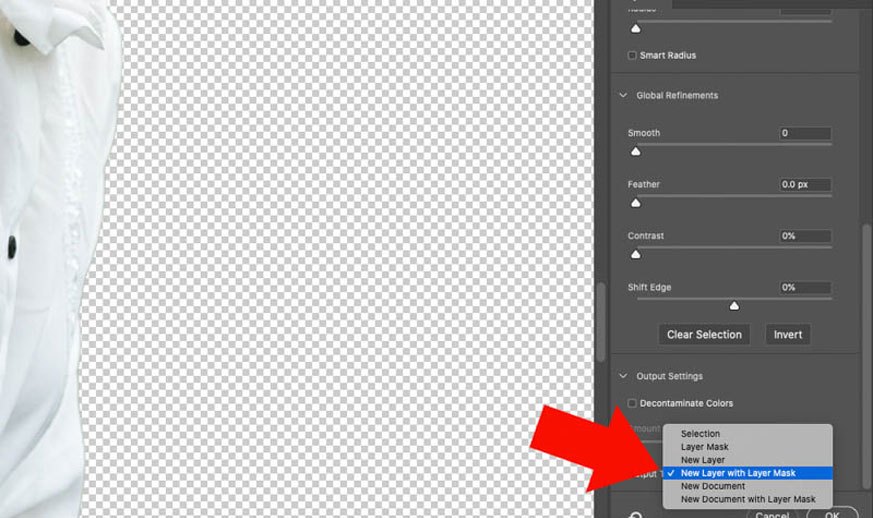
You will see a new Layer with Layer Mask, the white area will be displayed and the black area will be hidden. Use the black and white Brush tool to affect the Layer Mask.
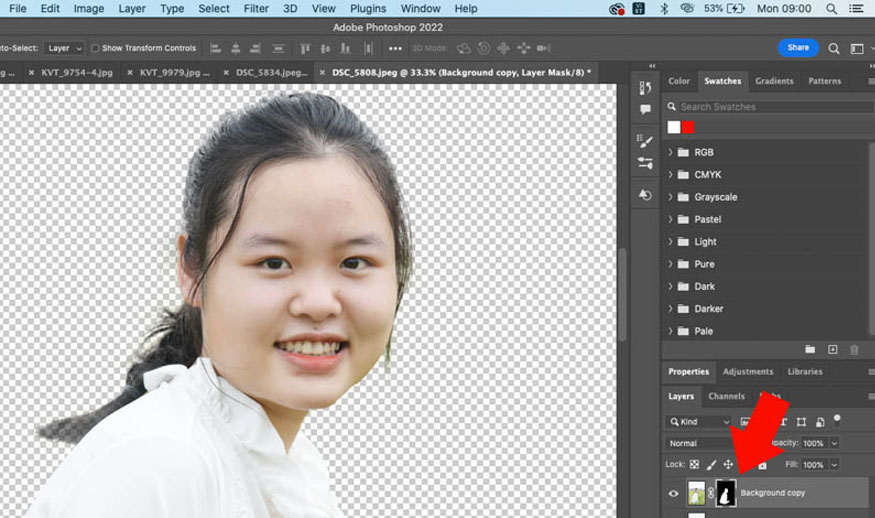
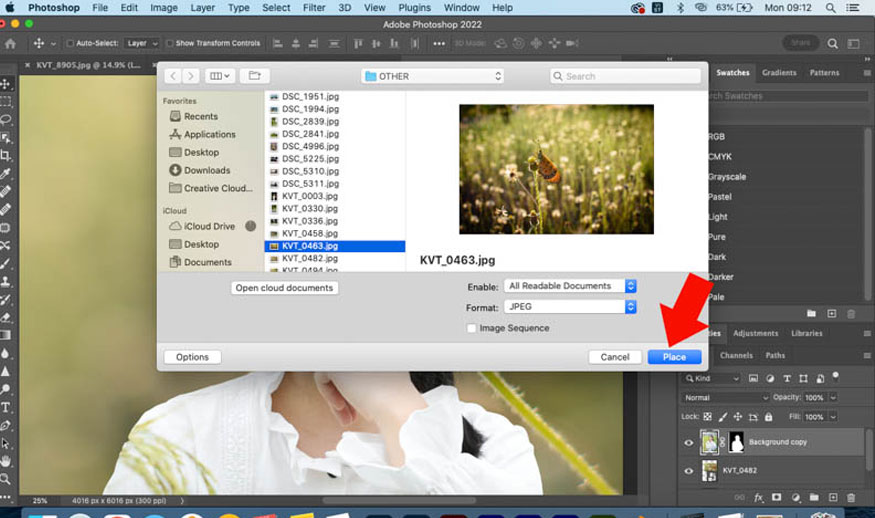
If you want to combine another background, just click on File, select Place Embedded => select the background => click Place => select the Selection Tool (V) then drag the background below the model layer and you're done. You can also select the background layer, and use the shortcut Ctrl + ] to move the layer up or down.
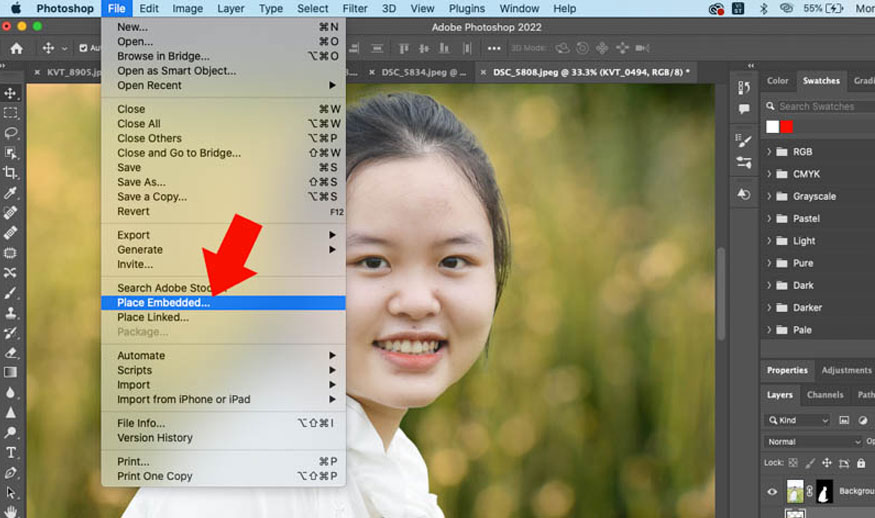
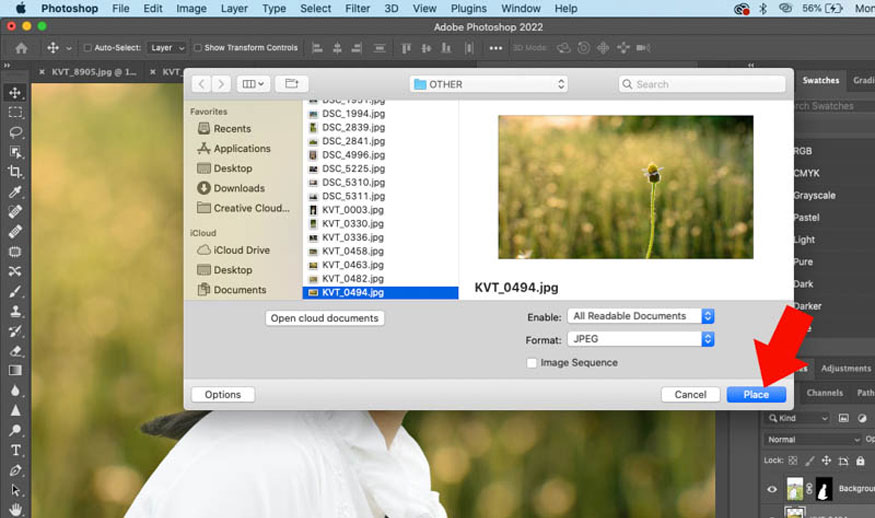
Use the Free Transform tool (Ctrl+T) to adjust it to fit.
If the background is too large or too small, use the Free Transform tool (Ctrl+T) to adjust it to fit.
2. Separate hair in Photoshop with the Select Menu tool
This method is suitable for those who use copyrighted Photoshop and do not need a network to connect to the Adobe server. Click Select and choose Subject.
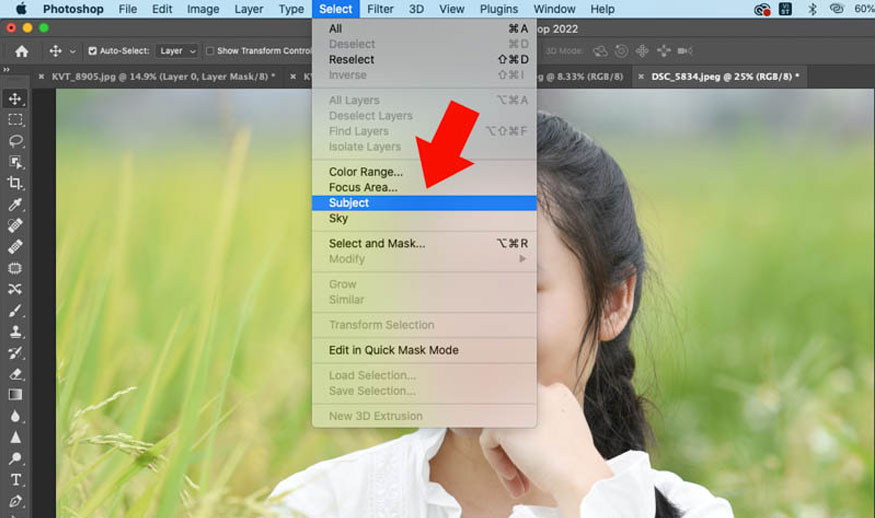
Photoshop will understand that you want to separate the hair using hardware on your computer. The software will handle the CPU and Graphics Card, you just need to wait until it is finished. This method is very fast but not as detailed as the Select Subject Cloud tool.
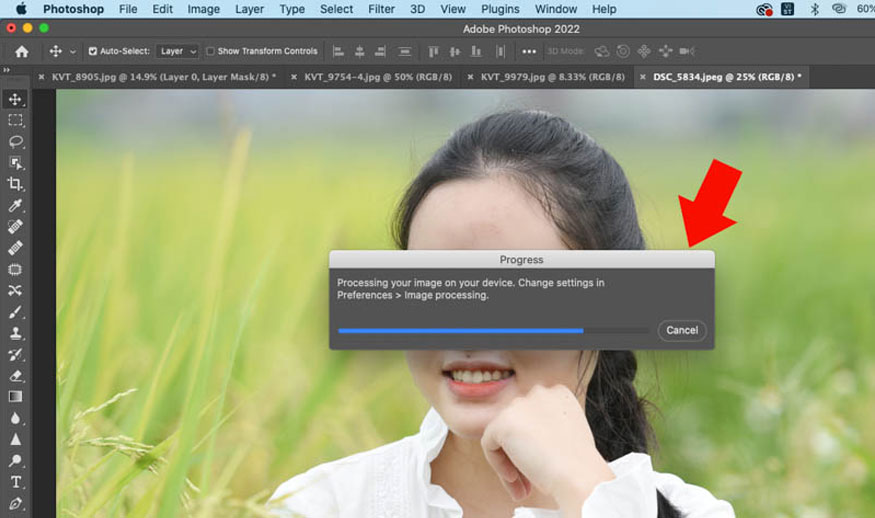
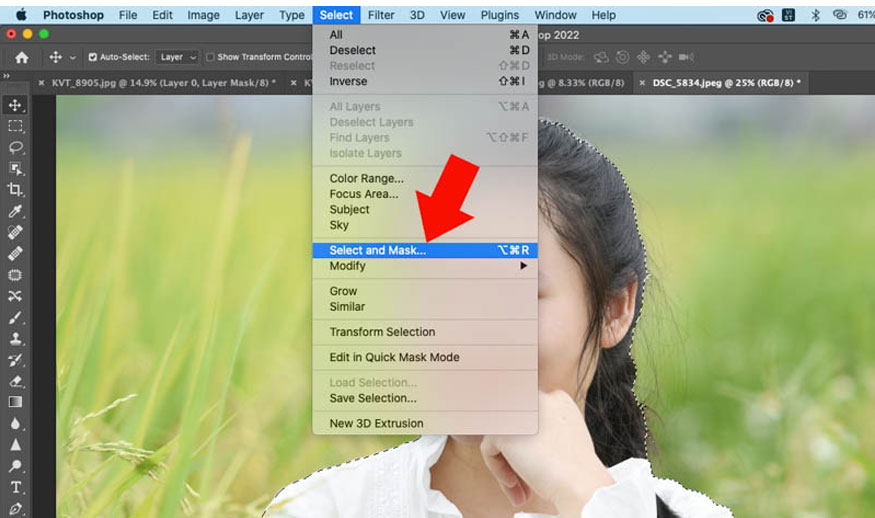
After Photoshop creates a selection around the model's hair, click Select and select Select and Mask to make adjustments.
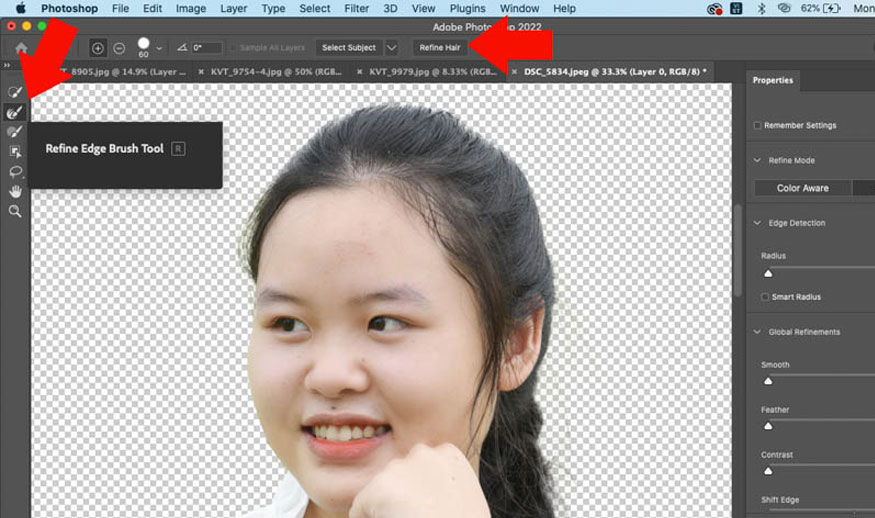
Select Refine Hair => Refine Edge Brush Tool => Press [ ] to increase or decrease the size. Then paint the Brush on the hair area you want to process so that Photoshop can adjust the hair area for the best results.
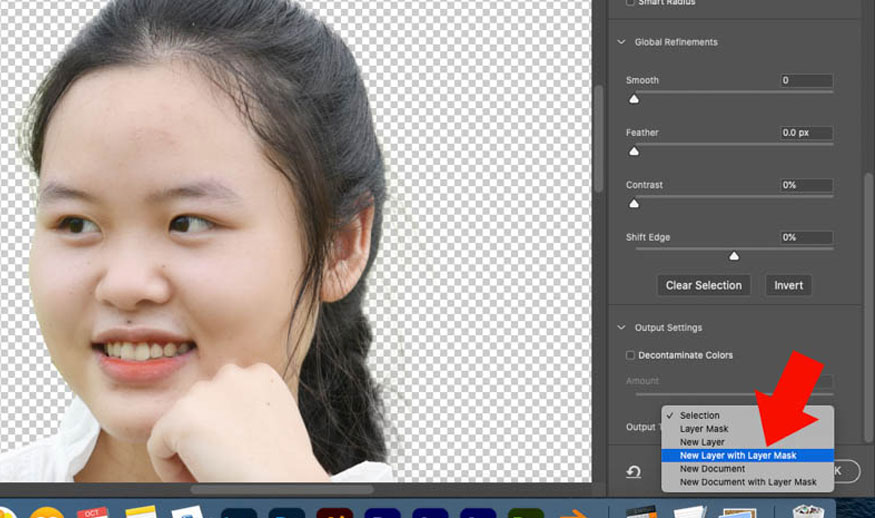
When finished processing, we click Output => New Layer with Layer Mask => OK.
Photoshop will create a new Layer with the Layer Mask as in the first method. You can use a black-and-white Brush to control the effects of the Layer Mask.
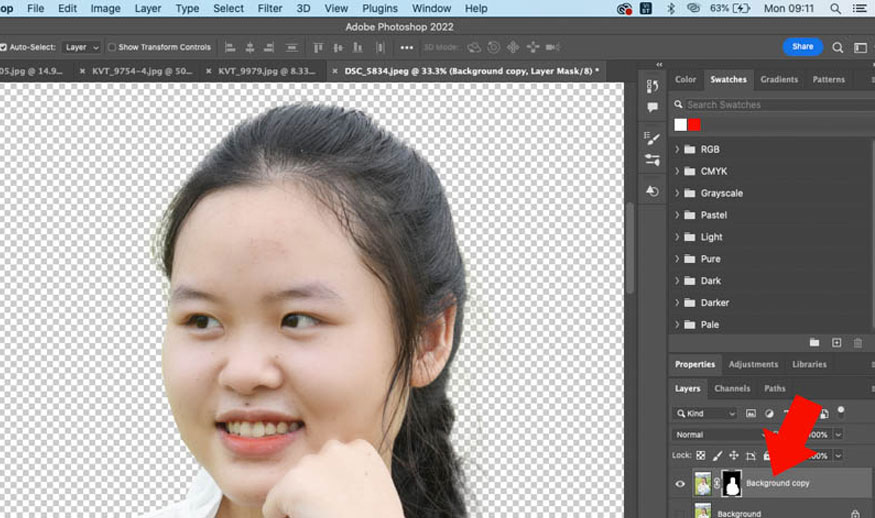
Click File => Place Embedded => Select the photo and click Place. You can use the Selection Tool (V) or the shortcut Ctrl+[ to move the Layer below the model.
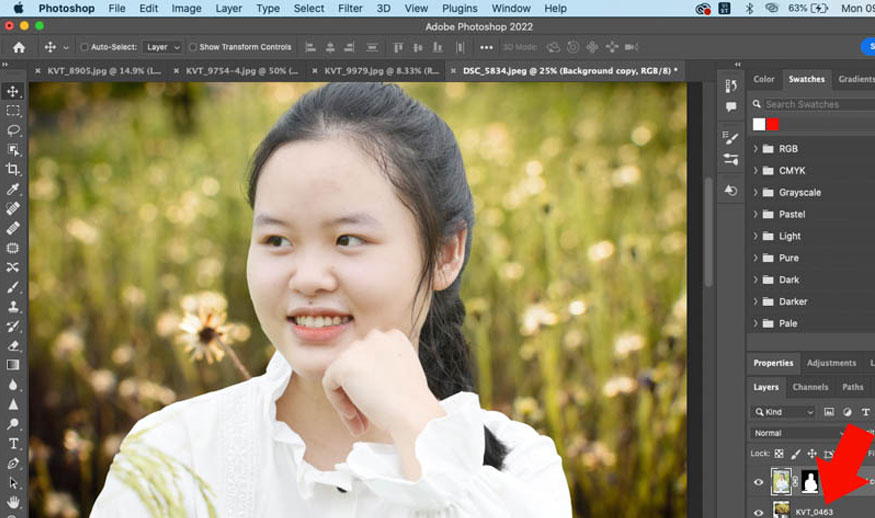
The model's hair is perfectly separated as a result.
3. Separate hair using Object Selection Tool
This way you should use the latest Photoshop. If you have not purchased the latest version of Photoshop, please contact SADESIGN immediately for a quick installation at a very reasonable price.
Click on the Object Selection Tool or press the shortcut key W.
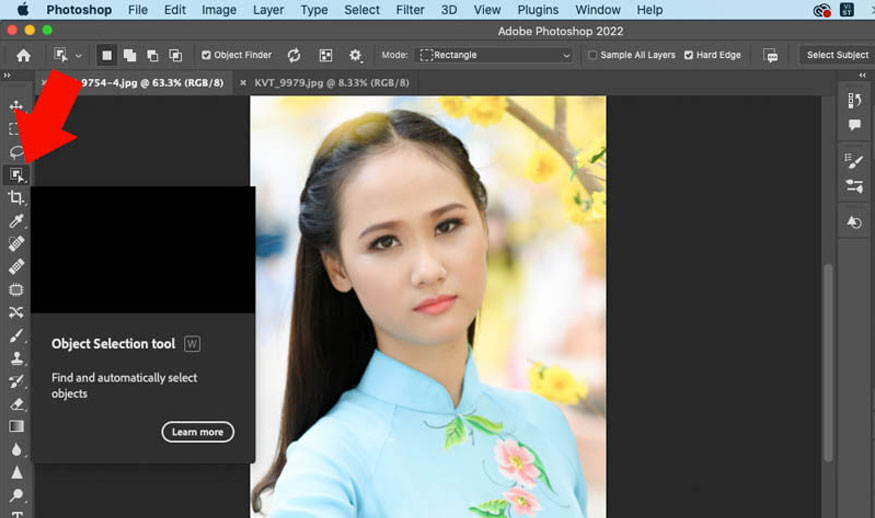
Check Object Finder to let Photoshop analyze the subject in the photo. After Photoshop finishes processing, click Show All Object to see the subject in the photo. The subject will be marked in blue as shown in the photo.
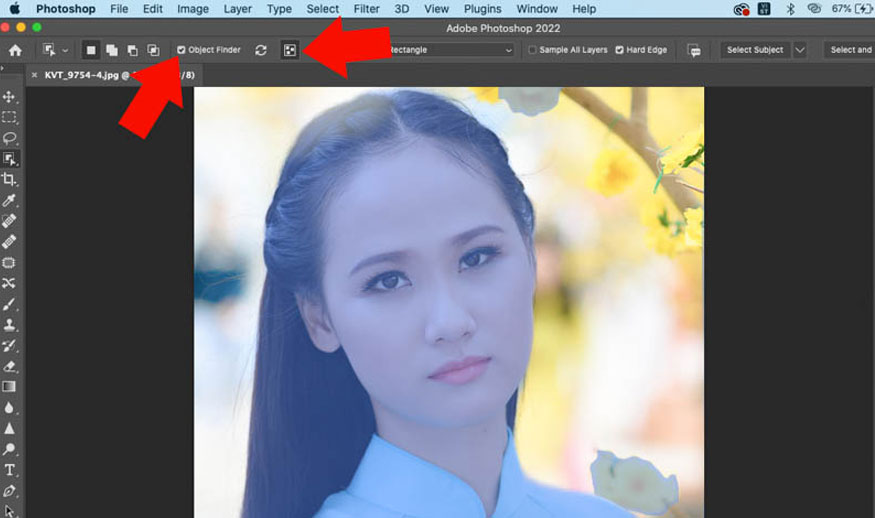
To separate the model's hair, left-click on the model, then wait for Photoshop to create a selection. When finished, you will see the selection surrounding the model as shown in the illustration.
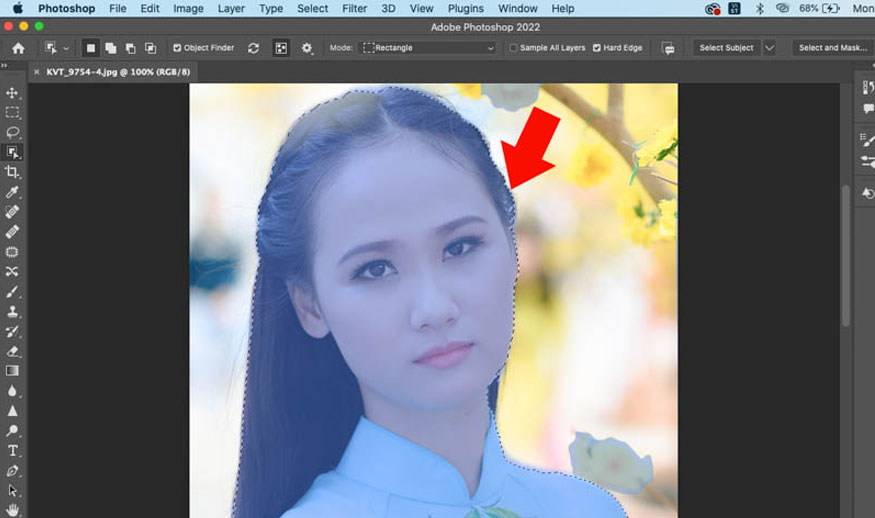
Click Select and Mask to adjust, then click Refine Edge Brush Tool => press [ ] to increase or decrease the Brush size. Apply Brush to the model's hair and you will see that this area is much improved. In most cases, using the Object Selection Tool will bring satisfactory results.
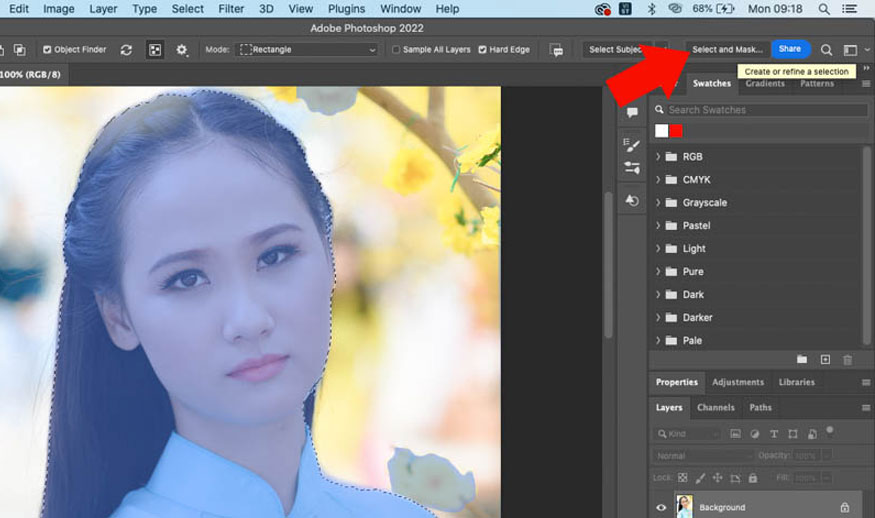
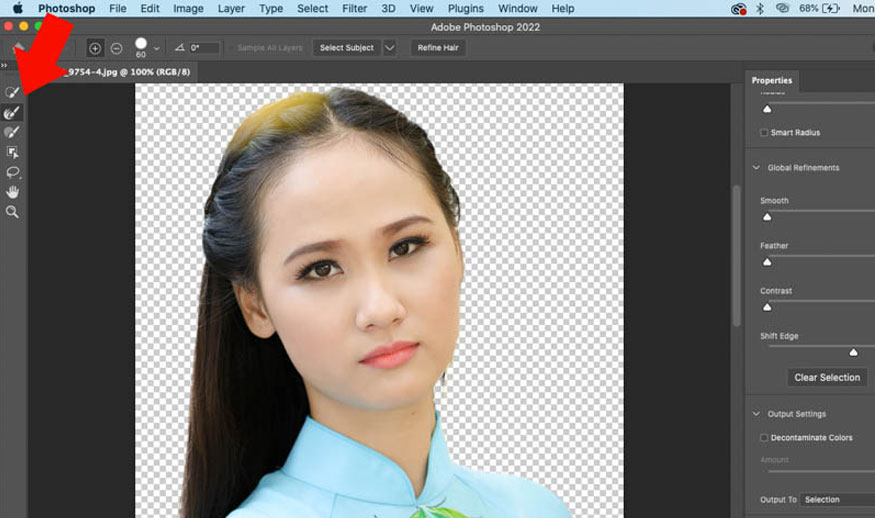
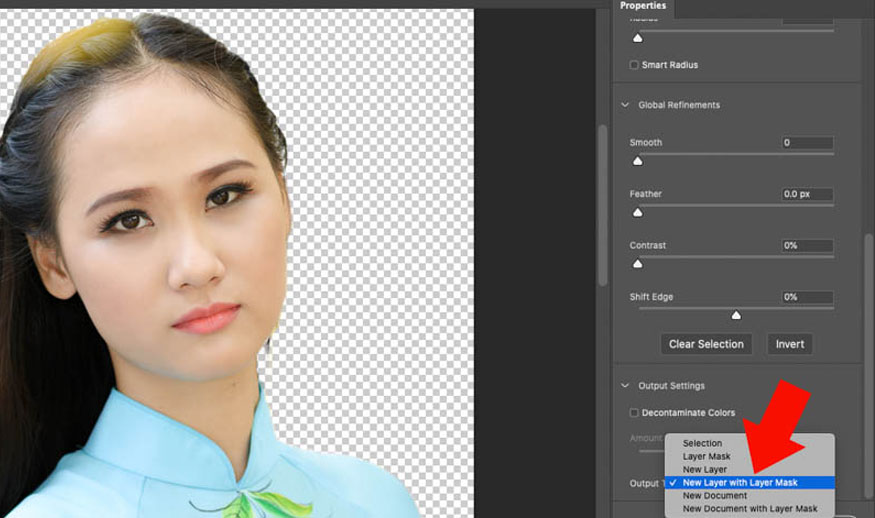
Click on Output, select New Layer with Layer Mask => OK, you will see the new Layer with Layer Mask. The white area is displayed on the screen and the black area is hidden. Use the black and white Brush to control the Layer Mask.
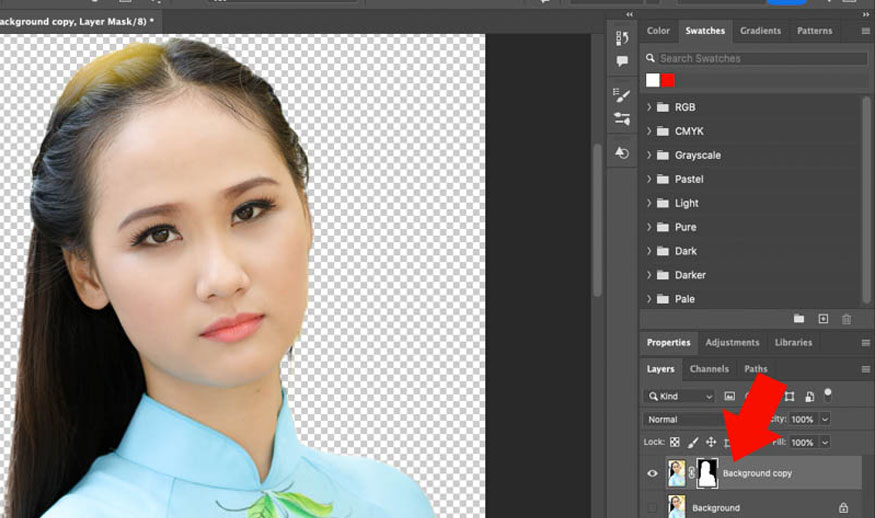
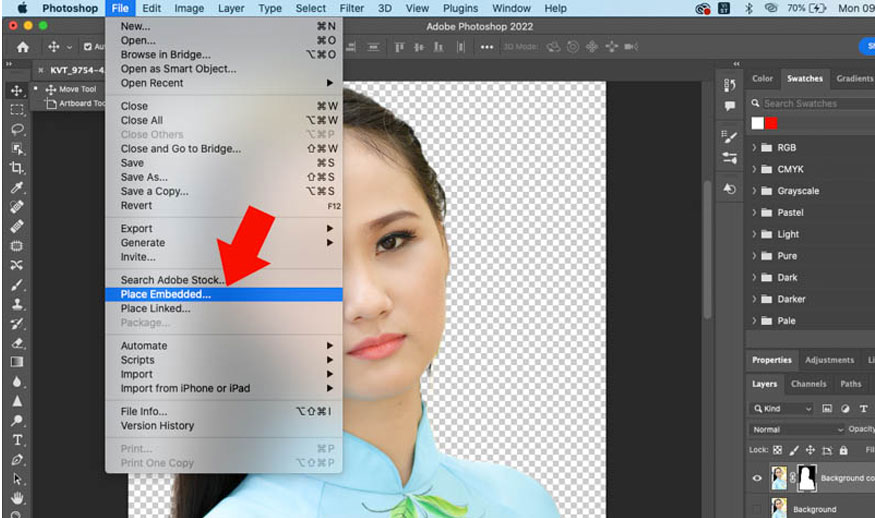
Click File => Embedded, select Background => Select Place.
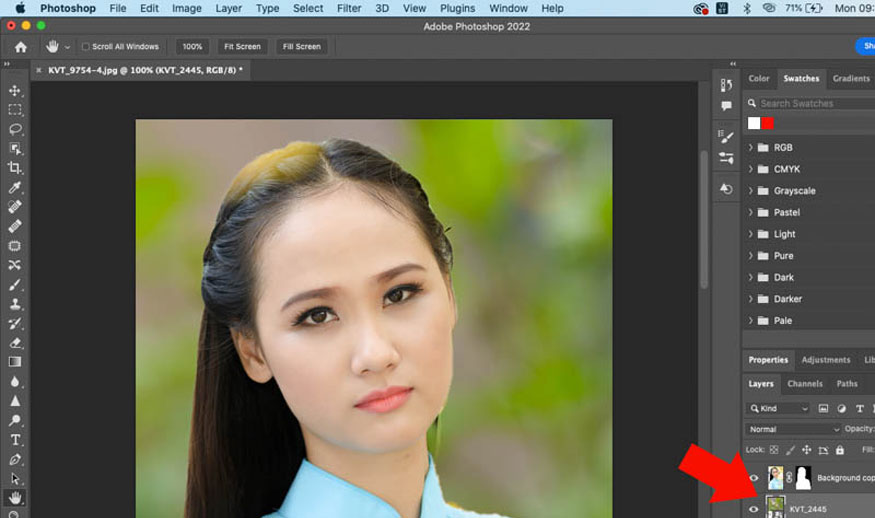
Use the Selection Tool (V) to drag the background down below the model. You can see that with a few clicks the model's hair is perfectly separated.
4. Separate Hair in Photoshop with Action
Open the photo by pressing Open or the shortcut Ctrl+O => press Ctrl+F to search in Photoshop => type Remove in the search box and press Enter.
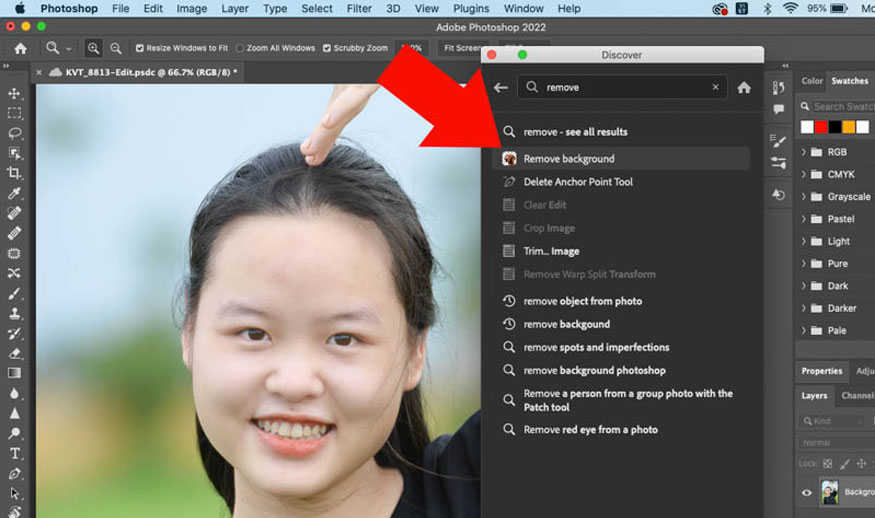
Select Remove Background then wait a moment. This is an Action to separate hair and subject in Photoshop. So, you just need to see the result in the thumbnail and press Apply.
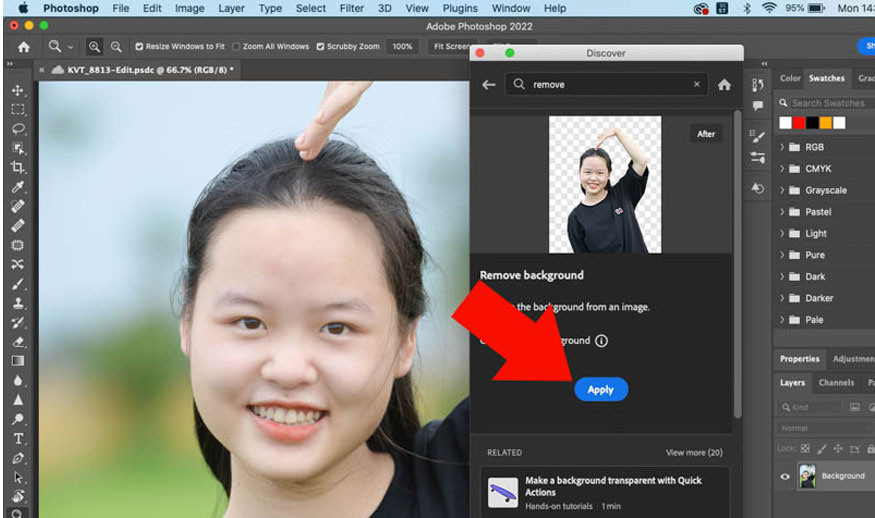
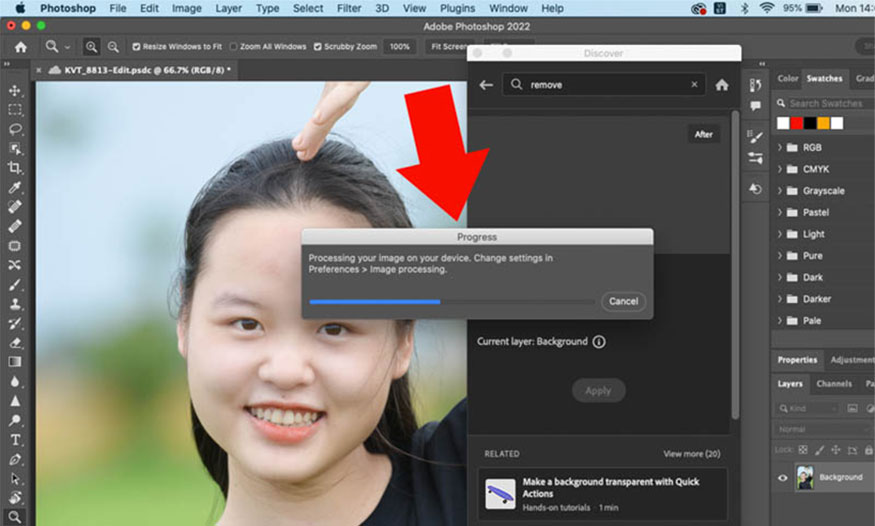
You can see that Photoshop uses CPU and GPU to separate hair, so you don't need to do too much. Instead, just wait for Photoshop to return the result.
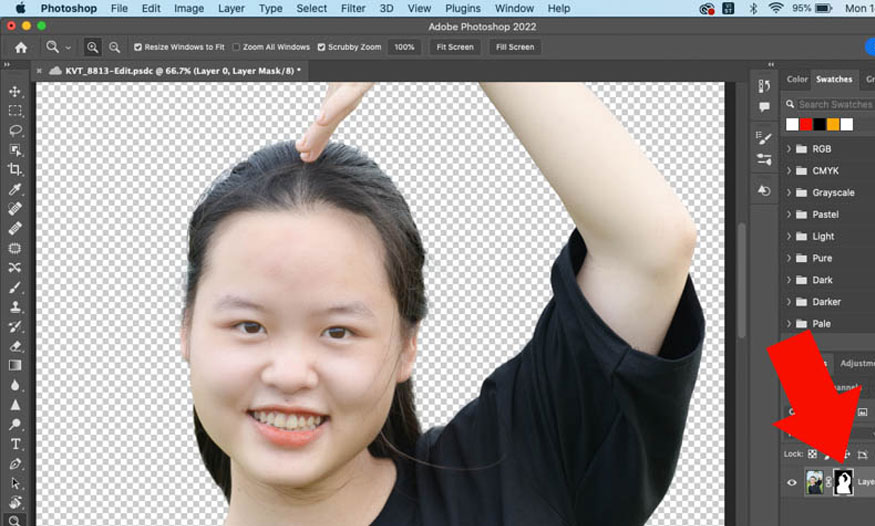
This is an extremely quick way to separate hair, saving maximum time for the editor.
5. Separate hair using select and mask
Create selection:
To create a selection you need to proceed in 2 ways as follows:
Method 1: Use the Quick Selection Tool to create a selection quickly. Just select the Quick Selection Tool (or press the shortcut key W) and apply it to the areas you want to select. For unwanted selections, just press and hold the Alt key, and apply to delete the selection.
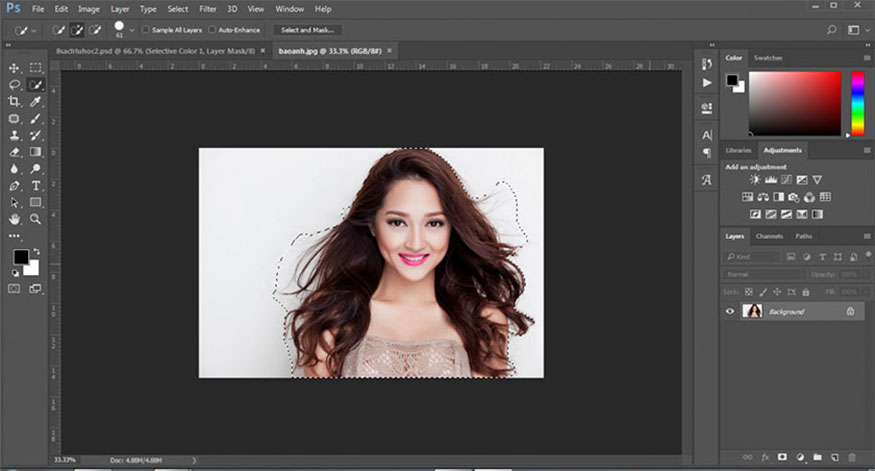
Method 2: Use the Pen Tool to create a selection by drawing a Path around the subject you want to select, including the hair with the Anchor Points of the Pen Tool. Then press Ctrl + Enter to create a selection.
Hairline treatment:
To handle the hair edges, you can use the “Refine Edge” selection. For Photoshop CC 2017 and later, this feature has been upgraded to Select and Mask. Therefore, our following instructions will use the Select and Mask tool instead of Refine Edge.
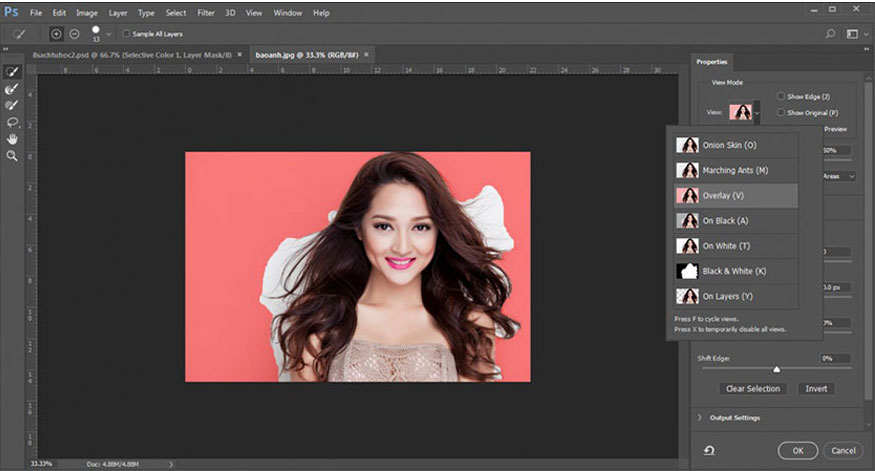
After getting the selection, click on Select and Mask on the Option bar and a new working window will appear. Click on the “View” thumbnail to change the view mode, making it easier to operate.
Look to the left and you will see the toolbar replaced by 6 tools, you need to pay attention to the following 2 tools:
- Quick Selection Tool: to paint the border area, helping to retrieve the selection more thoroughly and carefully.
- Refine Edge Brush Tool: To precisely adjust the transition area between selected and unselected areas. Paint on fine hair and multi-strand hair so that the software can select these hair parts to remove the background.
Looking at the right, pay attention to the following features:
- Smooth: To make the selection softer, the higher the parameter, the softer the selection will be without being rough like when we take the selection.
- Feather: makes the edge of the selection softer, the higher the parameter, the wider the edge of the selection will be away from the hair area.
- Contrast: This bar shows the contrast of the selected area. You will see it clearly when you drag the feather parameter up.
- Shift Edge: Is the displacement of the selected area. The higher this parameter is, the more surrounding areas the software will select and vice versa.
Separate the image from the background
After selecting the peel area, scroll down to the Output section => select New Layer with Layer Mask => OK.
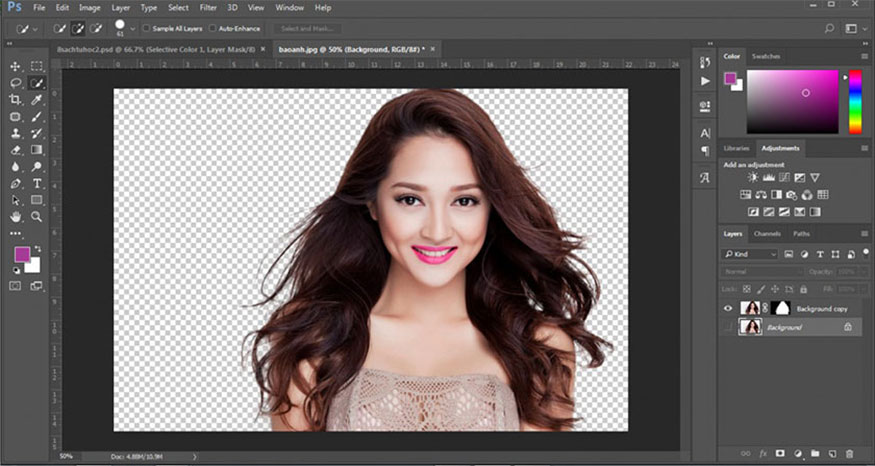
The result is a Layer with a Layer Mask when placed on a dark background will reveal a small selection around the hair that has not been completely removed. In this case, you can use a black Brush to paint on the Layer Mask to help complete the background separation.
6. Separate hair with channel
To separate hair with channel, follow these steps:
Step 1: Open Photoshop => Go to File => Open and select the photo you want to edit and crop.
Step 2: Duplicate the photo: Duplicate this photo by clicking on Layer => Duplicate to switch to Channel mode.
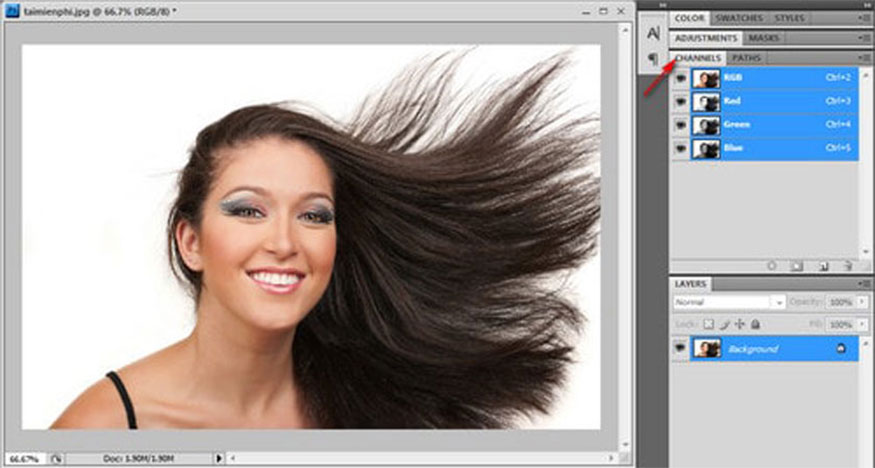
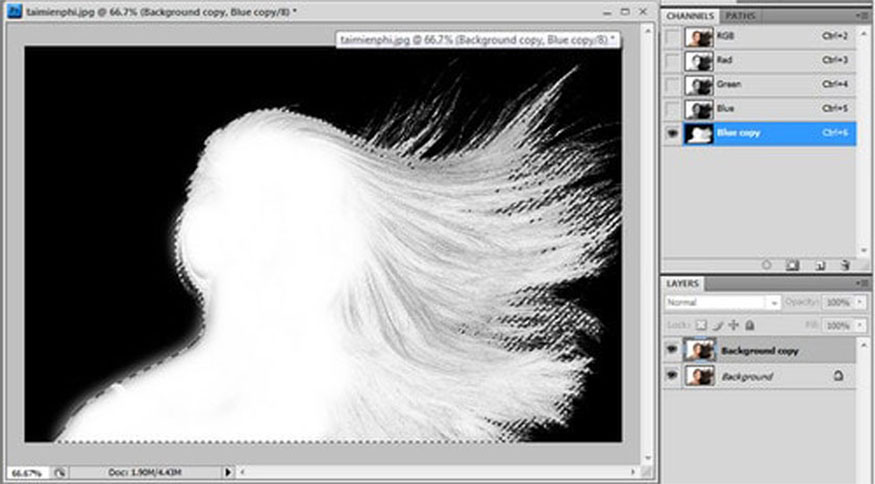
Step 3: Select the Channel of the photo: Click on each available Channel, and select the Channel that clearly shows the contrast between the character in the photo and the Background. With the edited photo in the example we made, it is clear that the Blue mode has the most obvious contrast.
Step 4: Duplicate Channel: Right-click on Blue mode => Duplicate Channels to duplicate Channels.
Step 5: Clarify the contrast: In the newly copied Channel to clarify the contrast of the character and Background, use 1 of the following 2 ways to adjust the contrast of the image:
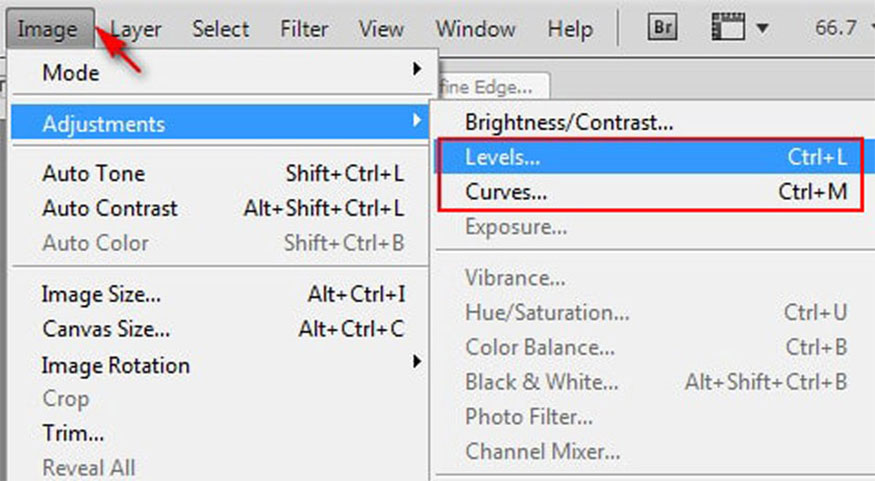
- Levels (Ctrl +L): Go to Image => select Adjustments => select Levels.
- Curves (Ctrl + M): Go to Image => select Adjustments => select Curves to edit. To quickly increase contrast, select White Point, and if you want to invert the Channel color, press the shortcut key Ctrl + I.
Step 6: Using Brush: To paint the object white, hold down the Ctrl key on the keyboard, then select the Thumbnail image of the Blue copy Channel.
Step 7: Select RGB Channel mode again, go to the layer area to duplicate the layer you just worked on.
With the 7 steps above, we have separated the image with the character's hair quickly and effectively.
7. Separate hair with Refine Edge
First, you need to open the photo you want to separate, then use the Quick Selection tool to create a selection. You don't need to select the exact hair part, but you shouldn't select too much outside the hairline.
Next, select Select => Refine Edge. In View Mode, select On Black or other modes for easy viewing.
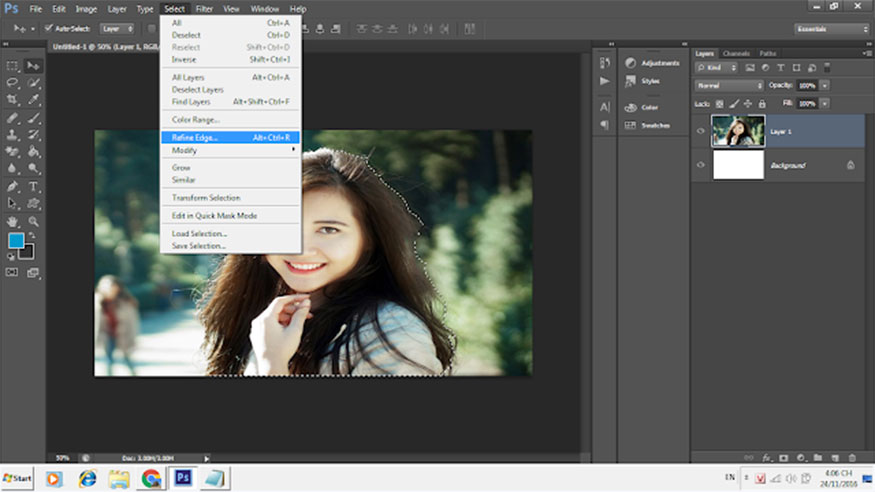
Hover the mouse over the border around the hair Refine Edge, select other edges of the hair that have not been selected yet. After selecting all the hair border areas, click Output => New Layer to separate the image into a new Layer.
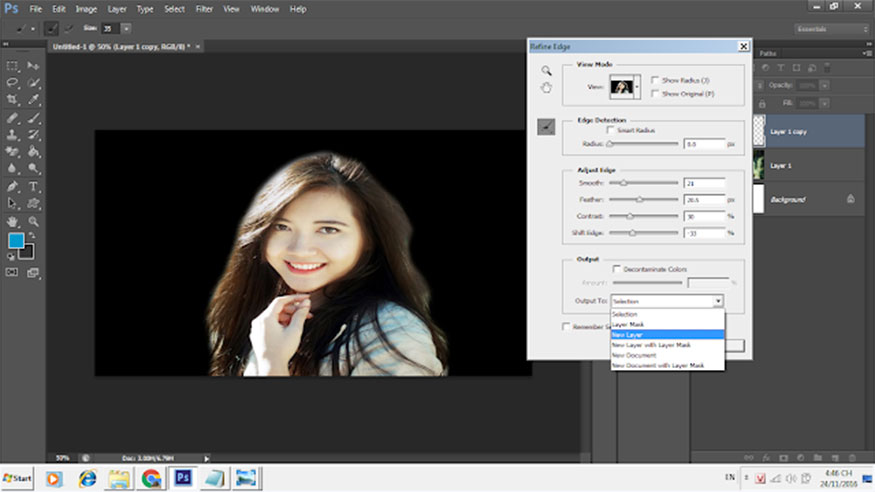
We get the following results:
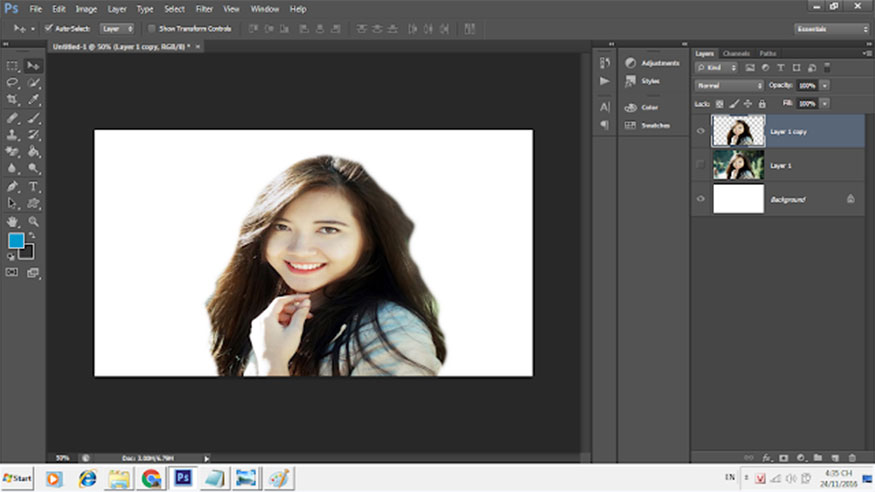
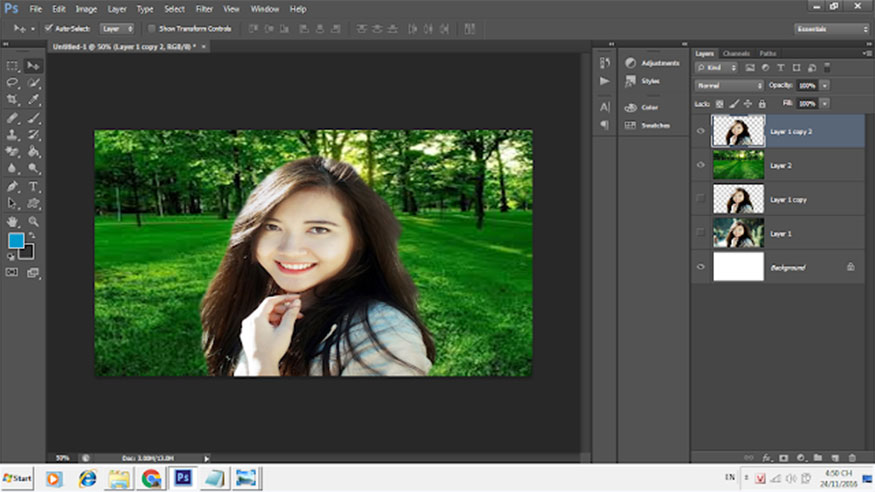
Above are the most detailed instructions on how to separate hair in Photoshop simply and effectively. SaDesign wishes you success!
Installation and support contact information:
🏡 SADESIGN Software Company Limited
📨 Email: phamvansa@gmail.com
🌍 Website: https://sadesign.ai


.png)


