Best Selling Products
How to create Spiderman movie text effect in Photoshop
Nội dung
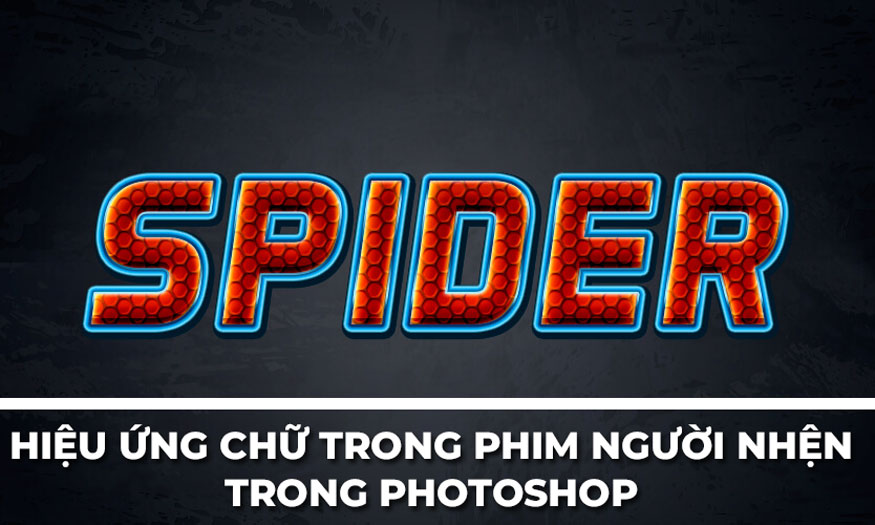
Spiderman style text will be characterized by layered spider webs, which makes your design much more unique. We can create text in this style by combining many different tools in Photoshop. Let's refer to SaDesign to create Spiderman movie text effects in Photoshop right after this.

1. Create a background for the Spiderman movie text effect in Photoshop
First of all, in this tutorial, we need to use Dark Wall and Spidy pattern. Download it to your computer for future use.
To get the Spiderman movie text effect in Photoshop, we first need to have a satisfactory background.
Step 1: Create a new document in Photoshop with size 850 x 500 px with Resolution 72 Pixel/Inch and Background Contents as White.
.jpg)
Step 2: Double click on the Background layer in the Layers panel to unlock it. Now right click on this unlocked layer to open the Layer Style panel.
In this panel, select Gradient Overlay and set the following parameters:
Blend Mode: Linear Burn
Opacity: 20%
Click the Gradient box to create a color transition effect using the colors White on the left and Black on the right.
Style: Radial
Angle: 0°
Tick Dither.
.jpg)
Step 3: Still in the Layer Style panel, select Pattern Overlay and set the following parameters:
Select the Pattern box and choose the Dark Wall pattern.
Opacity: 100%
Scale: 100%
.jpg)
This will create a dark textured background with a fade effect as shown in the image below.
.jpg)
2. Create Spiderman movie text effect in Photoshop
Once we have a satisfactory background, we will move on to adding text to the design.
Step 1: Select the Type Tool on the toolbar and select the Aero Matics font. Set the Font Style to Bold Italic and Font Size around 200 pt. Then write whatever you want, here I wrote "SPIDER" in capital letters.
.jpg)
Step 2: Select your text layer in the Layers panel, right-click on the layer and select Blending Options from the menu.
In the dialog box that appears, select Pattern Overlay and then set the following settings:
Click the Pattern box and select Spidy Pattern.
Scale: 25%
This will add a red spider web effect.
.jpg)
Step 3: Still in the Layer Style dialog box, select Gradient Overlay with the following settings:
Blend Mode: Multiply
Opacity: 14%
Click the Gradient box, create a gradient with the left color stop being Black and the right color stop being White.
Style: Linear
Angle: -90°
Tick Dither.
.jpg)
Step 4: Continue to select Color Overlay and set the following settings:
Blend Mode: Multiply
Click the Color box and select the color code #e10505.
Opacity: 100%
Both the color overlay and the gradient overlay will be slightly darkened.
.jpg)
Step 5: Add Satin with the following settings:
Blend Mode: Linear Dodge with color code #ffeb0d
Opacity: 100%
Angle: 0°
Distance: 4 px
Size: 16 px
Uncheck the Invert box.
Satin helps to add a golden and orange glow to the spider web effect texture.
.jpg)
Step 6: Add an Outer Glow effect with the following settings:
Blend Mode: Normal
Opacity: 100%
Technique: Precise
Spread: 0%
Size: 8 px
Range: 55%
Jitter: 0 %
Select the options button next to the gradient and edit the Gradient Stops
The first color stop selects the color code #111111 and Location at 21%.
The second color stop selects the color code #177ece and Location at 48%.
The 3rd color stop selects the color code #9adaff and Location at 73%.
This will add a blue band around the text with a dark blue center.
.jpg)
Step 7: Add an Inner Shadow with the following settings:
Blend Mode: Linear Burn with Color #010101
Opacity: 30%
Uncheck Use Global Light before setting Angle: -90°.
Distance: 6 px
Choke: 0%
Size: 0 px
Inner shadow gives a 3D shadow feel to the typography.
.jpg)
Step 8: Add an Inner Glow with the following settings:
Blend Mode: Screen
Opacity: 71%
Choose Color #ffeb0d
Technique: Softer
Source: Edge
Choke: 0%
Size: 5 px
Inner Glow adds a thin yellow stroke around the texture.
.jpg)
Step 9: Add a Stroke with the following settings:
Size: 2 px
Position: Outside
Blend Mode: Normal
Opacity: 100%
Fill Type: Gradient
Style: Linear
Angle: 90°
Select the Dither box.
Set the Gradient with 5 color stops as follows:
The first color stop selects the color code #003669 and Location at 12%.
The first color stop selects the color code #bcebff and Location at 22%.
The first color stop selects the color code #003669 and Location at 52%.
The first color stop selects the color code #bcebff and Location at 83%.
The first color stop selects the color code #003669 and Location at 96%.
Stroke will add shiny blue lines around the text.
.jpg)
Step 10: Add Bevel & Emboss with the following settings:
Style: Inner Bevel
Technique: Smooth
Depth: 100%
Direction: Up
Size: 18 px
Uncheck the Use Global Light box before setting Angle: 110° and Altitude: 30°
Highlight Mode: Linear Dodge (Add) with color code #ffc000 and Opacity: 26%
Shadow Mode: Linear Burn with color code #0a2a40 and Opacity: 20%
.jpg)
Step 11: Add Texture with the following settings:
Select the Pattern box and select Spidy pattern.
Scale: 25%
Depth: +120%
Textured inner bevel adds depth to the red spider web pattern.
.jpg)
Step 12: The final step, add a Drop Shadow with the following settings:
Blend Mode: Normal with color code #001e2d
Opacity: 100%
Uncheck Use Global Light before setting Angle: 120°
Distance: 3 px
Spread: 100%
Size: 11 px
.jpg)
So you have finished creating the Spiderman movie text effect in Photoshop. The text has a spider web layer with a characteristic red color, extremely eye-catching.
Above is a summary of the steps to create Spiderman movie text effects in Photoshop. You can also customize the parameters according to the appropriate background to get the most satisfactory results.
.jpg)


