Best Selling Products
Autodesk All App Account Copyright
120 USD
Upgrade Genuine Office 365
49 USD
Genuine Adobe Illustrator account
99 USD
Adobe Photoshop Copyright - Full App
120 USD

Upgrade Duolingo Super
29 USD
Capcut Pro 1 Year
39 USD
Genuine Cheap Canva Pro
39 USD
Upgrade genuine Capture One account
120 USD
Copyright Adobe Lightroom Account
59 USD
Adobe Premiere Pro Account
99 USD
Plugin Retouch4me
69 USD

ChatGPT Plus Account (GPT-4)
16 USD
Windows 10 & 11 Pro Key
36 USD

MidJourney Account
29 USD

Freepik Premium Account
59 USD
How to edit and combine videos beautifully in CapCut, creating impressive clips in just a few minutes.
Nội dung
- 1. What is CapCut?
- 2. Why should you use CapCut to edit videos?
- 3. Detailed instructions on how to cut and merge videos using CapCut
- 3.1. Step 1: Create a project and add the video to be edited.
- 3.2. Step 2: Cut out unnecessary video segments
- 3.3. Step 3: Combine the video clips in the appropriate sequence.
- 3.4. Step 4: Add transition effects between video clips
- 3.5. Step 5: Insert background music and adjust the sound.
- 3.6. Step 6: Add text, stickers, and effects to complete the video.
- 3.7. Step 7: Review and export the complete video
- 4. Tips for editing and splicing videos in CapCut to make them look more appealing and professional.
- 5. Sadesign: A reliable and dedicated CapCut upgrade service provider.
- 6. Conclusion
A captivating video doesn''t necessarily need to be shot with professional equipment or go through a complicated post-production process. Sometimes, simply knowing how to remove unnecessary footage, combine shots effectively, and add some suitable sound is enough to create an engaging clip. With CapCut, video editing becomes simpler thanks to its intuitive interface and many convenient editing tools. Whether you want to create a travel video, a personal vlog, a sales clip, or content for TikTok, you can complete it yourself in your own style. Let''s explore how to edit videos using CapCut in detail with the guide below!

1. What is CapCut?
CapCut is a popular video editing application thanks to its flexible image processing capabilities and relatively easy-to-learn interface. The application supports both phones and computers, allowing users to perform many operations from basic ones like cutting, merging, and splitting videos to advanced ones like adding effects, adjusting colors, creating subtitles, and combining audio. Therefore, you don't need extensive video editing experience to transform disparate footage into a complete video. A great feature of CapCut is its intuitively arranged tools, making it easy for users to find the necessary features during editing. You can take advantage of outstanding features such as:
-
Video editing and merging: Remove unnecessary footage and combine multiple video clips into a seamless piece of content.
-
Audio editing: Add background music, sound effects, or adjust the volume for each scene.
-
Add text and stickers: Highlight information and create emphasis on important moments.
-
Adjust the speed: Fast forward or slow down the video to create an interesting rhythm.
-
Filters and effects: Change the color, lighting, and style of the image according to your creative ideas.
-
AI tools: Support various operations such as automatic subtitle generation, image editing, and rapid content processing.

2. Why should you use CapCut to edit videos?
It's no coincidence that CapCut has become a familiar choice for many content creators. This application effectively meets the needs of everyday video editing, from short clips shared on social media to longer videos for learning or work. Instead of having to use many different software programs, you can perform most of the post-production work right on a single interface. Below are the advantages that make CapCut so popular:
-
Simple operation: Video clips are displayed on a timeline, making it easy to view, select, and rearrange the order of the footage.
-
Flexible video merging: Multiple video clips with different content, durations, and camera angles can be combined.
-
Multiple transition effects: These help create a smooth connection between segments, reducing the feeling of disjointedness.
-
Rich resource library: Provides music, stickers, fonts, filters, and effects to refresh your content.
-
Video export support: Allows customization of parameters such as resolution and frame rate depending on the version and device.

3. Detailed instructions on how to cut and merge videos using CapCut
To create a complete video, you should start by selecting suitable footage, then remove the unnecessary parts and rearrange them in a logical order. The following steps are performed on the mobile version of CapCut. The names of some tools may vary depending on the application version.
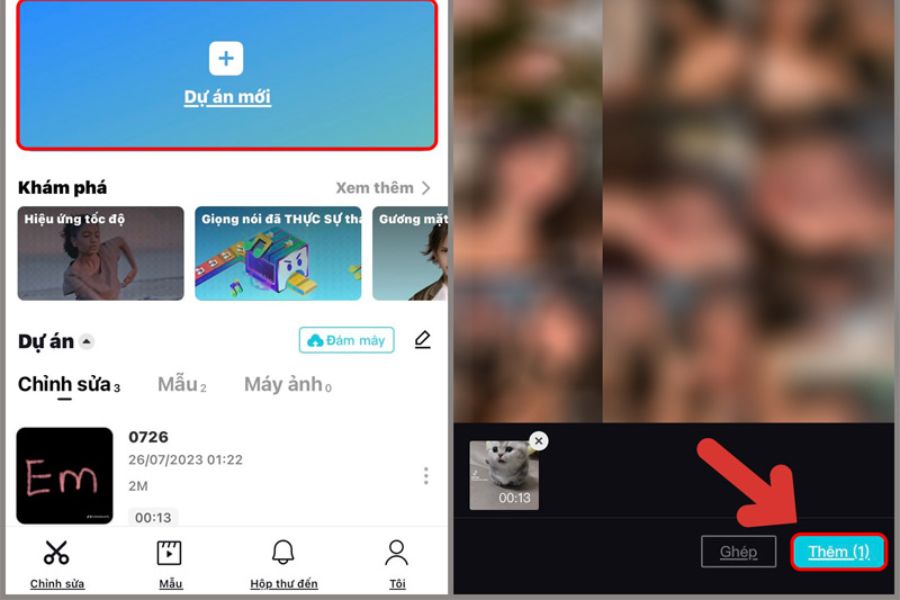
3.1. Step 1: Create a project and add the video to be edited.
First, prepare the video clips you want to use from your phone's library. You should choose clips with relevant content to make the merging process smoother.
-
Open the CapCut app on your phone.
-
On the main interface, select New project .
-
Find and select the videos you want to include in the edit.
-
Click Add to add the videos to the Timeline.
Once complete, the selected videos will appear in order on the timeline. You can drag the timeline slider to view each segment, check the content, and identify areas that need editing.
3.2. Step 2: Cut out unnecessary video segments
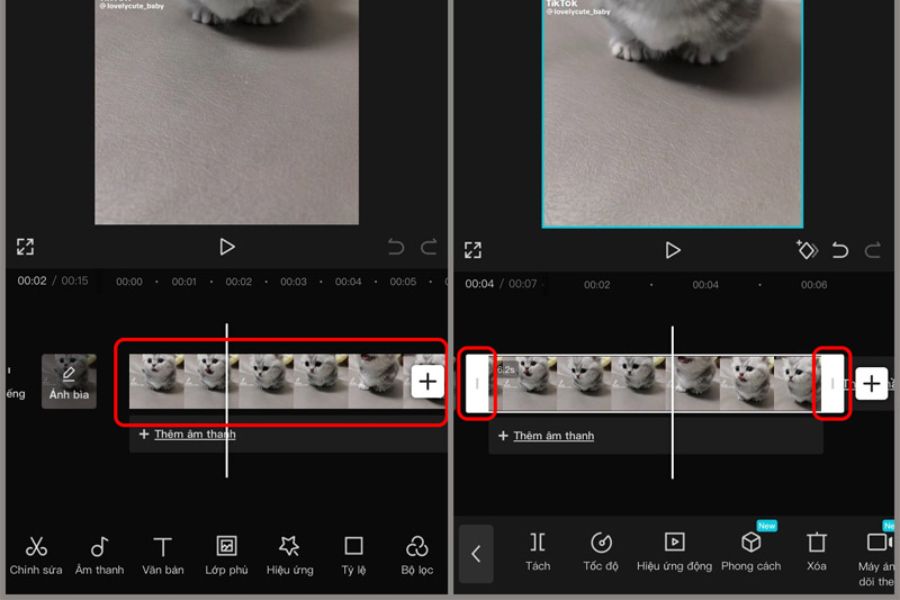
This is a crucial step in making the video cleaner and more focused. Instead of keeping all the original footage, you should remove shaky, blurry, or unnecessary scenes that don't contribute much to the content.
-
Tap the video segment you want to edit on the Timeline.
-
Move the white line to the desired starting position for cutting.
-
Select Split to separate the video into two distinct parts.
-
Continue moving the white line to the desired end point and repeat the same division process.
-
Select the extra video clip and then press Delete .
Besides splitting the video into smaller segments, you can also drag the two edges of the video to shorten the beginning or end. After each edit, press Play to review the result. Continuously checking will help you avoid cutting out important details or causing the content to be abruptly interrupted.
3.3. Step 3: Combine the video clips in the appropriate sequence.
After removing unnecessary scenes, arrange the remaining footage into a story with a clear beginning, middle, and end. A well-combined video will be easier for viewers to follow and will create a professional feel, even if the initial material consists of simple clips.
-
Press and hold the video segment you want to move to your Timeline.
-
Drag the video clip to the left or right to rearrange its order.
-
Adjust the scenes one by one so that the content is coherent.
-
Press Play to watch the entire video and check the transition points.
You should prioritize placing the most engaging scenes at the beginning to grab attention. Supporting scenes can be arranged in the middle, while the ending should provide a sense of completeness to the entire content.
3.4. Step 4: Add transition effects between video clips
When combining multiple individual videos, viewers may sometimes perceive a rather abrupt change between segments. In this case, transition effects help to connect the images more naturally, while also adding emphasis to the clip.
-
Find the transition icon located between the two video segments on your Timeline.
-
Click the icon to open the list of effects.
-
Choose a suitable transition style such as fade, slide, zoom, or other effects.
-
Adjust the transition duration if the app supports it.
-
Press confirm and review the results.
Not all videos need excessive effects. For travel, lifestyle, or educational clips, you should prioritize smooth transitions to avoid visual clutter. For fast-paced videos, some striking transition effects can make the content more dynamic.
3.5. Step 5: Insert background music and adjust the sound.
Sound is a key element in creating emotion in a video. The right music can make an ordinary scene more interesting and help connect different segments naturally.
-
Select the Audio option from the toolbar.
-
Tap on Sounds to select from available music or use an audio file from your device.
-
Choose music that matches the video's theme and add it to the timeline.
-
Drag both ends of the audio clip to adjust the duration.
-
Adjust the volume and use the gradual increase or decrease effect if needed.
If the video includes dialogue, you should balance the background music volume so that it doesn't interfere with the ability to clearly hear the content. For product introductions or tutorials, clear audio is often more important than using overly loud music.
3.6. Step 6: Add text, stickers, and effects to complete the video.
After completing the editing and audio, you can further decorate your video to give it a unique touch. CapCut offers a variety of fonts, stickers, and effects to make your content more visually appealing without requiring complicated operations.
-
Select Text to add a title, caption, or other necessary information.
-
Adjust the font, size, color, and display position.
-
Access the Sticker section to choose a suitable decoration.
-
Use Effects to highlight important scenes.
-
Review the appearance and end times of each element on the Timeline.
You should prioritize details that are truly useful for the content. For example, travel videos can use text to indicate place names, while instructional clips should include annotations to help viewers easily grasp the information. A balanced combination will make the video visually appealing without feeling overwhelming.
3.7. Step 7: Review and export the complete video
Before saving the video, don't skip the final check. This is the perfect time to spot minor errors such as out-of-sync footage, mismatched audio, text appearing too quickly, or inappropriate transition effects.
-
Press Play to watch the entire video from beginning to end.
-
Check the order of the scenes and the video transitions.
-
Adjust the audio, text, and effects as needed.
-
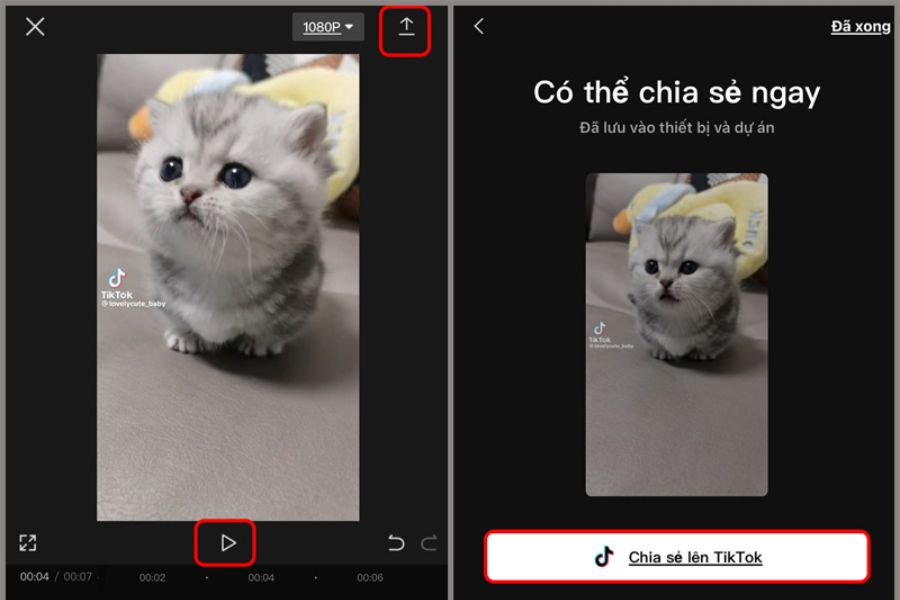
Tap the Export icon in the upper right corner of the screen.
-
Choose the appropriate resolution and frame rate.
-
Wait for CapCut to process and save the video to your device.
After successful export, you can upload the video to TikTok, Facebook, Instagram, or YouTube. Choose an aspect ratio suitable for the uploading platform to ensure the image displays well and to avoid content being cropped.
4. Tips for editing and splicing videos in CapCut to make them look more appealing and professional.
Knowing how to use the tools is the first step, but to create a truly engaging video, you also need to pay attention to storytelling and visual arrangement. The following tips will help make the editing process more effective:
-
Define the content before editing: Visualize what the video will convey to select appropriate footage, avoiding splicing together too many unrelated segments.
-
Make an impact right from the start: Use beautiful shots, an interesting question, or a short title to keep viewers engaged.
-
Synchronizing video transitions with music: For entertainment or travel clips, synchronizing scene transitions with the rhythm of the music creates a captivating effect.
-
Maintain color consistency: Avoid using too many different filters, as this can make the footage look inconsistent.
-
Avoid overusing effects: Only add transitions, stickers, or effects where absolutely necessary.
-
Choose the appropriate aspect ratio: TikTok and Reels videos typically use a 9:16 vertical ratio, while regular YouTube videos are better suited to a 16:9 horizontal ratio.
-
Check the audio quality: Ensure that the dialogue is not drowned out by the background music and that the volume is relatively consistent across different segments.
These seemingly small adjustments can make a significant difference. By knowing how to combine visuals, sound, and rhythm effectively, you can easily create videos with your own unique style without spending too much time on post-production.
5. Sadesign: A reliable and dedicated CapCut upgrade service provider.
If you frequently use CapCut to edit videos for work, study, or content creation, exploring suitable upgrade packages is also worthwhile. Advanced features can give you access to more resources and editing tools, allowing you to be more proactive when working on video projects.
At Sadesign, users can explore our CapCut upgrade service at an affordable price, with an easy-to-understand consultation process and dedicated support throughout the usage period. Our support team is ready to answer any questions related to the service package, helping you choose the option that best suits your needs.
-
Reasonable cost: There are many options to consider depending on your needs.
-
Clear consultation: Receive detailed information about the upgrade package before making a choice.
-
Dedicated support: There are support channels available for troubleshooting during use.
-
Save time: Easily find and choose services without spending a lot of effort searching.
If you want to explore more video editing tools and optimize your content creation experience, you can check out Sadesign's CapCut upgrade service for specific advice.
6. Conclusion
Editing videos in CapCut isn't too complicated, even if you've never edited before. Simply follow these steps: select videos, cut out unnecessary scenes, rearrange the order, add transitions, and combine audio. You can create a visually appealing clip in a short amount of time. Don't hesitate to experiment with new combinations to find the style that suits you best. Hopefully, these instructions will help you confidently create more impressive and interesting videos with CapCut!











VIP Products

Best Selling Products
Autodesk All App Account Copyright
120 USD
Upgrade Genuine Office 365
49 USD
Genuine Adobe Illustrator account
99 USD
Adobe Photoshop Copyright - Full App
120 USD
Upgrade Duolingo Super
29 USD
Capcut Pro 1 Year
39 USD
Genuine Cheap Canva Pro
39 USD
Upgrade genuine Capture One account
120 USD
Copyright Adobe Lightroom Account
59 USD
Adobe Premiere Pro Account
99 USD
Plugin Retouch4me
69 USD
ChatGPT Plus Account (GPT-4)
16 USD
Windows 10 & 11 Pro Key
36 USD
MidJourney Account
29 USD
Freepik Premium Account
59 USD