Best Selling Products

Adobe Photoshop Copyright - Full App
120 USD

MidJourney Account
29 USD

Autodesk All App Account Copyright
120 USD

Freepik Premium Account
59 USD

Capcut Pro 1 Year
39 USD

Genuine Cheap Canva Pro
39 USD

Windows 10 & 11 Pro Key
36 USD

Adobe Premiere Pro Account
99 USD

Upgrade Genuine Office 365
49 USD

Upgrade genuine Capture One account
120 USD

Genuine Adobe Illustrator account
99 USD

Upgrade Duolingo Super
29 USD

Copyright Adobe Lightroom Account
59 USD

Plugin Retouch4me
69 USD

ChatGPT Plus Account (GPT-4)
16 USD
How to enable Dropbox Online Only: A smart storage solution for Windows and Mac
Nội dung
Dropbox offers several ways for users to save hard drive space while still having full access to their data in the cloud.

1. Learn about Dropbox Files Online Only
Many people want to switch their files to Online Only mode . This way, the data is still fully stored on Dropbox Cloud but no longer takes up space on the computer's hard drive.
When needed, users only require an internet connection to open or download files. Once accessed, Dropbox will automatically download the necessary content to the device.
Using the Online Only mode offers several advantages, such as:
-
Significantly saves hard drive space.
-
You can still fully manage your files right within your Dropbox folder.
-
Easily access data anywhere with an internet connection.
-
Limit the amount of data you store locally.
-
Suitable for computers with low-capacity SSDs.
Dropbox currently offers several different methods for transferring files to an online-only state. Depending on your account type and needs, you can choose the most suitable solution.
2. How to switch Dropbox files to Online Only mode
If you want to free up space on your computer while keeping your data on Dropbox Cloud, you can use three different solutions.
Include:
-
Dropbox Smart Sync
-
Dropbox Selective Sync
-
Back up your data to Dropbox instead of syncing.
Below are detailed instructions for each method.
Method 1: Using Dropbox Smart Sync
Smart Sync is an advanced feature of the Dropbox desktop application. It's also the most convenient way to switch files or folders to Online Only mode.
Once activated, files remain visible in the Dropbox folder on the computer but take up almost no hard drive space. Dropbox only automatically downloads the content to the computer when the user opens a file.
Thanks to this, you still have the feeling that all your data is on your computer while in reality it's only stored on the cloud platform.
When should you use Smart Sync?
Smart Sync is particularly suitable for:
-
Businesses have large amounts of data.
-
Users often work with thousands of files.
-
The computer uses a small-capacity SSD.
-
People who need to access data from multiple devices.
Detailed instructions for using Smart Sync
Step 1: Access the Dropbox download page.
Download and install the Dropbox Desktop application on your computer if you haven't already.
After the installation is complete, log in using your Dropbox account.
Step 2: Open the Dropbox folder.
-
If using Windows, open File Explorer .
-
If you're using macOS, open Finder .
Then access your Dropbox folder.
Step 3: Change the file to Online Only.
Locate the file or folder you want to move.
Right-click on the file.
Move your mouse to the Smart Sync option .
Continue by selecting Online Only .
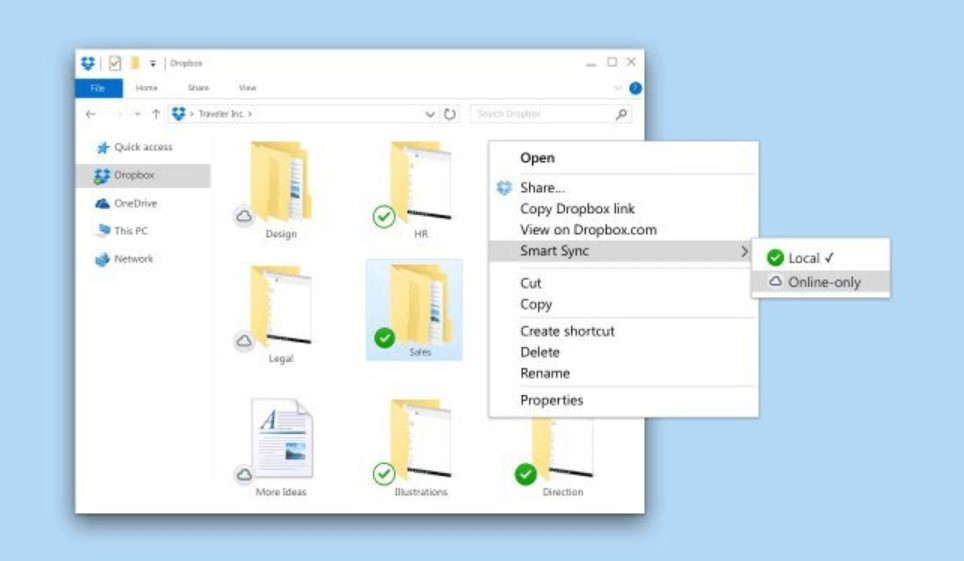
Dropbox will then remove the local backup from your computer while the data in the cloud remains intact.
From now on, the file will only be downloaded when you open it.
Switch back to local save mode.
If you want to save the file to your hard drive, the process is very simple.
Right-click on the file.
Select:
Smart Sync → Local
Dropbox will download the file to your computer and continue to save a local copy as before.
Method 2: Using Dropbox Selective Sync
If you're using a Dropbox Basic account or don't need to keep your entire folder on your computer, Selective Sync is a very useful option.
Unlike Smart Sync, which only transfers files online at a time, Selective Sync allows you to completely remove folders from your computer while keeping the data on Dropbox Cloud.
This is especially useful when you have many old project folders or documents that you rarely use.
How does Selective Sync work?
After deselecting a folder in Selective Sync:
-
The folder will no longer appear in Dropbox on your computer.
-
The data remains fully available on Dropbox Cloud.
-
You can still access it through the Dropbox website or other devices.
Detailed instructions for using Selective Sync
Step 1: Install Dropbox Desktop.
Log in to your Dropbox account.
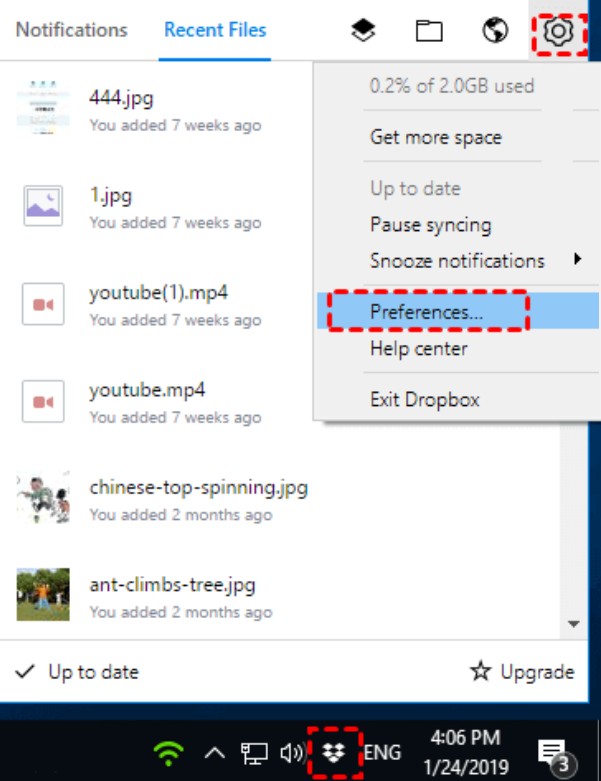
After successfully logging in, the Dropbox icon will appear on the taskbar (System Tray).
Step 2: Open Dropbox settings.
Click on the Dropbox icon.
Select the Gear icon in the upper right corner.
Continue by selecting Preferences .
Step 3: Open Selective Sync.
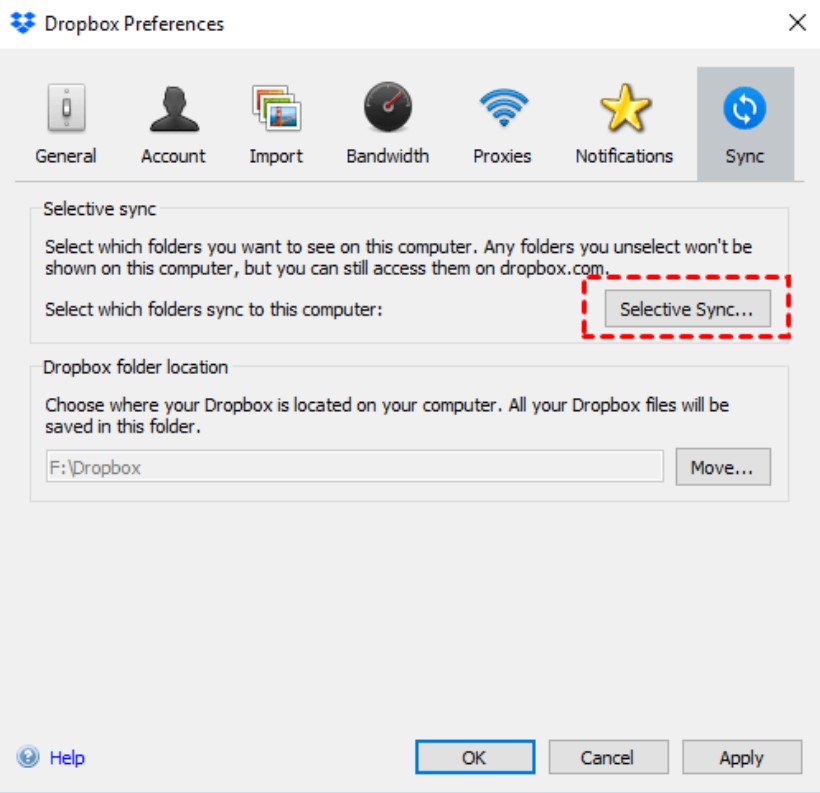
Select the Sync tab .
Press the Selective Sync… button.
Then press OK to continue.
Step 4: Deselect the folders.
A list of all Dropbox folders will appear.
Uncheck the boxes next to the folders you don't want to save files to on your computer.
Then click Update .
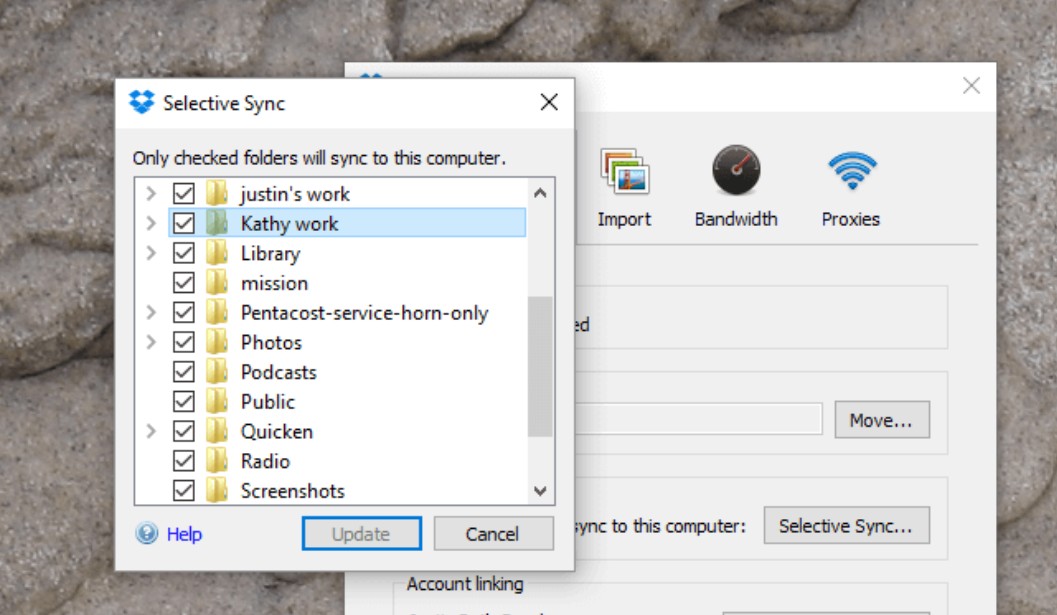
Dropbox will automatically delete these folders from your hard drive but will keep them in the cloud.
When you need to access it, simply log in to Dropbox on the web or turn syncing back on.
Method 3: Back up files to Dropbox instead of syncing.
Besides Smart Sync and Selective Sync, there is another method that ensures data only exists in the cloud.
That involves using backup software to back up data to Dropbox instead of syncing directly.
Unlike two-way synchronization, backup only creates one copy on Dropbox.
After the backup is complete, you can delete the data from your computer while the copy on Dropbox remains intact.
This is a suitable solution for those who want to completely free up hard drive space while still keeping their data secure in the cloud.
One of the commonly used tools is CBackup .
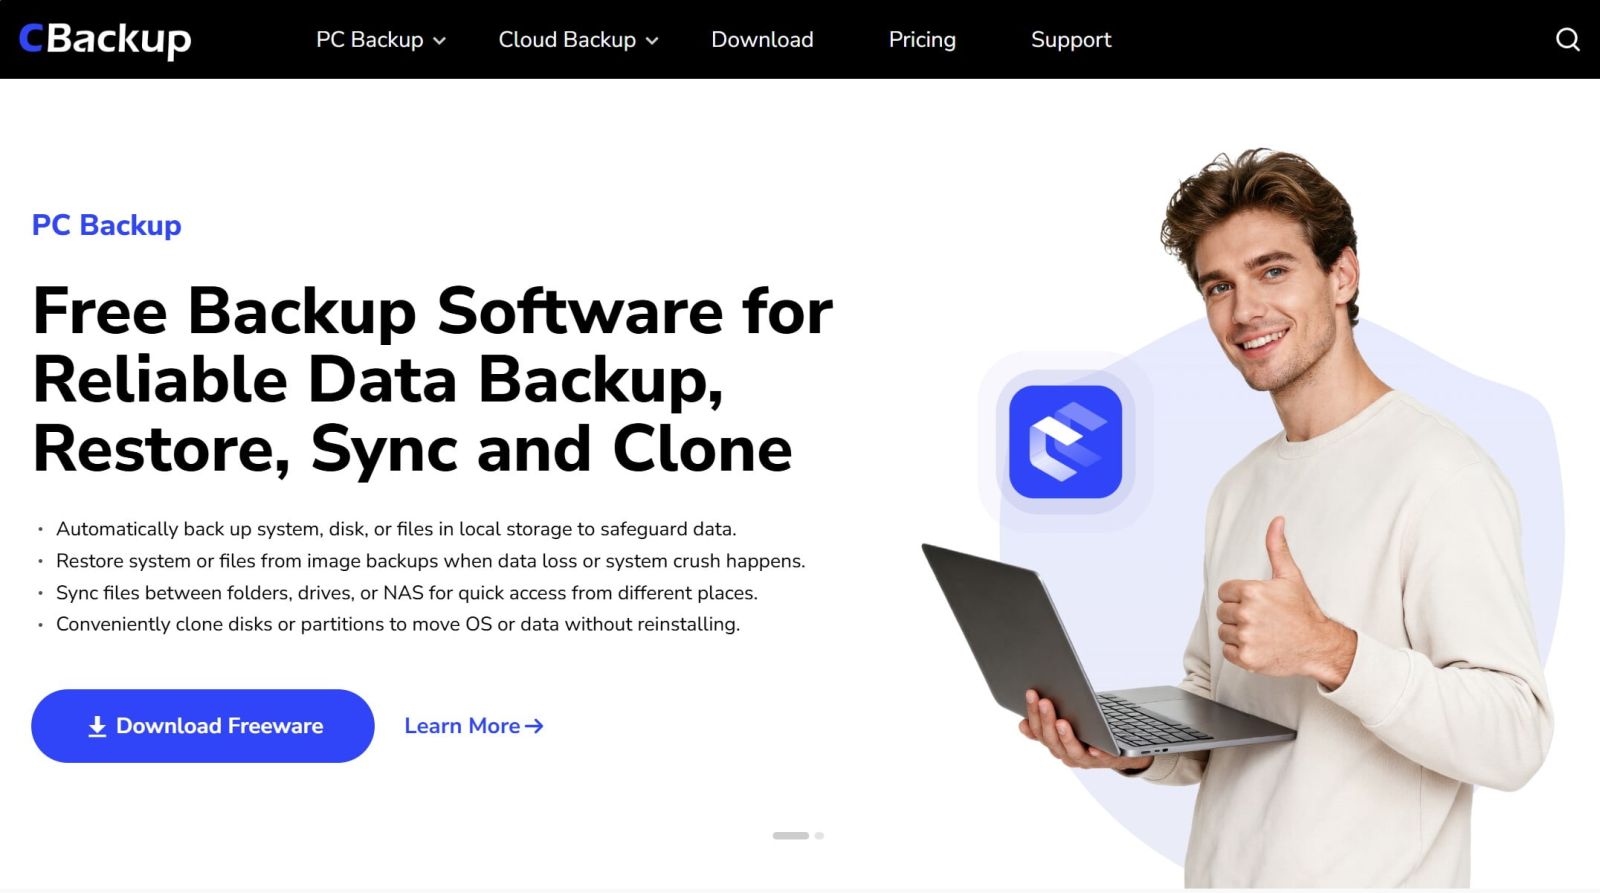
This software supports automatic data backup to various storage services such as:
-
Dropbox
-
Google Drive
-
OneDrive
-
Other cloud services
Detailed instructions on backing up to Dropbox using CBackup
Step 1: Download and install CBackup.
Launch the software.
Register for a CBackup account if you don't already have one.
Then log in.
Step 2: Connect to Dropbox.
In the main interface, select Storage .
Choose Dropbox .
Nhấn Authorize Now.
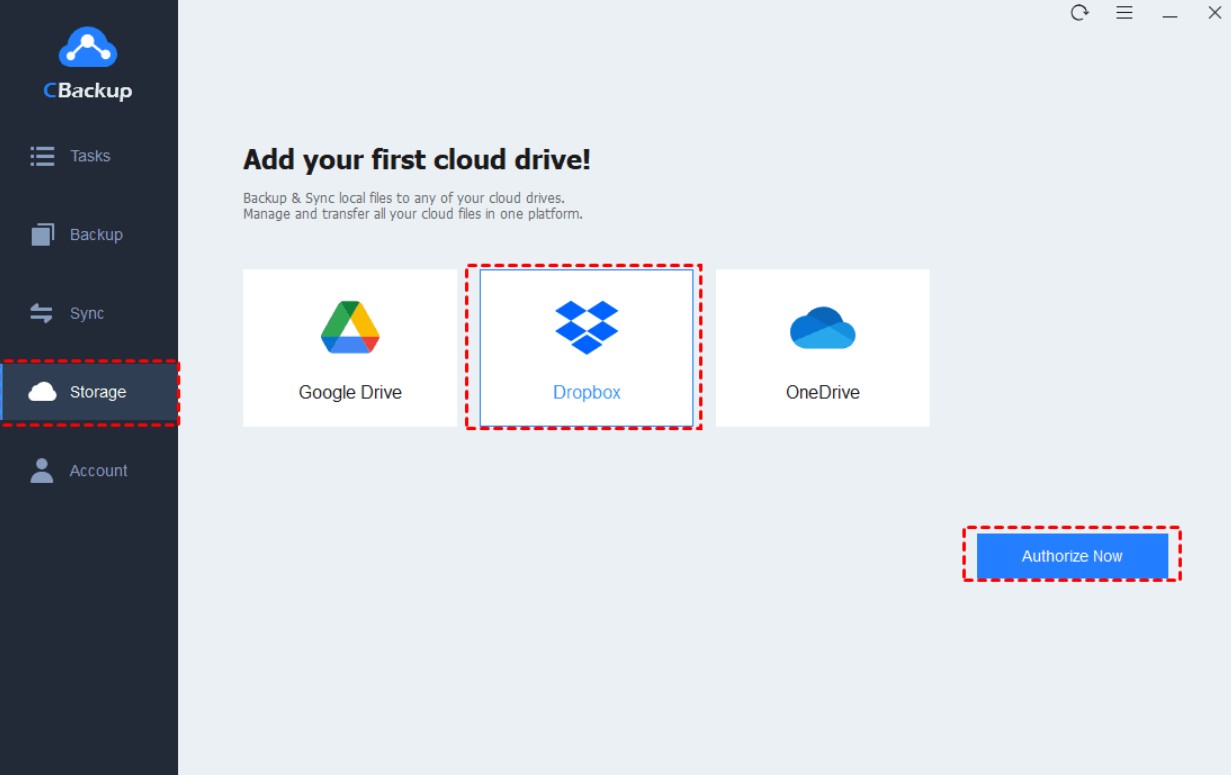
Follow the on-screen instructions to grant CBackup permission to access your Dropbox account.
Step 3: Create a backup task.
Select the Backup tab .
Nhấn Backup PC to Public Cloud.
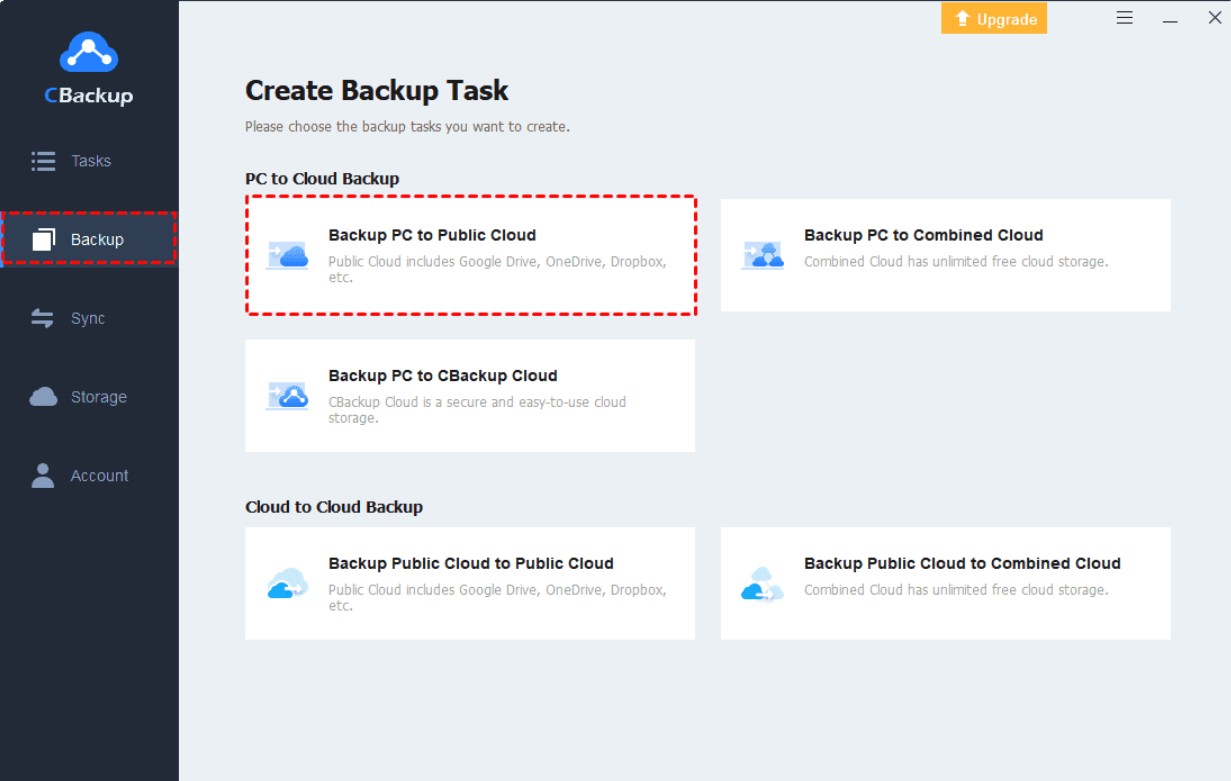
Step 4: Set up the task.
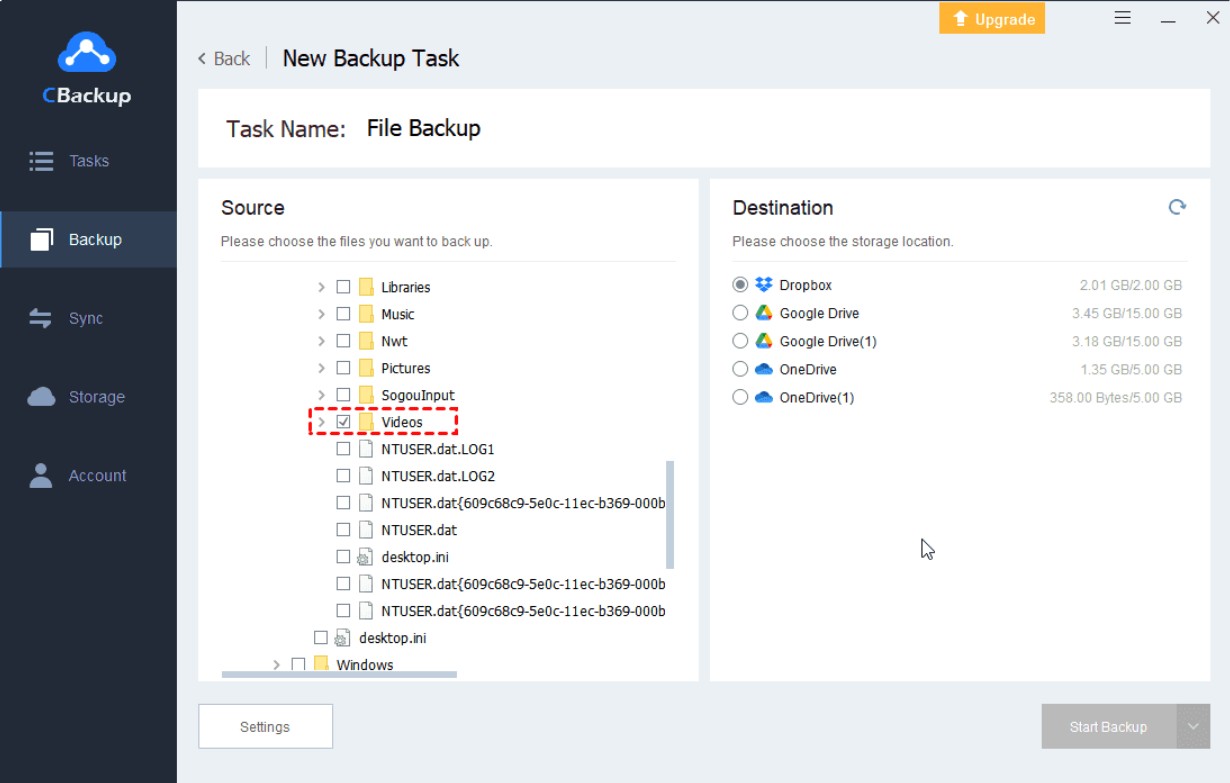
Enter a name for the backup task in the Task Name field .
Select the folders or files you want to back up.
For storage purposes, select Dropbox .
Set up automatic backups (recommended)
If you want your data to be backed up regularly:
Tap Settings at the bottom of the interface.
Check the box: Set a backup schedule for automated backup
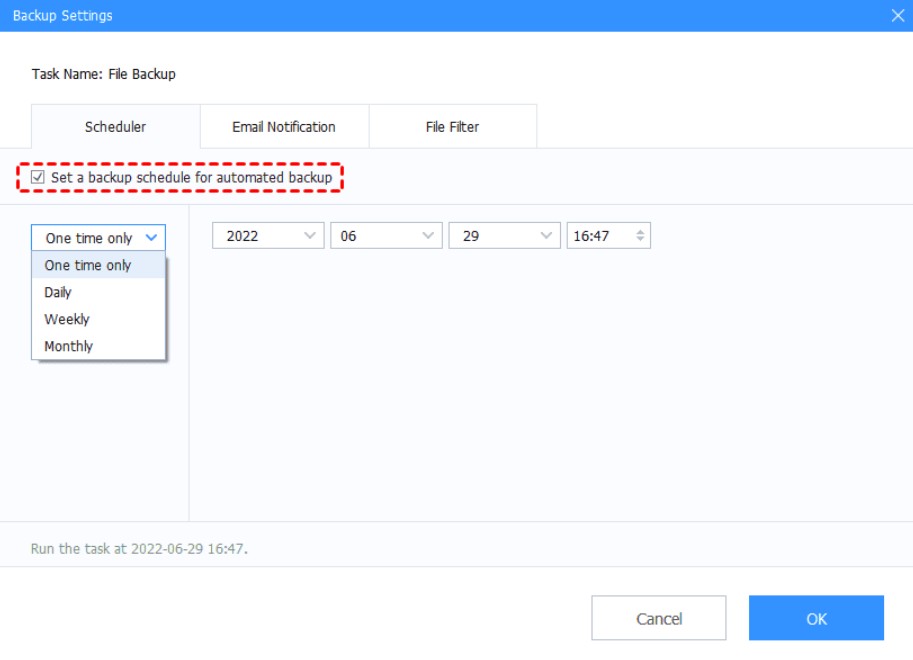
Choose the automatic backup schedule according to your needs.
Then press OK to save the settings.
Step 5: Begin the backup.
Double-check the entire configuration.
Press Start Backup .
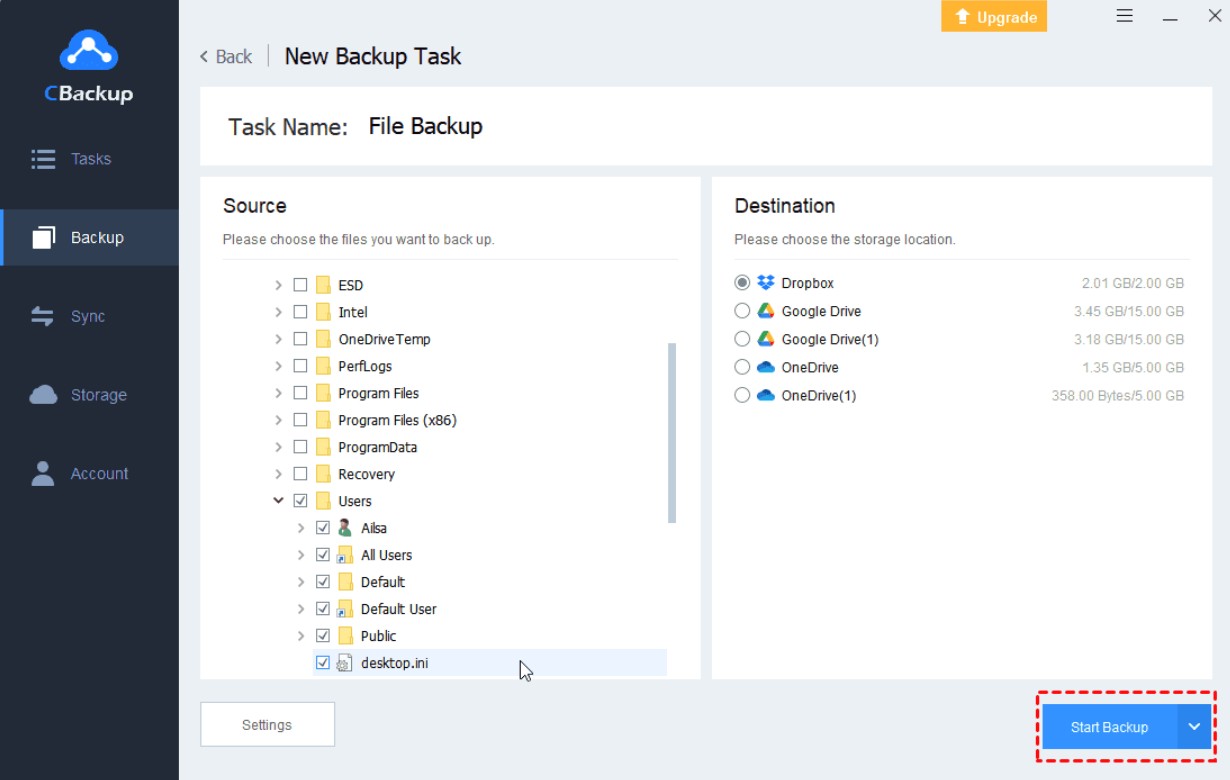
The backup process will be performed on Dropbox Cloud.
Step 6: Delete data on the computer.
After confirming that the data has been successfully backed up to Dropbox, you can delete any unnecessary local files.
At this point, the data only exists on Dropbox Cloud and no longer occupies hard drive space.
3. Which method should I choose?
All three solutions help reduce storage space on your computer, but each method is suitable for different needs.
Smart Sync is the optimal choice if you want to still see all the files in your Dropbox folder, but only load data when needed. This method provides the most convenient experience for Dropbox users who support this feature.
Selective Sync is suitable when you want to completely remove certain folders from your computer but still keep them on Dropbox Cloud. This method is especially useful for old projects or large folders that you rarely use.
Meanwhile, backing up using tools like CBackup is a solution for those who want to store data long-term in the cloud without needing two-way synchronization. After backing up, you can delete the original copy on your computer to free up space while ensuring your data is preserved on Dropbox.
The choice of method will depend on how you manage your data, the available hard drive space, and your file access needs during your workflow.
4. Conclusion
Switching Dropbox files to Online Only mode is one of the most effective ways to save hard drive space while ensuring your data is always available in the cloud. With Smart Sync , you can maintain your folder structure and only download files when needed. Selective Sync removes unnecessary folders from your computer while still securely storing them in Dropbox. Meanwhile, the CBackup backup method is suitable for those who want to store data long-term in the cloud without needing constant synchronization.
Whichever method you choose, it's crucial to always verify that the data has been successfully saved to Dropbox before deleting local files. By applying the correct method, you'll have a more organized storage space, efficiently utilize your hard drive capacity, and still easily access all your important documents from anywhere with just an internet connection.





















VIP Products








Best Selling Products
Adobe Photoshop Copyright - Full App
120 USD
MidJourney Account
29 USD
Autodesk All App Account Copyright
120 USD
Freepik Premium Account
59 USD
Capcut Pro 1 Year
39 USD
Genuine Cheap Canva Pro
39 USD
Windows 10 & 11 Pro Key
36 USD
Adobe Premiere Pro Account
99 USD
Upgrade Genuine Office 365
49 USD
Upgrade genuine Capture One account
120 USD
Genuine Adobe Illustrator account
99 USD
Upgrade Duolingo Super
29 USD
Copyright Adobe Lightroom Account
59 USD
Plugin Retouch4me
69 USD
ChatGPT Plus Account (GPT-4)
16 USD