Best Selling Products

Copyright Adobe Lightroom Account
59 USD

Windows 10 & 11 Pro Key
36 USD

Genuine Cheap Canva Pro
39 USD

Upgrade genuine Capture One account
120 USD

Upgrade Duolingo Super
29 USD

Plugin Retouch4me
69 USD

Adobe Premiere Pro Account
99 USD

Freepik Premium Account
59 USD

Upgrade Genuine Office 365
49 USD

Adobe Photoshop Copyright - Full App
120 USD

MidJourney Account
29 USD

Autodesk All App Account Copyright
120 USD

Genuine Adobe Illustrator account
99 USD

Capcut Pro 1 Year
39 USD

ChatGPT Plus Account (GPT-4)
16 USD
How To Merge a Beautiful Sky in Photoshop Add a Sunset To a Boring sky easily and Quickly
Nội dung
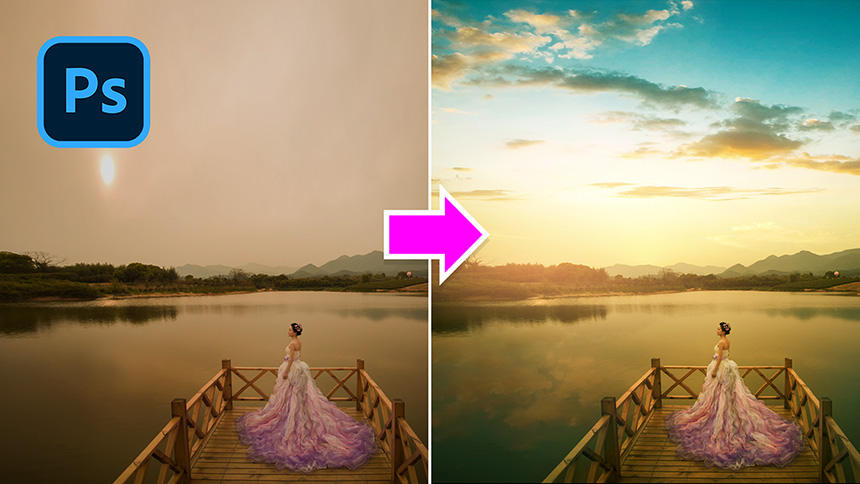
Heyyy, welcome back to our SaDesign channel, today I’ll show you how to how to merge a beautiful sky in Photoshop.
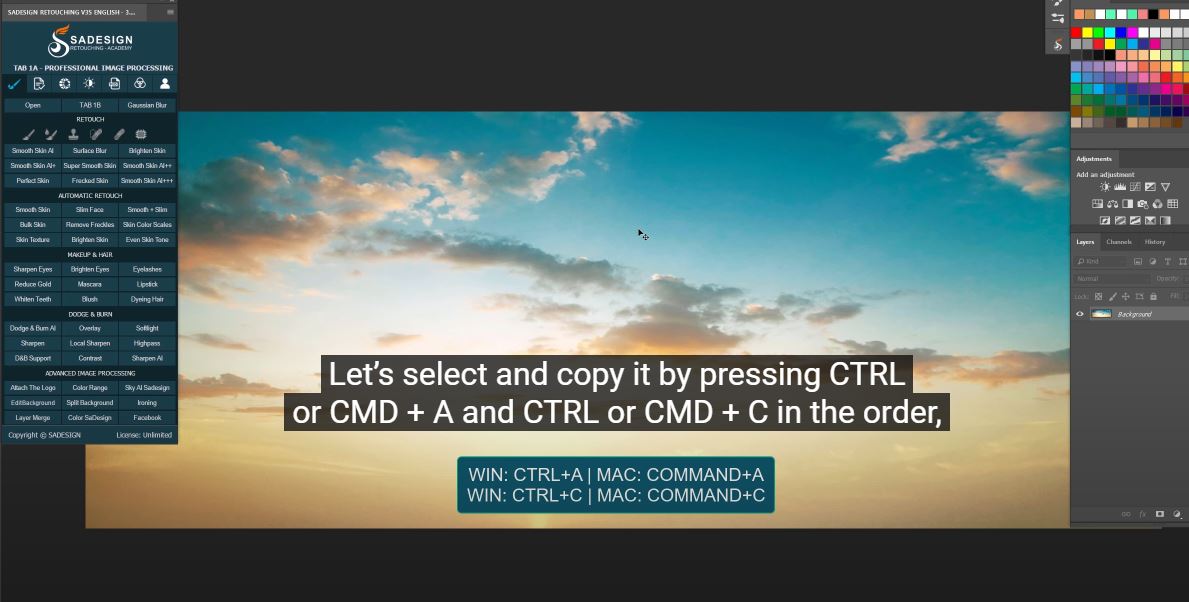
First, here is stunning photo of the bride in sunset and this is a sky that I want to merge to the original sky. Let’s select and copy it by pressing CTRL or CMD + A and CTRL or CMD + C in the order, move to the project and paste it with CTRL or CMD + V. It’s quite small, to resize it, use CTRL or CMD + T, click and move it up to match with the sky of background, then OK. Next, just reduce the opacity and you will see how the sky blend to each other. Let’s put it back.
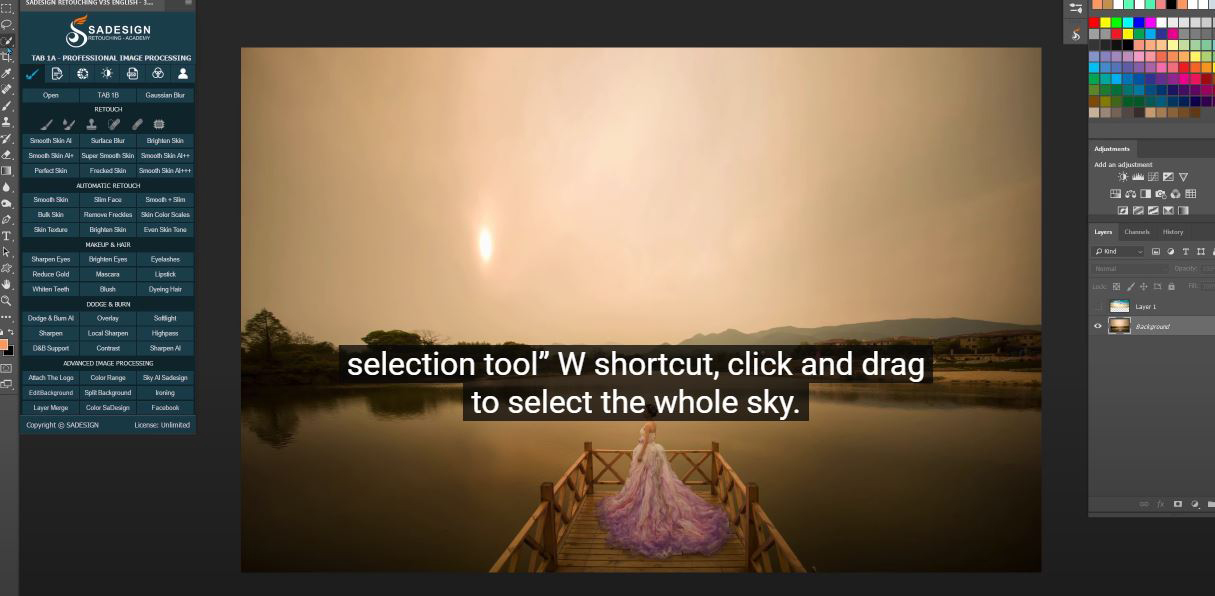
Now, we have to select the sky of the background, to do that, turn off the layer 1, pick “quick selection tool” W shortcut, click and drag to select the whole sky. Some mountains are also selected, let’s lick to the minor brush icon and click to these mountains to subtract the selection. Then, we will reverse the selection by using CTRL or CMD + SHIFT + I.
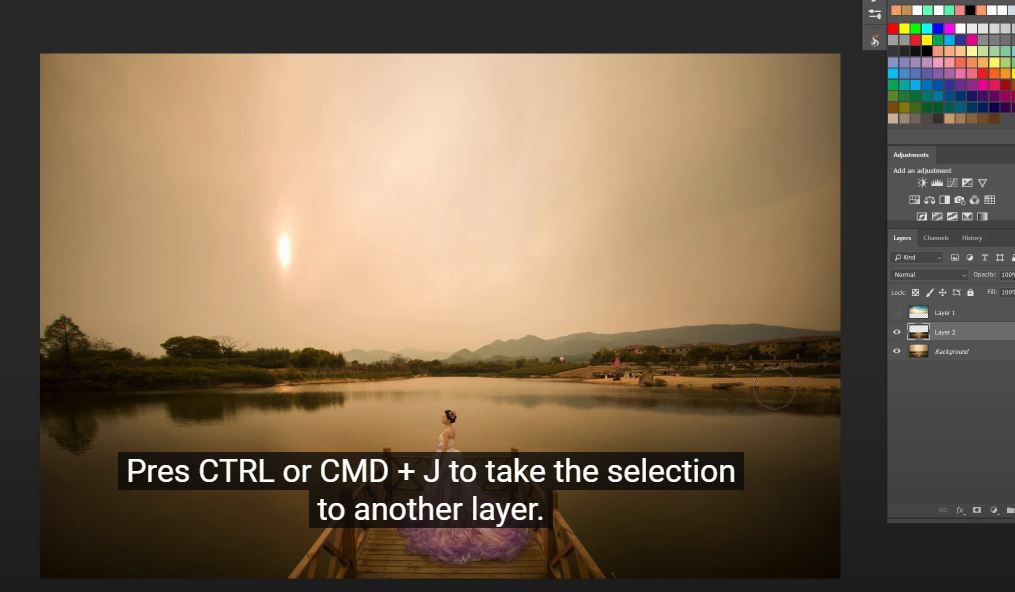
Add feather to it by pressing Shift + F6, set the radius around 0.5 pixels. Pres CTRL or CMD + J to take the selection to another layer. Now, the sky of the background is removed in layer 2. take new sky layer, put it under layer 2. Alright, it perfectly matches right? Click to the layer mask icon to add layer mask, use eraser tool, adjust the opacity to 30% and slight paint over the middle which is the cross of sky and the tree, mountains to soften it.
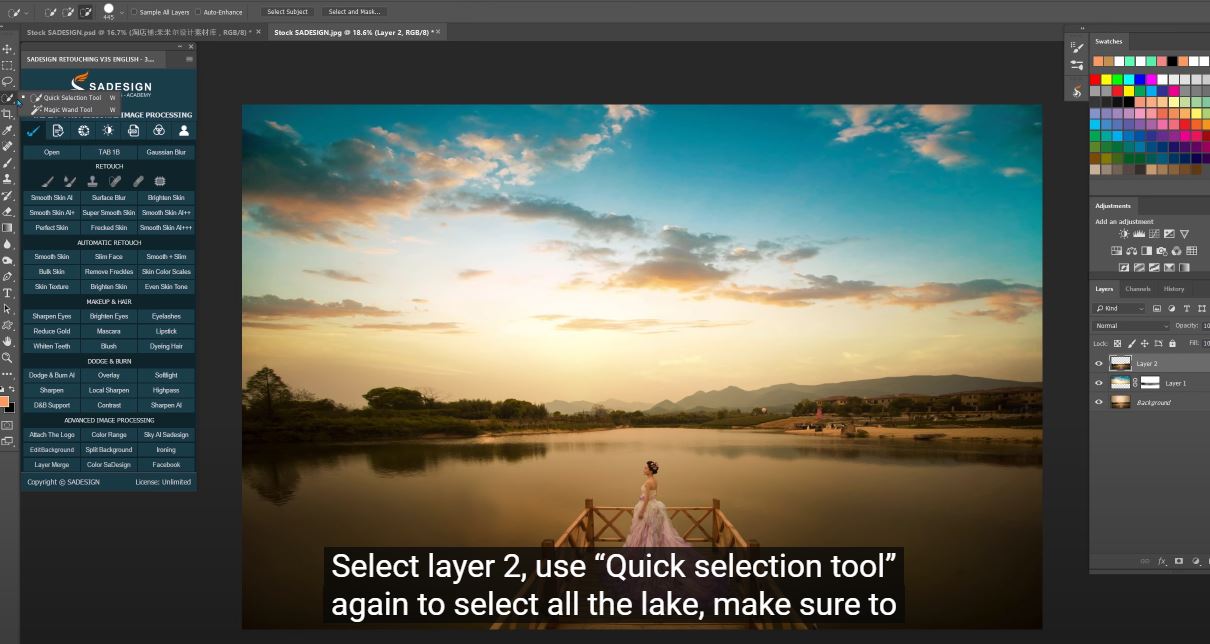
Next step, we will add the reflection of sky to the lake. Select layer 2, use “Quick selection tool” again to select all the lake, make sure to pick the plus brush in the middle before making the selection. For some areas apart of the lake, you select accidentally, use minor brush to remove it. Then, press Shift + F6 to add 0.5 of feather radius to it and press “Delete”.
Duplicate the sky by pressing CTRL of CMD + J, then CTRL or CMD + T, zoom out a little bit, click to the top middle point and pull down to the bottom to flip the sky into the lake. Then, adjust the opacity to see the changes. Soften the middle with eraser tool again for layer 1 copy.

Select layer 1 copy, head to Filter > Blur > Gaussian blur, now we will blur the reflection to make it looks realistic, set the radius at 5 pixels.

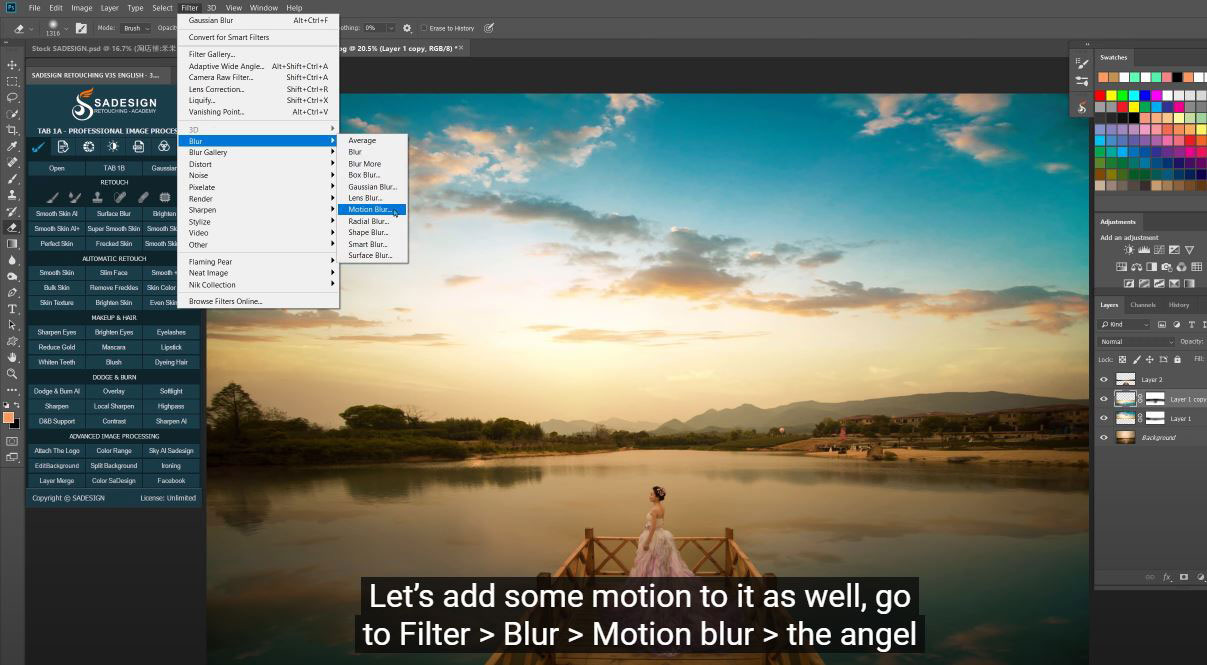
Let’s add some motion to it as well, go to Filter > Blur > Motion blur > the angel is 90 degree and Distance is 61 pixels. OK. Reduce the opacity a little bit more.
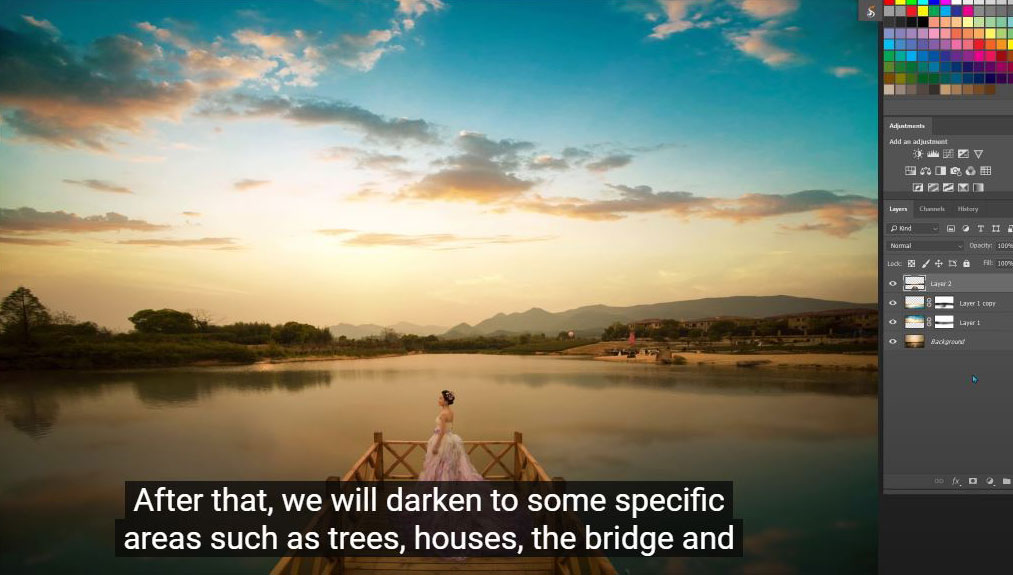
After that, we will darken to some specific areas such as trees, houses, the bridge and bride. Create a curves adjustment layer by click to the adjustment icon and select “curves”. Pull down the mid tone and you can see the whole image is quite dark right now. Press CTRL or CMD + I to reverse the white layer mask to black color, use brush tool – opacity is 30%, white is in foreground. Let’s just paint to the areas we want to apply the effect.
Next, adjust the color with color balance, click to adjustment icon and select color balance. Let’s reduce red to –12, green to –2 and blue to –15
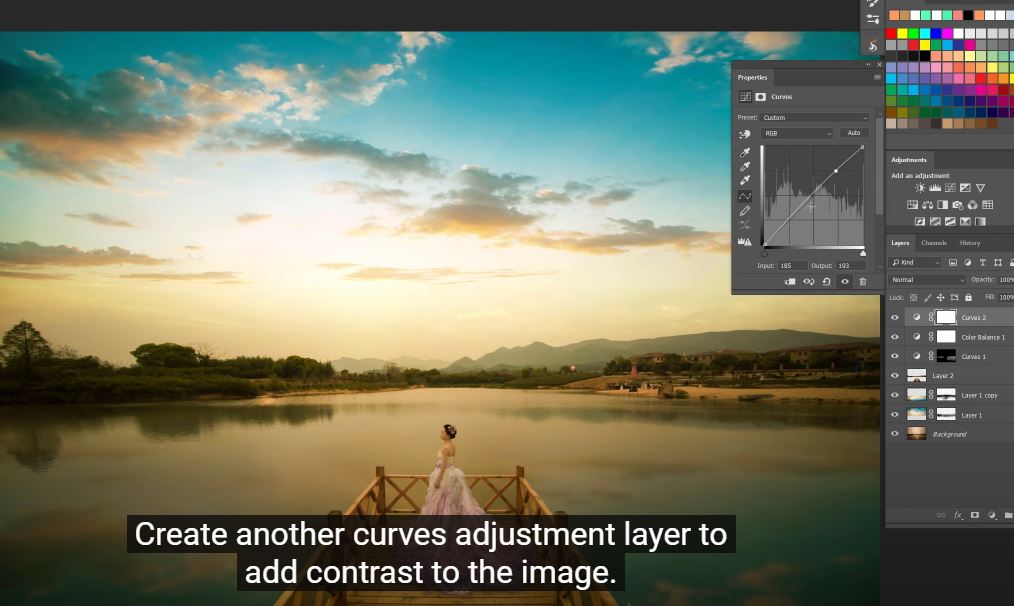
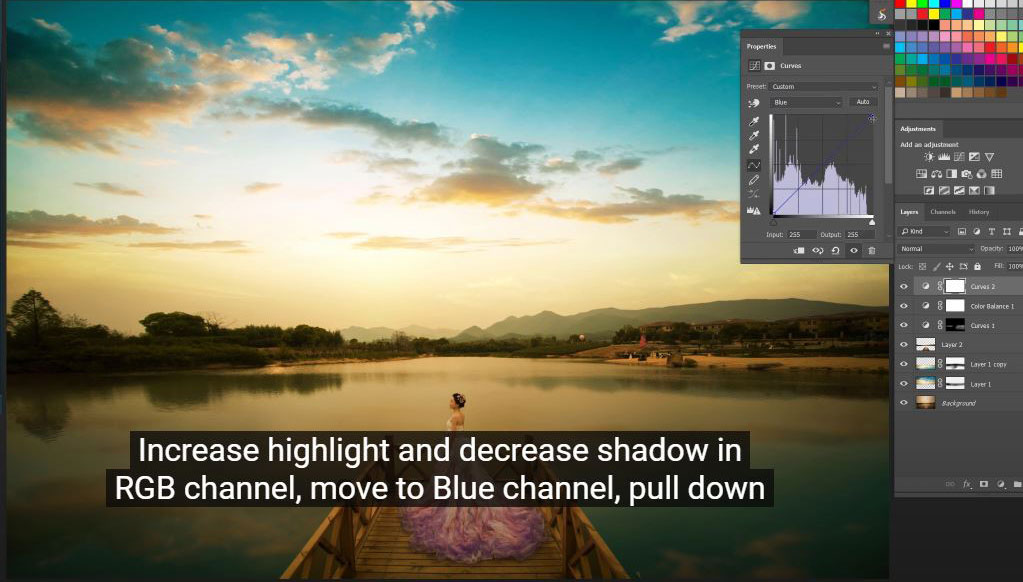
Create another curves adjustment layer to add contrast to the image. Increase highlight and decrease shadow in RGB channel, move to Blue channel, pull down white a bit and increase black.
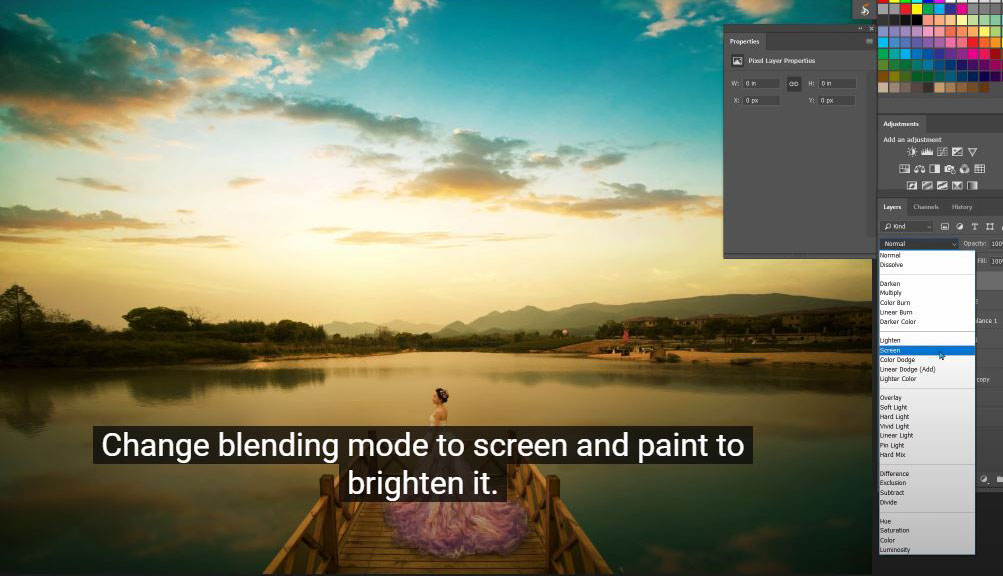
Finally, we will brighten the furthest mountains and the sky areas above them. This way to increase the depth of field of the image. Create a new layer, use brush with the foreground color is orange which is matching with the sky tone. Change blending mode to screen and paint to brighten it.
Checking back the result to see what we’ve done!
Hope that you will like this tutorial, please hit like and subscribe to our channel to update the latest tutorials day by day and feel free to leave comments in case you have any questions. Thank you and bye bye!
Watch the video right here:
Watch the video here:
REGISTER FOR FREE PHOTOSHOP LEARNING
============================
The most powerful Retouch tool processor
DOWNLOAD:
✅ SADESIGN PANEL ENGLISH: https://sadesign.ai/retouching/
✅ SADESIGN PANEL VIETNAM: https://www.retouching.vn/


VIP Products


Best Selling Products
Copyright Adobe Lightroom Account
59 USD
Windows 10 & 11 Pro Key
36 USD
Genuine Cheap Canva Pro
39 USD
Upgrade genuine Capture One account
120 USD
Upgrade Duolingo Super
29 USD
Plugin Retouch4me
69 USD
Adobe Premiere Pro Account
99 USD
Freepik Premium Account
59 USD
Upgrade Genuine Office 365
49 USD
Adobe Photoshop Copyright - Full App
120 USD
MidJourney Account
29 USD
Autodesk All App Account Copyright
120 USD
Genuine Adobe Illustrator account
99 USD
Capcut Pro 1 Year
39 USD
ChatGPT Plus Account (GPT-4)
16 USD