Best Selling Products

ChatGPT Plus Account (GPT-4)
16 USD
Upgrade genuine Capture One account
120 USD

Autodesk All App Account Copyright
120 USD
Adobe Photoshop Copyright - Full App
120 USD
Plugin Retouch4me
69 USD
Capcut Pro 1 Year
39 USD
Windows 10 & 11 Pro Key
36 USD
Genuine Cheap Canva Pro
39 USD
Upgrade Genuine Office 365
49 USD
Adobe Premiere Pro Account
99 USD
Genuine Adobe Illustrator account
99 USD

Freepik Premium Account
59 USD
Copyright Adobe Lightroom Account
59 USD

MidJourney Account
29 USD

Upgrade Duolingo Super
29 USD
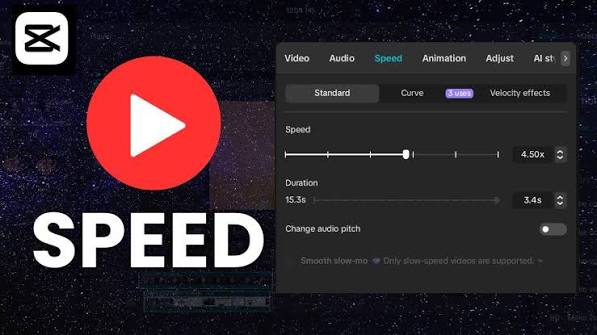
How to quickly and easily adjust video speed in CapCut for beginners.
Nội dung
- 1. Detailed instructions on how to adjust video speed in CapCut
- 1.1. Step 1: Open CapCut and add the video you want to edit.
- 1.2. Step 2: Access the Speed tool
- 1.3. Step 3: Adjust video speed using Normal mode
- 1.4. Step 4: Select the Bending mode to change the speed flexibly.
- 1.5. Step 5: Adjust the speed at each point in the video.
- 1.6. Step 6: Review and export the video after adjusting the speed.
- 2. Tips for adjusting video speed on CapCut for a more natural and beautiful result.
- 3. Some common errors when adjusting video speed on CapCut
- 4. Conclusion
Want your TikTok videos to be more engaging, your vlogs more lively, or memorable moments slowed down for emotional impact? Adjusting video speed with CapCut is one of the simplest ways to make a difference. With just a few taps on your phone, you can fast-forward unnecessary sections, slow down key details, or change the video''s rhythm to your own style. CapCut offers two speed adjustment modes: Normal and Curved, suitable for both beginners and those who want to create more professional motion effects. If you don''t know how to do it, let Sadesign guide you through the detailed instructions below to easily master this useful feature.
1. Detailed instructions on how to adjust video speed in CapCut
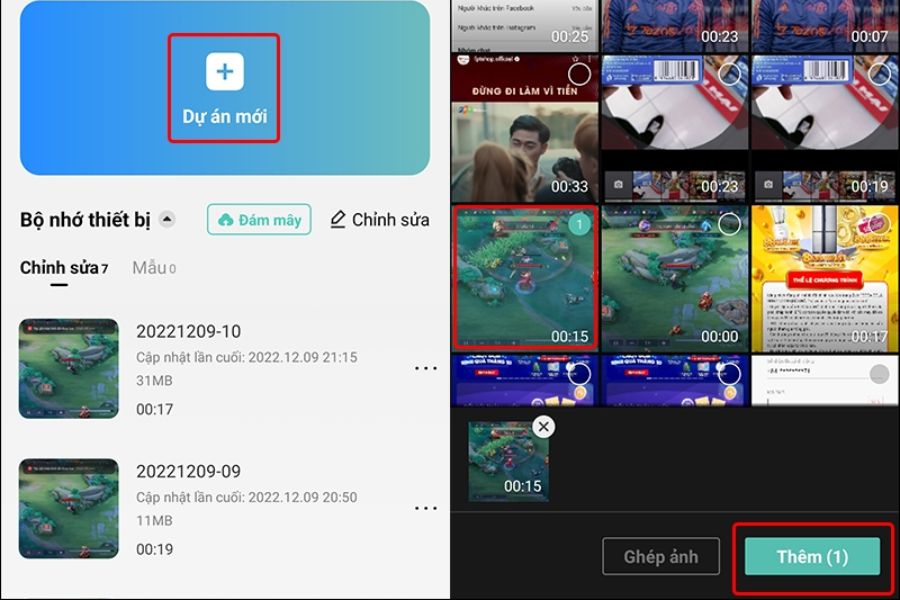
1.1. Step 1: Open CapCut and add the video you want to edit.
First, you need to import the video you want to edit into CapCut to begin. Open the app, find the new project creation area, and select a suitable clip from your phone's library. You should identify the moments you want to emphasize beforehand to ensure the editing process is quick and yields the desired results. The steps are as follows:
-
Open the CapCut app on your phone.
-
On the Edit tab, click New Project.
-
Select the video you want to change the speed of from your device's library.
-
Click Add to import the video into the editing interface.
Once complete, the video will appear on your timeline. This is where you can trim, add audio, insert text, and adjust playback speed. If you plan to edit multiple video clips, you should arrange them in the correct order before continuing to easily control the overall content.
1.2. Step 2: Access the Speed tool
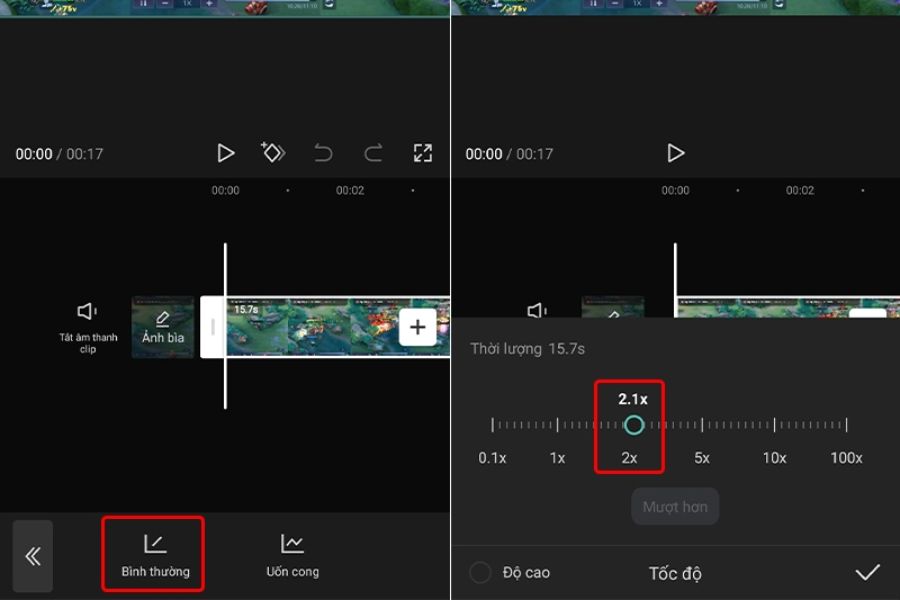
Once the video is on your timeline, tap on the segment you want to adjust. Next, find the Edit option in the toolbar at the bottom of the screen and select Speed. Here, CapCut will provide options to help you control the video's playback pace as needed.
Please note that this tool typically applies to the selected video segment. Therefore, if you want to speed up a section while maintaining the speed of the rest, you can cut the video into separate segments before editing.
-
Tap the video on your timeline.
-
Select Edit from the toolbar at the bottom.
-
Press Speed to open the adjustment modes.
-
Observe the two main options: Normal and Curved.
If you only need to fast-forward or slow down a clip, Normal mode is usually the easiest option. Meanwhile, Curve mode is more suitable when you want to create a dynamic speed change effect within the same video.
1.3. Step 3: Adjust video speed using Normal mode
Normal mode is the ideal choice for beginners because it's simple to use and easy to observe the results. After selecting this mode, you'll see a speed slider that allows you to increase or decrease the playback speed of the video. Simply move the circle to the right to fast-forward or to the left to slow down, and you can make a noticeable difference without performing complicated operations. Depending on the content, you can try different speed levels and preview them to choose the most suitable option. Some commonly used adjustment levels include:
-
0.5x: Slows the video down to half its original speed, suitable for scenes with movement, expressions, or moments that need emphasis.
-
1x: Maintains the original playback speed of the video.
-
2x: Double the speed, suitable for tutorial videos, preparation scenes, or extended activities.
-
3x or more: Creates a noticeable fast-forward effect, useful when you want to shorten less important footage.
After making the adjustments, press play to see if the video sounds natural. You should also pay attention to the audio, as changing the speed can alter the voice and background music. If the result isn't what you want, adjust the slider to a more suitable level before moving on to the next step.
1.4. Step 4: Select the Bending mode to change the speed flexibly.
If you want your video to have a more dynamic rhythm, you can use Speed Curve mode. Unlike Normal, this mode allows you to change the speed at multiple points within the same clip. For example, the video can start at a natural speed, increase rapidly as the character moves, and then slow down at the crucial moment. This editing method is often used in transformation videos, dance videos, sports videos, or TikTok clips with eye-catching motion effects.
To use it, follow these steps:
-
Select the video segment you want to edit on the timeline.
-
Tap Edit, then select Speed.
-
Switch to Bending mode.
-
Select Custom to set up your own speed curve as desired.
If you're unfamiliar with manual adjustments, you can try the pre-made curve templates in the app if your version of CapCut supports them. These templates help you quickly create speed change effects without having to manually set each point. After selecting a template, preview the video to assess the movement rhythm and make further adjustments if needed.
1.5. Step 5: Adjust the speed at each point in the video.
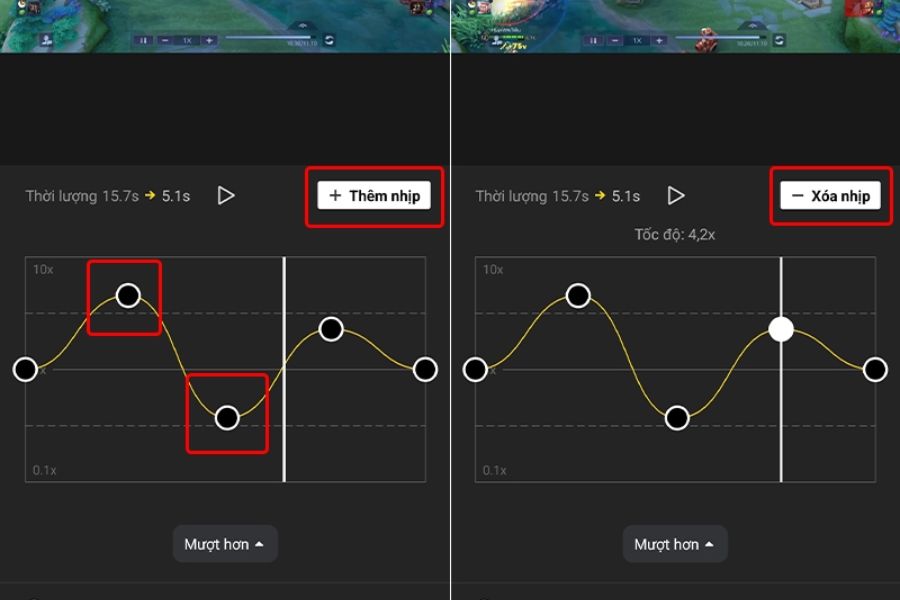
This step helps you create your own unique style for your video. When using the Curve mode and selecting Custom, you can adjust points on the curve to control the speed at each point. The higher the adjustment point, the faster the playback speed at that location; lowering the point will slow down the video. This allows you to combine multiple motion sequences within a single clip instead of applying a single speed from beginning to end. Here's how to do it:
-
Speed up: Drag the adjustment point upwards at the section you want to fast-forward.
-
Slow down: Lower the adjustment point at the moment you want to emphasize.
-
Add rhythm: Use the add point or rhythm adjustment option, if the interface supports it, to control the speed at multiple locations.
-
Erase the rhythm: Remove unnecessary points to make the curve simpler and easier to control.
For example, when creating a product unboxing video, you can fast-forward the preparation scene, slow down the moment the lid is opened, and return to normal speed when introducing the product details. A well-timed change in pace will help viewers focus on the main content without feeling bored. However, you shouldn't change the speed too abruptly if the video isn't intended to be fast-paced. Play back the entire edited clip to check if the transitions are smooth and match the background music.
1.6. Step 6: Review and export the video after adjusting the speed.
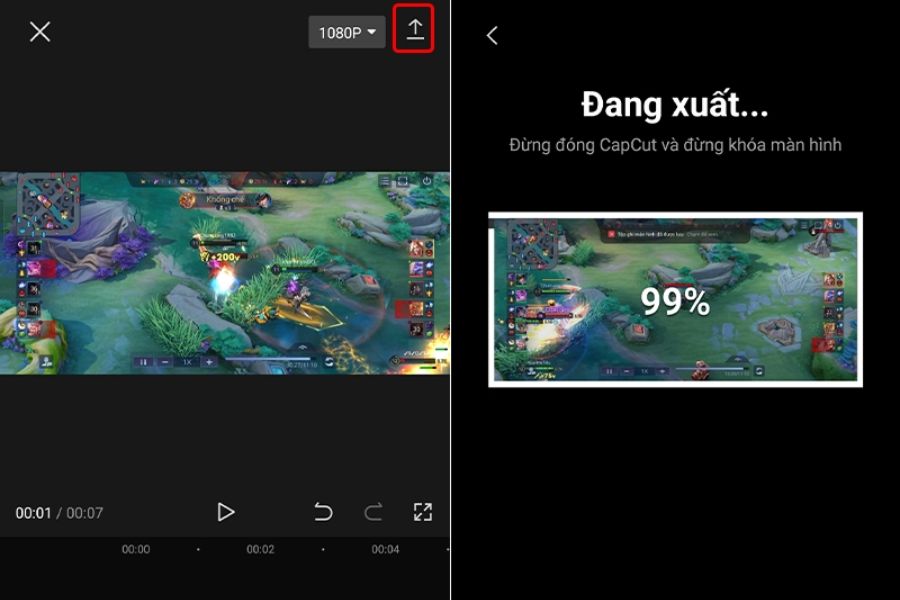
After adjusting the speed, don't rush to export the video. Take some time to review the final product. This is a crucial step to detect overly fast motion, jerky images, or audio that doesn't match the content. If you find any inconsistencies, you can go back to the timeline to make adjustments before saving the video to your device. Once you're satisfied with the result, follow these steps:
-
Press play to watch the entire video from beginning to end.
-
Check the motion speed, sound, and scene transitions.
-
Tap the video export arrow icon in the upper right corner of the screen.
-
Choose the resolution and frame rate that best suit your needs if CapCut provides these options.
-
Wait for the app to process and save the video to your device, then share it on TikTok, Instagram, or Facebook if you wish.
For social media videos, 1080p resolution and 30 FPS are often a suitable starting point for much common content. If the original video was shot at a high frame rate or has a lot of movement, you may consider other settings to preserve image quality. After exporting, reopen the video in your library for a final check. This completes the video speed adjustment process in CapCut, and you can now use the finished product for personal use or content creation.
2. Tips for adjusting video speed on CapCut for a more natural and beautiful result.
Simply increasing or decreasing the speed doesn't necessarily make a video more engaging. To create a product with good rhythm, easy to follow, and relevant to the content, you should combine speed adjustments with careful selection of shots, sound, and effects.
-
Choose the right moments to slow down: Prioritize important details such as facial expressions, product usage, or graceful movements to avoid making the video feel drawn out.
-
Speed up less informative scenes: Scenes of preparation, movement, or waiting can be fast-forwarded to save time.
-
Matching the tempo to the music: If you're creating a video to music, try placing speed increase or decrease points at drum beats or climactic moments to create a sense of harmony.
-
Avoid frequent changes in speed: Too many alternating fast and slow segments can make it difficult for viewers to follow the content.
-
Check image quality: When slowing down video, especially with low-frame-rate footage, the motion may not be smooth. Preview the footage and consider using more suitable footage.
3. Some common errors when adjusting video speed on CapCut
4. Conclusion
Adjusting video speed in CapCut isn't complicated if you understand the difference between Normal and Curved modes. While Normal mode is suitable for fast-forwarding or slowing down the entire clip, Curved allows you to actively change the pace at different points to create a more impressive effect. Just follow the 6 steps above, and you can edit videos on your phone without much experience. Start with simple changes, preview the finished product, and experiment with different combinations to find the style that suits you best. A little speed adjustment can sometimes be the key to making your video more engaging and professional when shared on social media















VIP Products

Best Selling Products
ChatGPT Plus Account (GPT-4)
16 USD
Upgrade genuine Capture One account
120 USD
Autodesk All App Account Copyright
120 USD
Adobe Photoshop Copyright - Full App
120 USD
Plugin Retouch4me
69 USD
Capcut Pro 1 Year
39 USD
Windows 10 & 11 Pro Key
36 USD
Genuine Cheap Canva Pro
39 USD
Upgrade Genuine Office 365
49 USD
Adobe Premiere Pro Account
99 USD
Genuine Adobe Illustrator account
99 USD
Freepik Premium Account
59 USD
Copyright Adobe Lightroom Account
59 USD
MidJourney Account
29 USD
Upgrade Duolingo Super
29 USD