Best Selling Products

Upgrade Genuine Office 365
49 USD

Copyright Adobe Lightroom Account
59 USD

Freepik Premium Account
59 USD

Autodesk All App Account Copyright
120 USD

Adobe Photoshop Copyright - Full App
120 USD

Upgrade genuine Capture One account
120 USD

Capcut Pro 1 Year
39 USD

Plugin Retouch4me
69 USD

Adobe Premiere Pro Account
99 USD

ChatGPT Plus Account (GPT-4)
16 USD

Genuine Adobe Illustrator account
99 USD

MidJourney Account
29 USD

Windows 10 & 11 Pro Key
36 USD

Genuine Cheap Canva Pro
39 USD

Upgrade Duolingo Super
29 USD
How to recover photos that you thought were lost forever from your memory card.
Nội dung
Anyone who''s used cameras or phones for a long time has probably experienced the panic of discovering precious photos—perhaps a child''s first steps or the last picture taken with loved ones—suddenly disappearing from their memory card. It could be due to accidentally pressing the delete button, or a formatting error on the memory card. Whatever the reason, the good news is that as long as you still have the memory card, the chances of recovering your data are still very high. This article will help you understand the mechanism behind file recovery and provide step-by-step instructions for both Windows and Mac users.
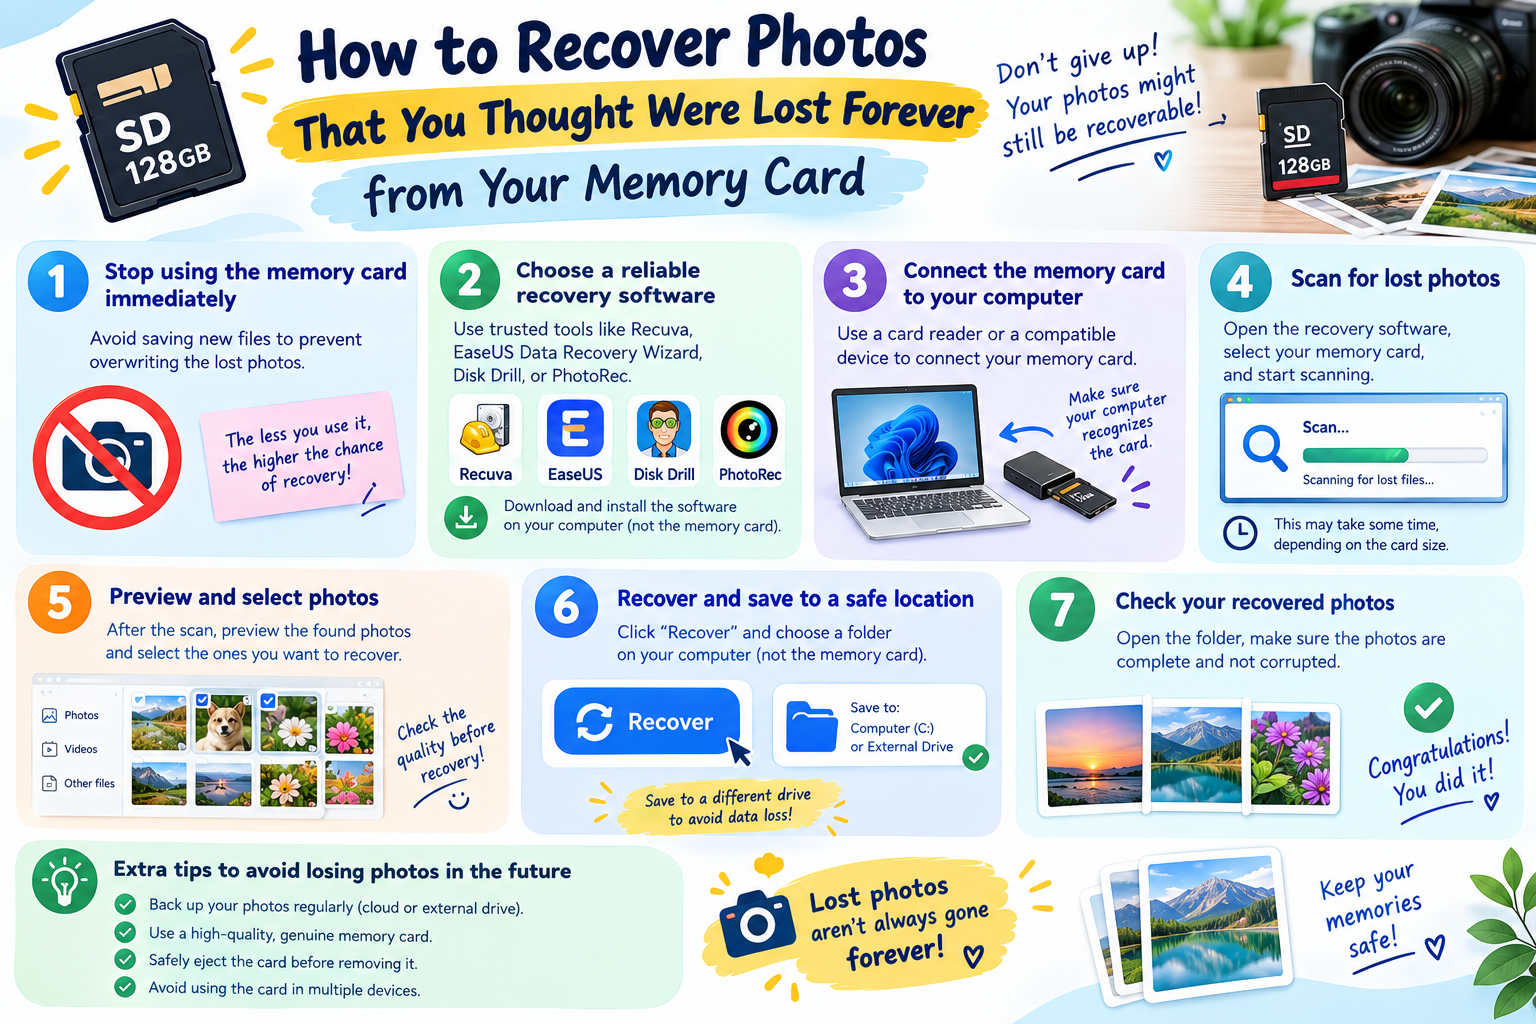
1. The secret behind how deleted files can still be recovered.
What not everyone knows is that when you delete a photo from a memory card, hard drive, or USB drive, the data isn't instantly erased. What actually happens is the system simply marks that storage space as "empty," ready to overwrite with new data. In other words, your photo is still there somewhere on the memory card; you just can't see it through the normal interface. As long as no new data is overwritten in that exact location, the old file remains intact and can be detected, read, and recovered by specialized software.

Because of this mechanism, the first and most important thing you need to do when you discover that photos are missing is to stop using that memory card. Don't take any more photos, and don't save any more files to the card. Remove the card from the camera or device immediately and store it separately. If you continue to use it, the probability of new data overwriting the old photo area will increase significantly, and once overwritten, it is almost impossible to recover the data.
You should also be prepared for the fact that sometimes free tools won't be powerful enough to perform a deep scan and recover all lost data. In that case, paying a small fee for more professional software is entirely worthwhile, especially when those photos hold irreplaceable sentimental value. Most paid software offers free trial scans; you only pay when you actually want to recover the files, so you can confidently test it before deciding to spend money.
2. A savior for Windows users: Recover your data with Recuva.
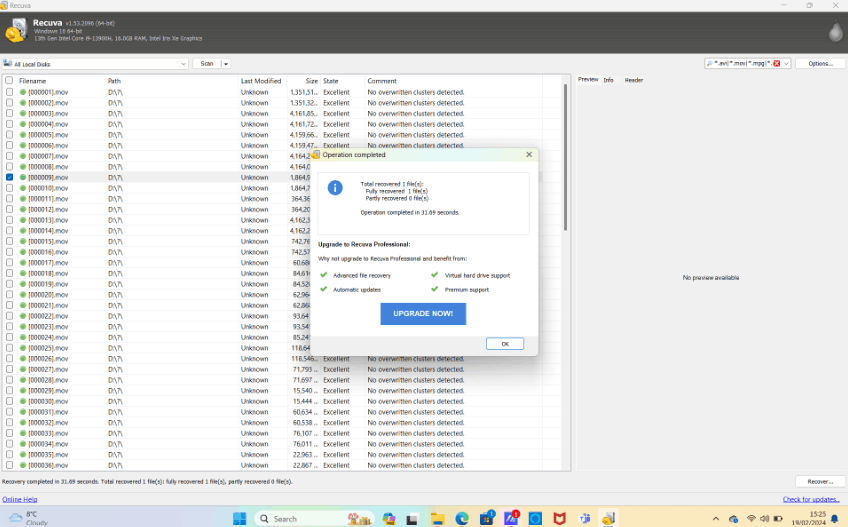
If you're using a Windows computer, Recuva is one of the free options worth trying first. This software has a fairly simple interface and installs like any other Windows program. However, sometimes Recuva can conflict with drivers or antivirus software on your computer, preventing the program from starting. If this happens, you can try booting your computer into Safe Mode by holding down the Shift key during restart, then selecting Troubleshoot, followed by Advanced Options, then Startup Settings, and booting into Safe Mode with Networking. Alternatively, if the built-in memory card slot on your laptop isn't working properly, you should try using an external card reader via the USB port to connect the memory card to your computer.
When you first open Recuva, a wizard will ask you what type of files you want to scan to speed up the process. For lost photos on a memory card, you should select Pictures and specify your memory card as the drive. For a more comprehensive scan, you can also select All Files from All Drives, although the scanning process will take longer.
After the scan is complete, Recuva will display a list of all found files. If there are too many files, instead of manually selecting each one, you can select the first file, hold down the Shift key, then select the last file to highlight the entire list, then right-click and select Check Highlighted to select all at once. Finally, press the Recover button and choose a save location on your computer's hard drive to recover the files. A crucial note: absolutely do not save the recovered files back to the memory card, as doing so could accidentally overwrite other files that are still waiting to be recovered.
If the first scan doesn't find all the images you're looking for, don't give up. Try running Recuva again and select Deep Scan mode. This mode scans much more thoroughly than a regular scan, and the processing time is significantly longer, but it's entirely possible to discover files that you thought had disappeared a long time ago.
3. Mac users also have a lifeline called LazeSoft Mac Data Recovery.
For those using a Mac, a free tool worth considering is LazeSoft Mac Data Recovery. The software's interface isn't highly rated aesthetically; it's rather rudimentary and less intuitive compared to many modern applications. However, it's completely free and offers impressive recovery results in practical use.
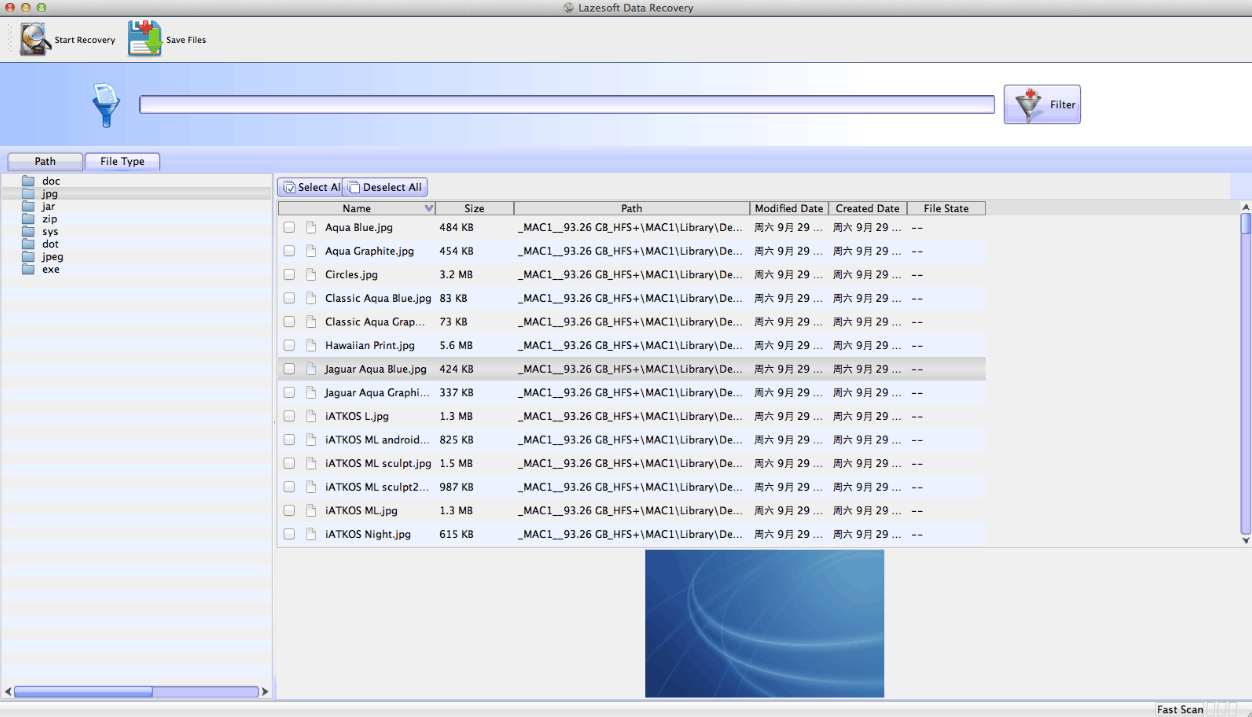
After installing it like a regular Mac application, you open the program and will be asked to choose between two scanning modes: Fast Scan and Deep Scan. Fast Scan provides quick results but may miss some files, while Deep Scan is more thorough and comprehensive, but at the cost of significantly longer processing time; sometimes you will need to be patient and wait quite a while depending on the capacity of your memory card. After selecting the appropriate scanning mode, specify the memory card to scan and let the software handle it automatically.
Once the scanning process is complete, the results will be organized into a list of folders displayed in the left sidebar of the screen. One limitation is that LazeSoft doesn't display thumbnails of the images, so you'll have to spend time opening each folder one by one to find the right photos you need. After identifying the files you want to recover, simply select them and click Save Files at the top to save them to your computer's hard drive. Just like when using Recuva on Windows, absolutely do not save the recovered files back to the original memory card. Also, you should patiently check all the folders in the list on the left, because it's possible that the most valuable photos are located in a folder you might easily overlook.
4. When free tools fail: advanced options worth considering.
Free software like Recuva or LazeSoft are good starting points, but as the saying goes, free often comes with limitations. If, after trying these tools, you still haven't recovered your most important files, it's time to consider more in-depth solutions, which usually come with a fee. Some reliable names on the market today include Disk Drill Pro, EaseUS Data Recovery Wizard, and Ontrack EasyRecovery, all of which support both Windows and Mac.
A major advantage of these paid software programs is their superior deep scanning capabilities, able to find significantly more files than free tools, including photos taken a long time ago and seemingly lost to memory. Most of these programs allow you to scan your entire memory card for free first; you only pay when you actually want to download the files to your computer, usually based on the amount of data recovered or a monthly/annual subscription plan. A wise approach is to try several different programs first, compare their scan results, and then decide which one provides the best results before spending your money.
If you've tried all software tools and still can't recover your data, especially if the memory card shows signs of physical damage, you can seek professional data recovery services like DriveSavers or LC Technology. These companies possess specialized equipment and techniques, capable of hardware-level intervention to recover data that conventional software cannot access. However, the cost of this service is usually quite high, potentially ranging from several hundred to thousands of dollars, so you need to carefully consider the value of the data you need to recover against the amount of money you'll have to spend.
5. Conclusion
Losing photos on a memory card is never a pleasant experience, but as you can see, the opportunity to recover those precious moments still exists, as long as you act correctly from the start. Stopping the use of the memory card as soon as you discover data loss, and patiently trying various tools, both free and paid, are key to whether you can recover your photos.
Regardless of whether the recovery results are satisfactory or not, this is a good time to seriously build better data backup habits for the future. Make it a habit to regularly copy photos from your memory card to your computer or cloud storage service, always perform a secure eject before removing the memory card from your computer, and consider setting up a reliable backup system. With these layers of protection in place, your precious moments will no longer be at the mercy of a faulty memory card.





















VIP Products








Best Selling Products
Upgrade Genuine Office 365
49 USD
Copyright Adobe Lightroom Account
59 USD
Freepik Premium Account
59 USD
Autodesk All App Account Copyright
120 USD
Adobe Photoshop Copyright - Full App
120 USD
Upgrade genuine Capture One account
120 USD
Capcut Pro 1 Year
39 USD
Plugin Retouch4me
69 USD
Adobe Premiere Pro Account
99 USD
ChatGPT Plus Account (GPT-4)
16 USD
Genuine Adobe Illustrator account
99 USD
MidJourney Account
29 USD
Windows 10 & 11 Pro Key
36 USD
Genuine Cheap Canva Pro
39 USD
Upgrade Duolingo Super
29 USD