Best Selling Products
How to Selectively Desaturate Images in Photoshop
Nội dung
Saturation determines the color of the image, too high saturation will make the color stand out but too low will make the image color fade. However, adjusting the saturation of the image has never been easy. Let's refer to the steps to selectively desaturate images in Photoshop with SaDesign through the following shares.

1. What is image saturation?
Saturation or color intensity in English is Saturation. It is understood as the level of color in a photo. If you want the color of the photo to be cleaner and more vibrant, increase the color saturation. Reducing the saturation will make the color of the photo dull and dull.
Saturation will vary from 0% (gray) to 100%. However, adjusting the color saturation of an image is not always easy.
Selective desaturation is a great technique in Photoshop. It can make a photo pop while removing unwanted colors. It's great for both photos with lots of distracting elements or simple photos that need to stand out.
2. How to Selectively Desaturate Images in Photoshop
Desaturating in Photoshop is easy! In this section, we will desaturate part of an image in Photoshop.
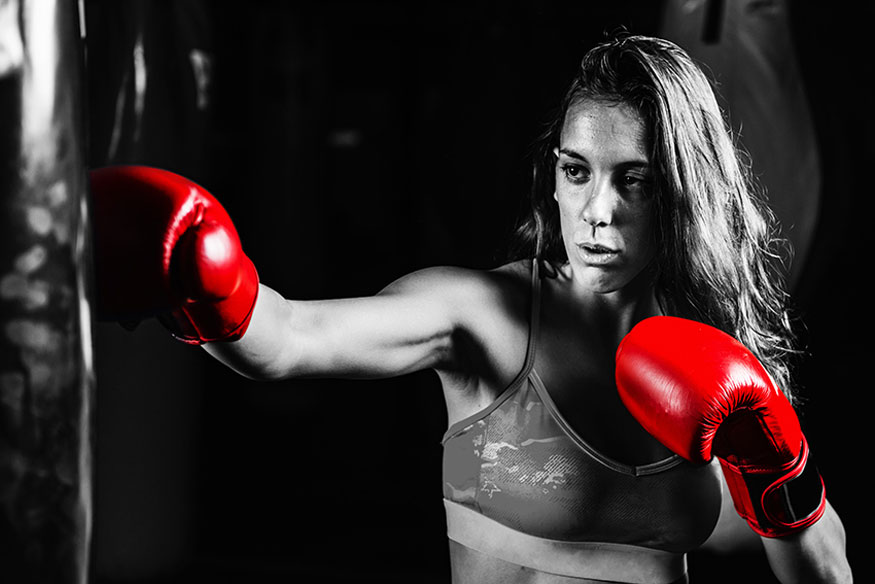
Step 1: First, open the photo you want to selectively desaturate in Photoshop. Here I will use a photo of a female boxer to illustrate. We will desaturate all colors except the red on the boxing gloves.
(1).jpg)
Step 2: On the menu bar go to Layer => New Adjustment Layer => Hue/Saturation to create a new hue/saturation adjustment layer and name it Desaturate.
(1).jpg)
Step 3: Double click on this layer thumbnail and in the Properties panel, set Saturation to -100.
(1).jpg)
Step 4: Now set the foreground color to #000000. On the toolbar select the Brush Tool (B), choose a soft brush and brush over the boxing glove area to reveal the red color again.
(1).jpg)
So you have selectively desaturated an image in Photoshop. All the colors are darkened and faded except for the gloves. The gloves become the highlight with a very prominent red color.
3. How to increase photo contrast in Photoshop
The contrast in a photo is the difference between the darkest and brightest areas in the same photo. High contrast will highlight the subject of the photo. To continue adjusting the contrast of the photo of the boxing girl, we follow these steps:
Step 1: Press D on your keyboard to reset the swatches to default, then press X to toggle them. Then go to Layer => New Adjustment Layer => Gradient Map to create a new Gradient Map adjustment layer and name it Contrast.
(1).jpg)
Step 2: Change the Blending Mode of this layer to Overlay and set the Opacity to 75%.
(1).jpg)
And that's how you selectively desaturate an image in Photoshop and create an interesting effect with dramatic highlights.
(1).jpg)
Above is a summary of information on how to selectively desaturate images in Photoshop. The implementation is not difficult, right? Depending on your photo, adjust the parameters accordingly to get the most satisfactory results. Hopefully, the above sharing can help you edit your photo to be the most beautiful.


