Best Selling Products

Autodesk All App Account Copyright
120 USD

Plugin Retouch4me
69 USD

Adobe Premiere Pro Account
99 USD

Adobe Photoshop Copyright - Full App
120 USD

Copyright Adobe Lightroom Account
59 USD

Freepik Premium Account
59 USD

Upgrade Duolingo Super
29 USD

MidJourney Account
29 USD

Genuine Adobe Illustrator account
99 USD

Capcut Pro 1 Year
39 USD

ChatGPT Plus Account (GPT-4)
16 USD

Windows 10 & 11 Pro Key
36 USD

Upgrade genuine Capture One account
120 USD

Genuine Cheap Canva Pro
39 USD

Upgrade Genuine Office 365
49 USD
Secrets to Brightening Night Photos in Photoshop Easily and Effectively
Nội dung
- 1. The Importance of Processing Night Photos with Specialized Software
- 2. Using the Camera Raw Filter – The First Breakthrough Step for Underexposed Photos
- 3. Techniques for Using Curves and Levels to Control Light Precisely
- 4. The Power of Blend Modes in Brightening
- 5. Handling Color After Brightening to Make the Night Photo Radiant
- 6. Secrets to Limiting Noise When Brightening Extremely Dark Night Photos
- 7. Optimizing Sharpness After Brightening
- 8. Vital Notes to Keep a Night Photo Looking Natural
- 9. Techniques for Magical Light Effects with Glow and Bloom
- 10. Local White Balance and Split Toning
Discover how to brighten night photos in Photoshop naturally, without causing noise. A detailed guide on techniques using Camera Raw, Curves, Levels, and Blend Mode to professionally rescue underexposed photos.
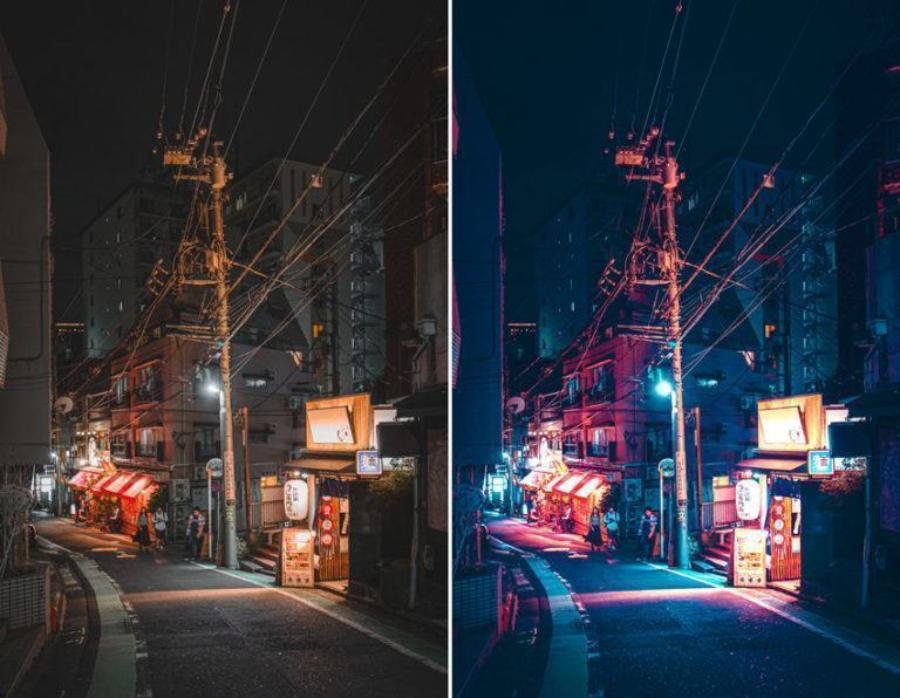
1. The Importance of Processing Night Photos with Specialized Software
.png)
Nighttime light is often unstable, causing the camera to fail to capture as much color and brightness information as the human eye perceives. Digital transformation in photography has brought powerful post-production capabilities, helping to compensate for the physical shortcomings of capture devices.Recovering Details in Hidden Light Areas
In underexposed photos, details in the shadows are often completely lost to the naked eye on a camera screen. However, digital files — especially RAW format — contain a huge amount of hidden data. Properly brightening in Photoshop will "awaken" architectural lines, wood grain, or skin texture that seemed to have vanished. This is the difference between an amateur photo and one with artistic depth.
Balancing Dynamic Range and Color
Night photos are often tinted by artificial light sources such as yellow street lamps or blue neon lights. The brightening process simultaneously allows you to adjust the color temperature, making the photo either more faithful or more artistically intentional. Good control of the dynamic range keeps highlights from blowing out while shadows retain clarity, creating a harmonious, visually appealing whole.
2. Using the Camera Raw Filter – The First Breakthrough Step for Underexposed Photos
Camera Raw Filter is the most powerful and intuitive tool to begin the brightening process for any night photo, whether it's a JPEG or RAW file.
Smartly Adjusting the Exposure and Shadows Sliders
Instead of raising the overall brightness of the entire photo, focus on the Exposure slider to lift overall brightness moderately. Then take advantage of the Shadows and Blacks sliders. Pushing the Shadows slider up will brighten the darkest areas without affecting areas that are already bright enough. This approach protects highlight detail, preventing the photo from becoming washed out or losing its natural nighttime contrast.
Controlling Noise with AI Denoise
An inevitable consequence of brightening a night photo is the appearance of fine noise that reduces sharpness. In modern versions of Photoshop, the AI-powered Denoise feature in the Camera Raw panel has become the ultimate "weapon." This tool can analyze pixels and remove noise intelligently while still preserving sharp edge detail. Denoising before performing deeper color adjustments will make the photo look much cleaner and more professional.
3. Techniques for Using Curves and Levels to Control Light Precisely
If Camera Raw provides general adjustments, Curves and Levels let you intervene in specific tonal ranges of the photo manually and with absolute precision.
(1).jpg)
Mastering the Histogram with Adjustment Levels
The Levels tool (Ctrl + L) lets you observe the photo's light distribution histogram. For night photos, the histogram is usually skewed heavily to the left (shadow area). You can drag the White point to the left to increase brightness in the midtones and highlights. This helps the photo brighten noticeably while still retaining the necessary depth of night. This is a basic but immediately effective technique for photos that are only slightly underexposed.
Creating Artistic Contrast with Curves
Curves (Ctrl + M) is a more advanced tool that lets you create nodes on a straight line to adjust light. By creating a gentle S-shaped curve, you can brighten the midtones while keeping the shadows from washing out. For night photos, slightly raising the bottom end of the curve can create a fashionable "matte" effect, giving the photo a cinematic, nostalgic feel.
4. The Power of Blend Modes in Brightening
An extremely simple and quick way to brighten without delving too deeply into technical parameters is to use Layer blend modes.
Duplicating the Layer and Using Screen Mode
This is a small trick experts often use to save overly dark photos. Simply press Ctrl + J to duplicate the current layer, then change the blend mode from "Normal" to "Screen." Screen mode filters out dark pixels and naturally brightens the entire photo. If the photo is still too dark, you can duplicate the Screen layer again. To control the intensity of the brightening, simply adjust that layer's Opacity slider until you get the result you want.
Combining with Layer Mask for Localized Brightening
Sometimes you only want to brighten the main subject rather than the entire scene. After applying Screen mode or Curves, add a black Layer Mask (Alt + click the Mask icon). Then use the Brush tool (shortcut B) with white to paint over the areas you want to brighten. This technique lets light focus exactly where you want it, creating strong visual guidance and avoiding unnecessary brightening, so the night photo keeps its mysterious atmosphere.
5. Handling Color After Brightening to Make the Night Photo Radiant
When brightness is raised, color tones often fade or unwanted casts appear. Color correction is an essential finishing step.
Enhancing Vibrancy with Vibrance and Saturation
Night photos often need a bit of extra "warmth" after brightening to look more alive. Vibrance is a safe choice because it boosts the intensity of muted colors without blowing out colors that are already strong. For photos with many street lights, slightly increasing Saturation in the yellow and orange channels will make the space feel cozier and more radiant, compensating for the coldness of darkness.
White Balance to Create Emotion
Color temperature determines the soul of a night photo. If you want a modern urban feel, pull the temperature slider toward blue. If you want romance and nostalgia, a warm yellow tone is the right choice. Brightening often exposes white balance errors, so use the Eyedropper tool in Camera Raw to select a neutral gray point, letting the software automatically bring the colors back to the most balanced state.
6. Secrets to Limiting Noise When Brightening Extremely Dark Night Photos
In cases where a photo is severely underexposed, brightening will reveal an enormous amount of digital noise. Smart strategies are needed to minimize this phenomenon..jpg)
Using the Luminosity Mask Technique
Luminosity Mask is an advanced technique that lets you create a selection based on pixel brightness. This way, you only brighten the truly dark areas without blowing out the areas that are already bright. Isolating the affected area helps reduce noise appearing across the entire frame, keeping the most important parts of the photo smooth and clear.
Utilizing Plugins for Advanced Noise Reduction
Beyond Photoshop's default tools, third-party plugins such as Topaz Photo AI or DxO PureRAW offer superior noise-reduction algorithms. These tools can reconstruct details lost to noise during the brightening process, allowing you to rescue even photos shot at extremely high ISO. Integrating these tools into your workflow will give you more confidence when handling difficult files.
7. Optimizing Sharpness After Brightening
After brightening and denoising, night photos tend to become soft or slightly blurry. The final step is to restore sharpness to the lines.
Using the High Pass Filter
The High Pass technique is the most natural way to create sharpness without causing white halos. Create a merged layer (Ctrl + Shift + Alt + E), go to Filter > Other > High Pass, and choose a setting so the edges appear clearly on a gray background. Then change the blend mode to Overlay or Soft Light. This method emphasizes edge details, making the night photo crisper and clearer, giving the impression it was shot with high-end equipment.
Locally Sharpening with the Sharpen Tool
Instead of sharpening the whole image, you can use the Sharpen tool at low intensity to highlight important areas such as a subject's eyes, letters on a sign, or architectural grain. This focus on small details creates a visual illusion that makes viewers feel the photo is very sharp, even though the whole image has gone through a complex brightening process.
8. Vital Notes to Keep a Night Photo Looking Natural
The difference between a photo retoucher and an artist lies in the ability to control "just enough." Overdoing the brightening will strip a photo of its nighttime soul..jpg)
Preserving True Blacks
A proper night photo doesn't necessarily need to be as bright and clear as daytime. Keeping a few areas of true black creates contrast and depth. If you brighten to the point where no dark areas remain, the photo will look flat and lifeless. Let the darkness serve as the backdrop for the light to shine — that is the natural aesthetic rule of night photography.
Paying Attention to Direct Light Sources
When brightening, light sources such as light bulbs and LED signs often get blown out to white. You need to use the Brush tool to burn down (reduce brightness) in these spots, preserving detail inside the bulb or the content on the sign. Maintaining detail in both the darkest and brightest areas is the measure of a successful post-production photo.
9. Techniques for Magical Light Effects with Glow and Bloom
In night photography, light sources such as street lamps, billboards, or car headlights tend to radiate a soft halo. Recreating this effect not only makes the photo look more radiant but also hides flaws caused by excessive brightening.
Creating a Halo Around the Light Source
After brightening the overall image, create a new layer and use the Brush tool with Hardness set to 0. Choose a color similar to the light (usually warm yellow or cool blue), then gently dab it onto the light source location. Change this layer's blend mode to Screen or Linear Dodge (Add) and lower the Opacity to a moderate level. This creates a natural "Bloom" effect, making the light look as though it's passing through a hazy layer of night air, giving the photo a mysterious feel.
Using Light Trails to Add a Sense of Motion
If your night photo includes vehicles but the exposure time wasn't long enough to create long light streaks, you can create them manually with the Pen Tool. Draw soft curves along the vehicle's path, then use the Stroke Path command with a small, bright-colored brush tip. Combined with the Outer Glow effect in Layer Style, you'll create vibrant light trails, making the night photo more dynamic and full of life.
10. Local White Balance and Split Toning
One of the biggest issues after brightening a night photo is the chaos of light sources with different color temperatures. Applying uniform color treatment across the entire photo doesn't always produce the best aesthetic result.
Applying Split Toning to Highlights and Shadows
Split Toning is a technique that applies one color tone to the highlights and an opposing tone to the shadows. For night photos, a classic formula is to apply cool teal to the shadows and warm orange to the highlights. This contrast creates an extremely appealing "cinematic" color palette, giving the freshly brightened details more depth and clearly separating them from the background. You can easily do this in the Color Grading panel of the Camera Raw Filter.
Removing Color Casts in Important Detail Areas
When brightening, areas such as a model's skin often pick up a blue or yellow cast from street lights. Use a Hue/Saturation Adjustment Layer, select the affected color channel, and reduce Saturation, or use a mask to apply the change only to the skin area. Keeping natural skin tone within a vividly lit nighttime setting is the key to creating a polished, realistic retouched photo.
Enhancing Light Reflection Effects
You can select the road surface area, duplicate it, and flip the object above it downward. Apply a vertical Motion Blur filter and change the blend mode to Soft Light or Screen. Then lower the Opacity and use a mask to erase unnecessary parts. This technique turns a dry street into something more romantic, while doubling the amount of light in the frame without adding noise.
11. Conclusion
How to brighten night photos in Photoshop is essentially an art that combines technical mastery of the tools with an aesthetic eye. From basic brightening with Camera Raw, using smart blend modes, to controlling noise and enhancing sharpness, every step contributes to creating a perfect work from an imperfect file. Remember that Photoshop is only the tool for realizing your vision; the subtlety and patience in the editing process are the true keys to creating night photos that are radiant, authentic, and full of emotion. I hope that with the tips shared above, you will no longer worry about underexposed shots and will be ready to turn darkness into material for wonderful creations.





















VIP Products








Best Selling Products
Autodesk All App Account Copyright
120 USD
Plugin Retouch4me
69 USD
Adobe Premiere Pro Account
99 USD
Adobe Photoshop Copyright - Full App
120 USD
Copyright Adobe Lightroom Account
59 USD
Freepik Premium Account
59 USD
Upgrade Duolingo Super
29 USD
MidJourney Account
29 USD
Genuine Adobe Illustrator account
99 USD
Capcut Pro 1 Year
39 USD
ChatGPT Plus Account (GPT-4)
16 USD
Windows 10 & 11 Pro Key
36 USD
Upgrade genuine Capture One account
120 USD
Genuine Cheap Canva Pro
39 USD
Upgrade Genuine Office 365
49 USD