Best Selling Products

Adobe Photoshop Copyright - Full App
120 USD

Upgrade Duolingo Super
29 USD

Copyright Adobe Lightroom Account
59 USD

Autodesk All App Account Copyright
120 USD

MidJourney Account
29 USD

Adobe Premiere Pro Account
99 USD

Plugin Retouch4me
69 USD

Genuine Adobe Illustrator account
99 USD

Genuine Cheap Canva Pro
39 USD

Capcut Pro 1 Year
39 USD

Freepik Premium Account
59 USD

Upgrade Genuine Office 365
49 USD

Windows 10 & 11 Pro Key
36 USD

Upgrade genuine Capture One account
120 USD

ChatGPT Plus Account (GPT-4)
16 USD
The Art of Three-Layer Composition: Foreground, Middleground, and Background in Photography
Nội dung
- 1. Concepts and roles of foreground, middle ground, and background in photography.
- 1.1 Foreground
- 1.2 Medium shot
- 1.3 Background
- 2. Benefits of using three layers of scenery simultaneously
- 3. How to apply foreground, midground, and background elements in photos.
- 3.1 The Rule of Thirds
- 3.2 Path Layout (Main Line)
- 3.3 Framing Technique
- 4. Some notes on applying the three layers of scenery.
Learn how to use foreground, middle ground, and background to make each photograph vibrant, emotionally rich, and visually appealing.
The secret to creating photographs with depth and emotion lies not only in shooting technique or camera, but also in how you utilize different layers of the scene in your composition. The foreground, middle ground, and background are three fundamental elements that directly determine the sense of space and story in a photograph. When skillfully combined, they transform simple images into vibrant, realistic, and captivating visuals. This article will help you understand how to use these three layers of the scene in photography to elevate each of your photos.
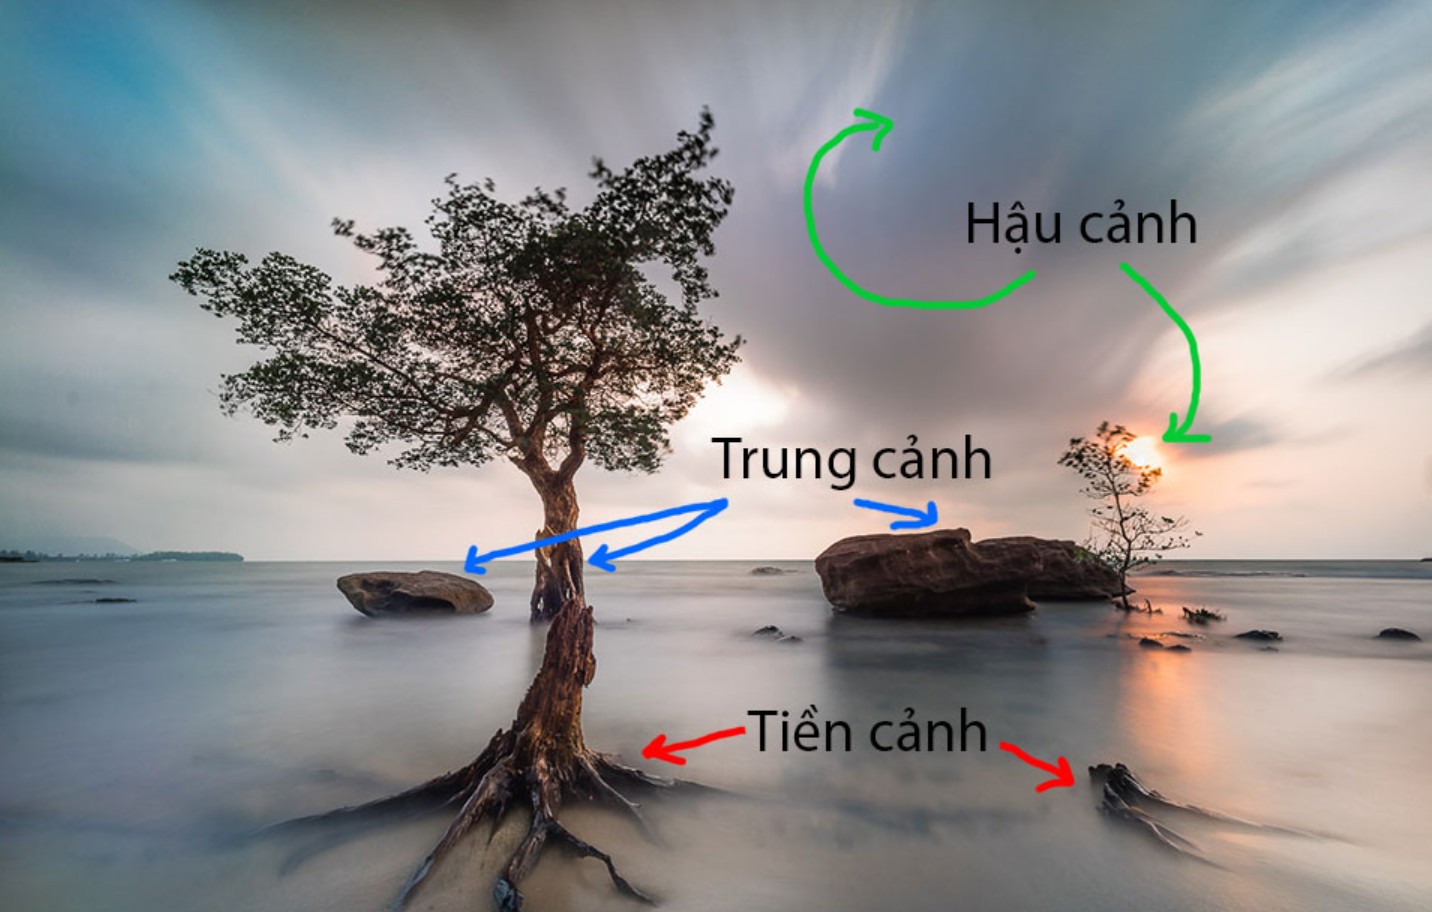
1. Concepts and roles of foreground, middle ground, and background in photography.
1.1 Foreground
The foreground is the part closest to the viewer in the frame. These are usually details, objects, or elements that appear in the foreground, contributing to the initial focal point when the viewer's gaze is directed towards the image. The foreground not only acts as a "window" to the overall picture but also guides the viewer's eye to follow the story of the photograph.
In photographic composition, the foreground acts as an introduction, guiding the viewer's gaze to the main subject. A carefully chosen foreground increases depth, creates a sense of three-dimensionality, and helps the viewer connect more naturally with the space in the image. For example, in landscape photography, a clump of grass, a few rocks, or a stream of water in the foreground can serve as the foreground. The viewer's eye will then follow these details into the middle ground, where the main story unfolds. However, it's important to note that if the foreground is too prominent or takes up too much space, it will distract attention from the middle ground and the main subject, causing the composition to become unbalanced.
1.2 Medium shot
The mid-ground is the area between the foreground and background, usually where the main subject or the "content" of the photograph is placed. It's the storytelling zone, where viewers pause to understand the message or story the photographer wants to convey. The mid-ground not only connects the layers of the scene but also serves as a focal point that determines the emotional impact of the photograph.
The mid-ground can be a person, a building, an animal, or any object identified as the main subject. To maximize the effectiveness of the mid-ground, the photographer needs to pay attention to brightness, color, sharpness, and composition within the frame. Balancing the mid-ground with the foreground and background helps the photograph have depth while conveying the message seamlessly.
For example, in a landscape photograph, the mid-ground might be a group of people walking on a trail, with flowers, grass, and boulders in the foreground, and majestic mountains or a vibrant sky in the background. When properly arranged, the mid-ground becomes the visual focal point, both striking and harmonious with the overall composition.
1.3 Background
The background is the furthest part of the frame, serving as the foundation for the entire composition. While often not the primary element, the background is still crucial in defining the space, time, and emotion of the photograph. A harmonious background helps the viewer better understand the shooting context, thereby perceiving depth and the story within the image.
The background can be a bustling city, a peaceful mountain range, a sunset sky, or a vast river. When the background is well-arranged, it both supports the middle ground and creates a sense of spaciousness, making the photograph more realistic and aesthetically pleasing. Conversely, a cluttered, messy, or overly prominent background will disrupt the narrative and distract attention from the main subject.
Observing the background before pressing the shutter button is essential. Even simply changing the shooting angle or adjusting the aperture to blur the background can keep the middle ground prominent while maintaining a sense of depth in the image.
2. Benefits of using three layers of scenery simultaneously
Combining foreground, middle ground, and background offers several important benefits, making the photograph more vibrant and visually appealing.
First, the three layers of the scene function as three parts of a story: the foreground opens, the middle ground is the main content, and the background concludes, creating the overall emotion. When these three layers are closely linked, the viewer will perceive the distance, connection, and balance between the elements in the image.
Secondly, using three layers of scenery simultaneously makes it easier to control the composition. When each layer is strategically placed, the image becomes balanced, harmonious, and aesthetically pleasing. This is especially important in types of photography such as landscapes, travel, architecture, or outdoor portraits, where the photographer wants to convey space and story visually.
Finally, the three layers of scene enhance visual depth. With the foreground guiding the eye, the middle ground holding attention, and the background providing context, viewers perceive the photograph not as a flat image but as a vibrant, three-dimensional space.
3. How to apply foreground, midground, and background elements in photos.
3.1 The Rule of Thirds
The rule of thirds is one of the most fundamental principles in photography. When dividing the frame into nine equal squares, you should place the subject or important elements at the intersections.

When this rule is combined with three layers of scene, the photograph will have a natural and harmonious balance. For example, the foreground can occupy about one-third of the bottom frame, with the middle and background occupying the remaining two parts. This division helps the image have depth and guides the viewer's gaze smoothly.
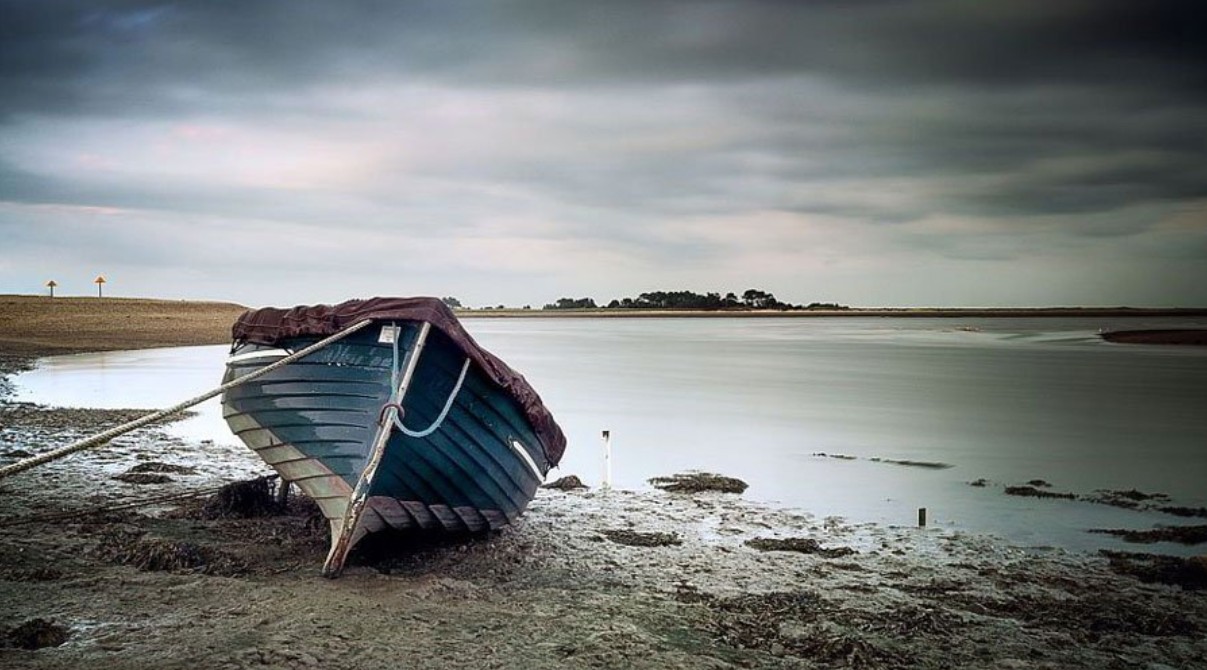
In landscape photography, the ideal composition is usually: the foreground is the ground, flowers, grass, or rocks; the middle ground is the main subject, such as a person, house, or important object; and the background is mountains, clouds, the sky, or distant scenery. Applying the rule of thirds helps to place each element in the right position, creating balance and harmony in the overall photograph.
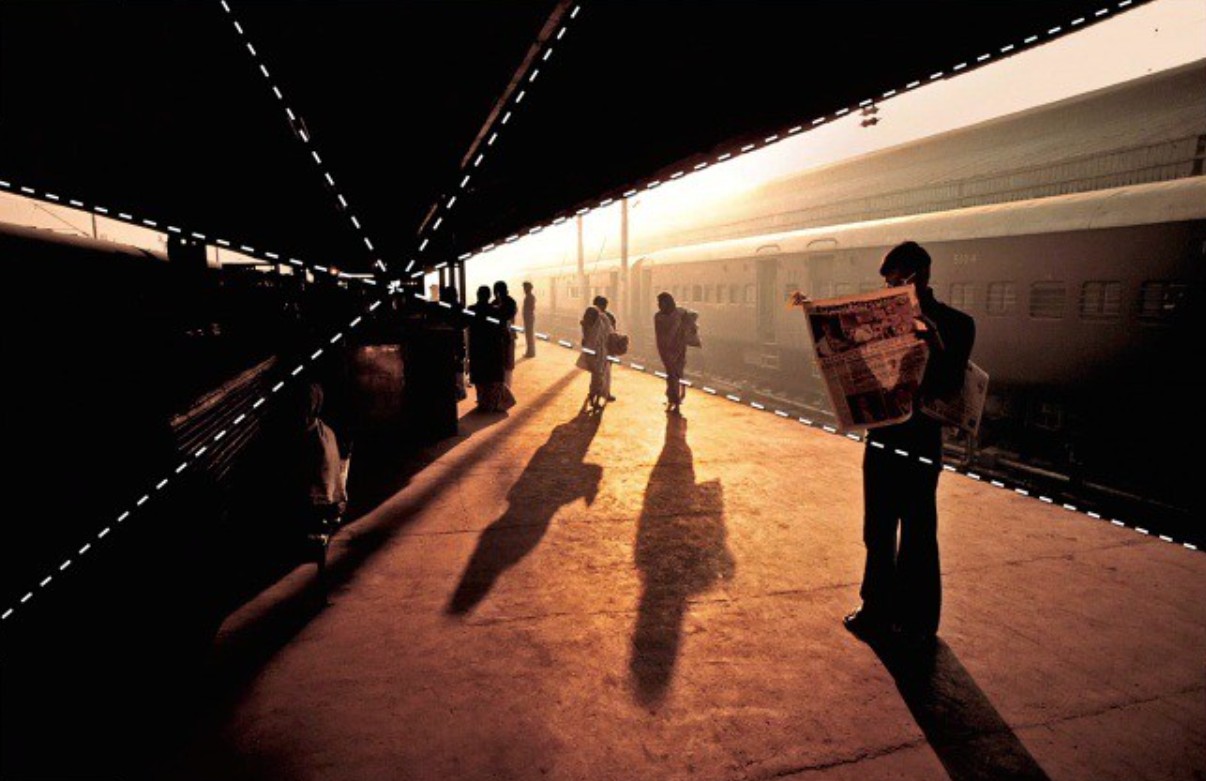
3.2 Path Layout (Main Line)
Lead lines are natural lines within a frame that guide the viewer's gaze from the foreground to the midground and background. These lines can be roads, fences, rivers, rows of trees, or architectural elements.
By combining the path with three layers of scenery, you build a visual sequence for the viewer's eye. The foreground opens with the path, the middle ground is where the viewer pauses to focus on the subject, and the background is not the final destination but rather an additional backdrop.
This technique is particularly effective for street photography, countryside scenes, or majestic nature. Viewers will feel as if they are "entering" the photograph, experiencing the space and story in a natural and vivid way.
3.3 Framing Technique
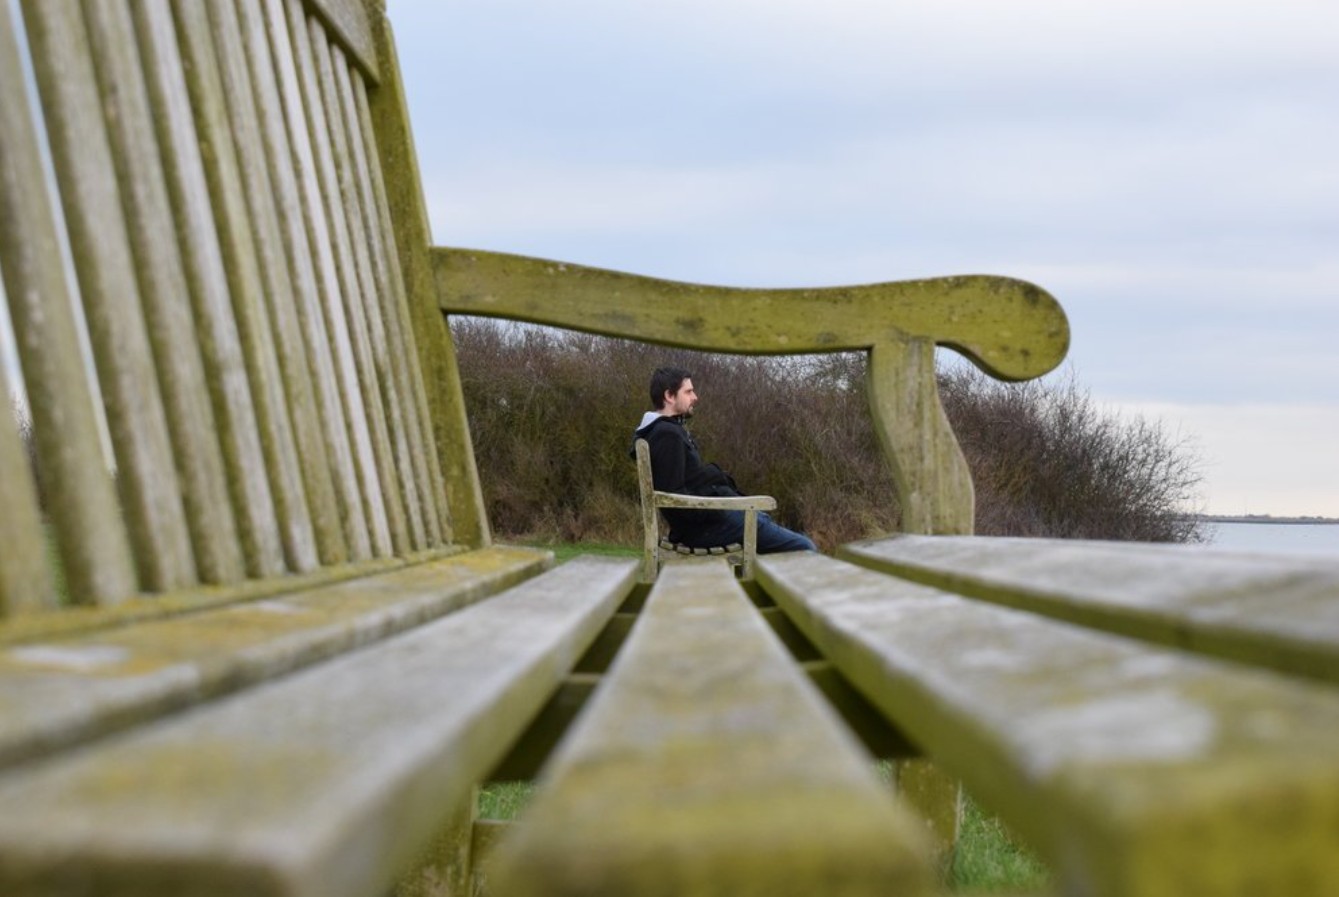
Framing techniques use elements in the foreground to create a "frame" around the subject, such as windows, tree branches, rock arches, or other natural objects. This method helps to increase depth and focus the viewer's attention on the middle ground.
Beyond physical elements, you can use light, shadows, or color to create a natural framing effect. Framing techniques help viewers clearly identify the three layers of the scene, while also creating a sense of three-dimensional space and vibrancy in the photograph.
For example, when photographing a person standing in a forest, you can use the branches in the foreground as the foreground, the person as the middle ground, and the distant sky or vegetation behind as the background. As light shines through the foliage, the shadows create a natural frame, allowing the viewer to focus on the central subject while still perceiving the vastness of the surrounding space.
4. Some notes on applying the three layers of scenery.
When applying a three-layered scene, the most important thing is to identify the subject before arranging the foreground and background elements. This helps guide the viewer's mind and prevents the layers of the scene from overpowering each other.
For portraits, the background should be kept simple so that the viewer focuses on the subject. Meanwhile, for landscape or architectural photos, the background can be richer but still needs to ensure it doesn't distract attention.
Aperture is a crucial factor affecting how depth of field is depicted. Small apertures (f/8 to f/16) help maintain consistent sharpness across all three layers, while large apertures (f/2.8 to f/4) create a bokeh effect, highlighting the mid-ground and the main subject.
Lighting also needs to be clearly layered so that the different scenes have natural contrast and their own appeal. Don't be afraid to try different angles: from low angles, high angles to oblique angles, to create a fresh sense of space and make the photo more vibrant.
Furthermore, color, patterns, and textures are also important tools for separating the three layers of a scene, helping viewers to visually recognize and experience depth.
The foreground, middle ground, and background are not just parts of the frame, but three layers of storytelling—three elements that bring a photograph to life, adding depth and emotion. When skillfully used, they guide the viewer's gaze, focusing attention on the subject, while providing context and space for the story to unfold more clearly.
Understanding and applying the three layers of scene helps photographers control composition, create balance, and enhance the aesthetic value of their images. This technique is not only suitable for landscapes, architecture, or street photography, but can also be applied to portraits, product photography, or any genre that aims to convey depth and storytelling.


VIP Products


Best Selling Products
Adobe Photoshop Copyright - Full App
120 USD
Upgrade Duolingo Super
29 USD
Copyright Adobe Lightroom Account
59 USD
Autodesk All App Account Copyright
120 USD
MidJourney Account
29 USD
Adobe Premiere Pro Account
99 USD
Plugin Retouch4me
69 USD
Genuine Adobe Illustrator account
99 USD
Genuine Cheap Canva Pro
39 USD
Capcut Pro 1 Year
39 USD
Freepik Premium Account
59 USD
Upgrade Genuine Office 365
49 USD
Windows 10 & 11 Pro Key
36 USD
Upgrade genuine Capture One account
120 USD
ChatGPT Plus Account (GPT-4)
16 USD