Best Selling Products

Upgrade genuine Capture One account
120 USD

Capcut Pro 1 Year
39 USD

Adobe Premiere Pro Account
99 USD

MidJourney Account
29 USD

ChatGPT Plus Account (GPT-4)
16 USD

Upgrade Genuine Office 365
49 USD

Adobe Photoshop Copyright - Full App
120 USD

Plugin Retouch4me
69 USD

Genuine Cheap Canva Pro
39 USD

Autodesk All App Account Copyright
120 USD

Copyright Adobe Lightroom Account
59 USD

Freepik Premium Account
59 USD

Genuine Adobe Illustrator account
99 USD

Windows 10 & 11 Pro Key
36 USD

Upgrade Duolingo Super
29 USD
Tips for Taking Outdoor Photos Without Overexposure, While Preserving Detail
Nội dung
- 1. Understanding the Causes of Overexposure and Loss of Detail in Photos
- 2. Master Camera Parameters to Control Lighting
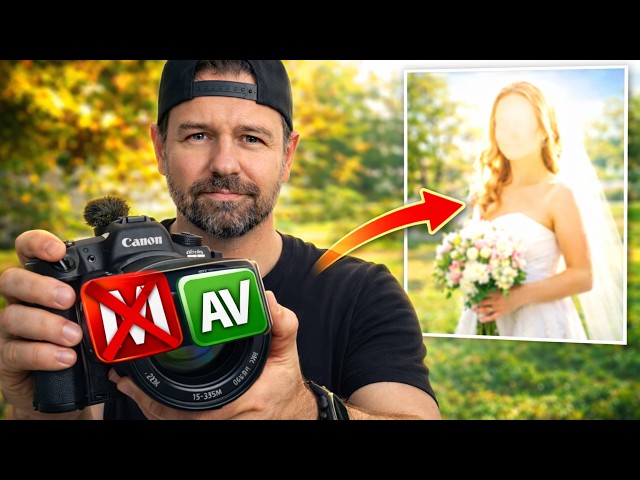
- 2.1. High Shutter Speed to Reduce Light
- 2.2. Low ISO and Appropriate Aperture
- 2.3. Using Exposure Compensation and Smart Metering
- 3. Choose the Right Time and Location for the Photo Shoot
- 4. Use Tools to Balance the Light
- 5. Leverage HDR Technology and RAW Format
- 6. Use ND Filters and Post-Processing to Optimize Images
This detailed guide explains how to control lighting when shooting outdoors. Learn how to adjust parameters, choose the right time, and use supporting tools to effectively avoid overexposure.
1. Understanding the Causes of Overexposure and Loss of Detail in Photos
Overexposure occurs when the amount of light entering the sensor exceeds the device's detection capacity. This often happens in brightly lit environments, especially direct sunlight at midday.
When the contrast between bright and dark areas is too great, the camera has to "prioritize" certain areas. In many cases, the automatic metering system will try to preserve detail in the dark areas, inadvertently overexposing the bright areas and causing overexposure.
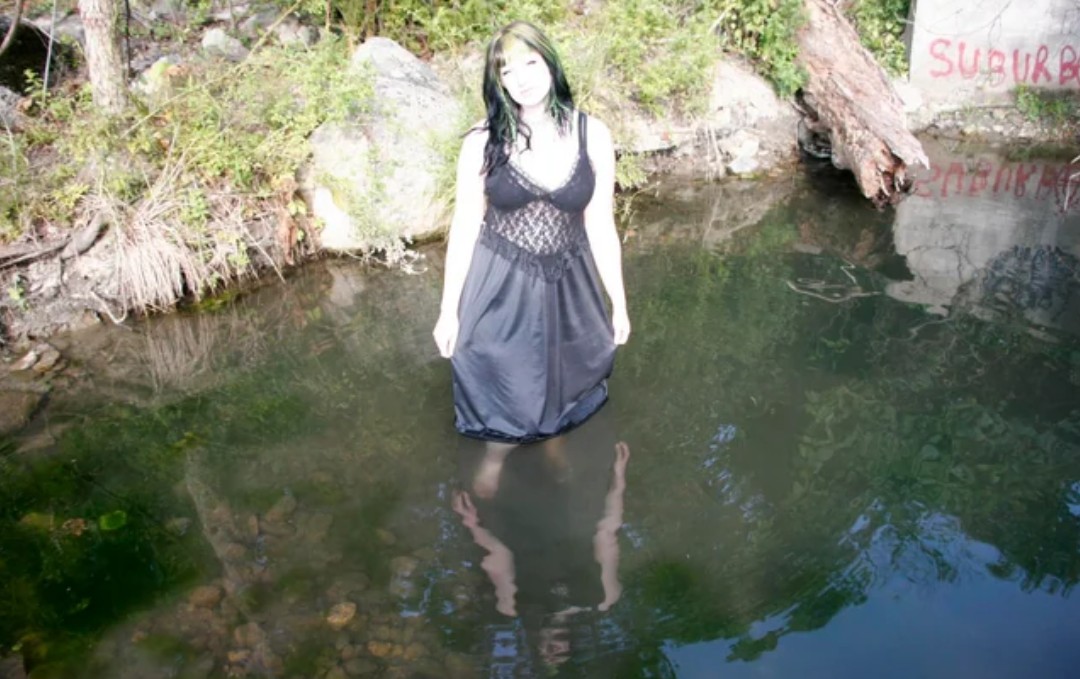
The areas most vulnerable to overexposure are typically the sky, white backgrounds, or reflective surfaces such as human skin, water, or glass. When overexposed, these areas completely lose image data, meaning they cannot be recovered in post-production.
Besides environmental factors, improper parameter settings are also a major cause. High ISO, wide aperture, or slow shutter speed all increase the amount of light entering the sensor.
An important concept to understand is dynamic range. This refers to the sensor's ability to capture detail in both bright and dark areas. When the light exceeds this limit, the data is "cropped" and cannot be recovered.
Understanding the causes will help you proactively control the lighting right from the moment you shoot, instead of relying entirely on post-processing.
2. Master Camera Parameters to Control Lighting
In outdoor photography, adjusting camera settings is the "first line of defense" against overexposure. By mastering the exposure triangle of shutter speed, aperture, and ISO, you can precisely control the amount of light entering the sensor.
2.1. High Shutter Speed to Reduce Light
The faster the shutter speed, the shorter the time the sensor is exposed to light. In bright sunlight, using high speeds such as 1/1000s or even faster is essential.
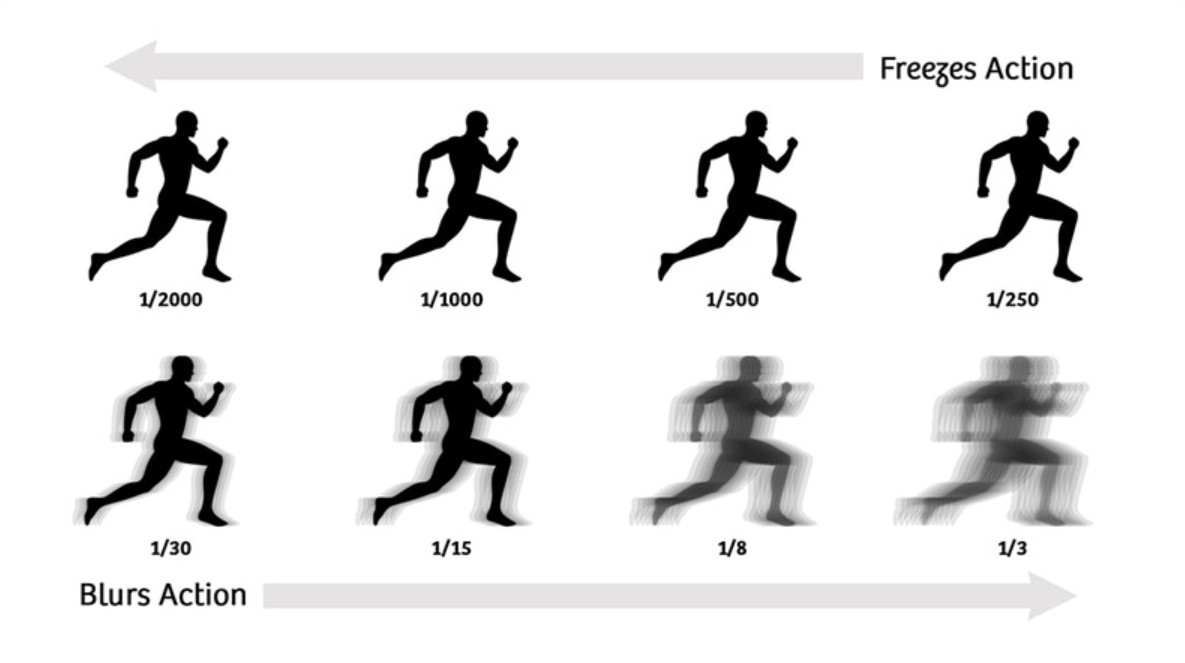
This significantly reduces the amount of light entering the frame while preserving detail in bright areas. Additionally, a high shutter speed helps avoid blurring when shooting moving subjects.
2.2. Low ISO and Appropriate Aperture
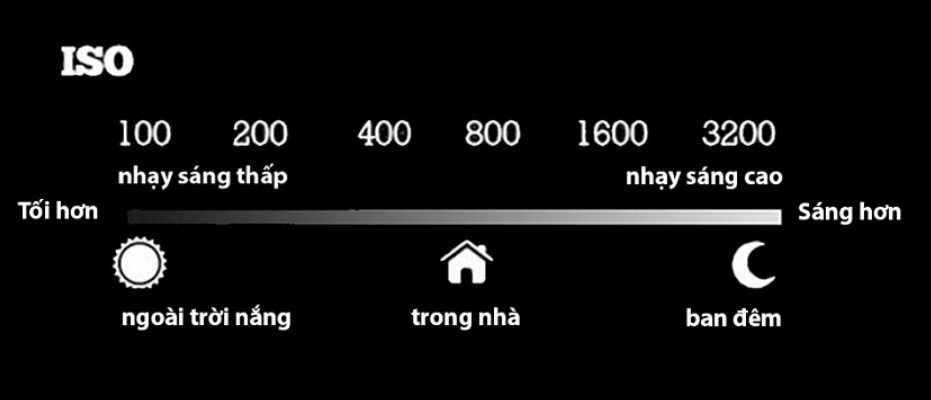
The ISO should be kept as low as possible, usually ISO 100. This not only helps reduce light but also ensures the best image quality with minimal noise.
The aperture acts as a "gateway" to control light. In bright sunlight, you should close the aperture to around f/8 to f/11. This is the ideal setting to reduce light while ensuring sharpness across the entire frame.
2.3. Using Exposure Compensation and Smart Metering
One of the quickest ways to avoid overexposure is to use exposure compensation. When you reduce the EV to negative levels like -0.3 to -1.0, the camera will automatically reduce the amount of light it captures.
In addition, the metering mode is also very important. Instead of using full-frame metering, you should switch to spot metering and set it to the brightest area. This helps to better preserve detail in the brightest areas.
Combining these elements will give you more precise and proactive control over lighting in any situation.
3. Choose the Right Time and Location for the Photo Shoot
The ideal time is the golden hour, which usually occurs about an hour after sunrise and an hour before sunset. During this time, the sun is low in the sky, and the light passes through a thicker atmosphere, resulting in a softer, warmer yellow hue with low contrast. This light not only helps prevent overexposure but also adds depth and emotion to the photograph.
Conversely, midday light presents the biggest challenge. When the sun is directly overhead, the light shines down, creating very high contrast, harsh shadows, and easily obscuring detail in the highlights. If you are forced to shoot in these conditions, finding the right position is crucial.
Natural shade is an effective solution for reducing the intensity of direct sunlight. Areas such as under trees, next to buildings, or under awnings can help soften the light. However, not all shade is ideal. You should prioritize areas with "open shade," meaning shaded areas that still receive reflected light from the sky or surrounding environment. This ensures the subject is well-lit while maintaining a soft, natural look.

A key technique is to position the subject near the edge of the shade rather than deep within it. In this position, the light is just right to create depth in the face without being harsh. If the subject is too deep in the shade, the light will lack direction, making the photo look flat and lifeless.
Besides position, the direction of light also plays a very important role. Direct light often makes the skin look harsh and easily overexposed. Instead, you should try shooting against the light or with offset lighting. When shooting against the light, the sun is behind the subject, creating a beautiful light outline around the hair and body, while reducing the pressure of direct light on the face. With offset lighting, you can create clear areas of light and shadow, giving the face more depth and making it stand out.
One often overlooked factor is the surrounding environment. Bright surfaces like white walls, cement floors, or sand can act as natural light reflectors, helping to illuminate the subject without the need for a reflector. Conversely, dark or heavily colored environments can cause color casts or underexposure in the image.
4. Use Tools to Balance the Light
A diffuser is one of the most effective tools for softening light. When placed between a light source and a subject, a diffuser disperses strong light into smaller beams, thereby reducing harshness and minimizing harsh shadows on the face. This is especially useful when shooting outdoor portraits, helping skin look more natural and smooth.
Meanwhile, a reflector's role is to "compensate" for dark areas. When light shines from one direction, a face or subject will have noticeable shadows. Using a reflector to reflect the light back helps brighten these areas, thereby balancing the overall lighting in the image.
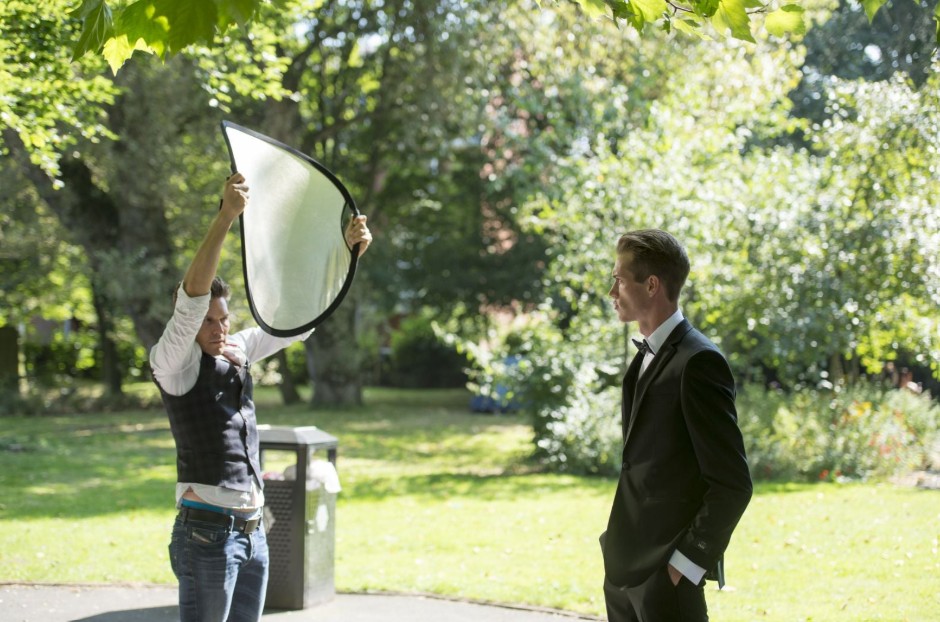
The key to using a reflector is choosing the right material. White surfaces provide soft, natural light, silver surfaces offer stronger reflection, and gold surfaces create warm skin tones. You can flexibly choose depending on the style of your photos.
The combination of a diffuser and reflector allows you to control light in both directions: softening bright areas and enhancing dark areas. This results in a harmonious contrast in the photo, preserving detail in both areas without requiring significant camera adjustments.
5. Leverage HDR Technology and RAW Format
HDR (High Dynamic Range) works by taking multiple photos with different exposure levels and then combining them into a single image. This prevents bright areas from being overexposed and preserves detail in dark areas. The result is a more balanced image, closer to what the human eye sees.
However, HDR isn't always suitable. When photographing moving subjects like people, vehicles, or animals, combining multiple frames can cause ghosting or image distortion.
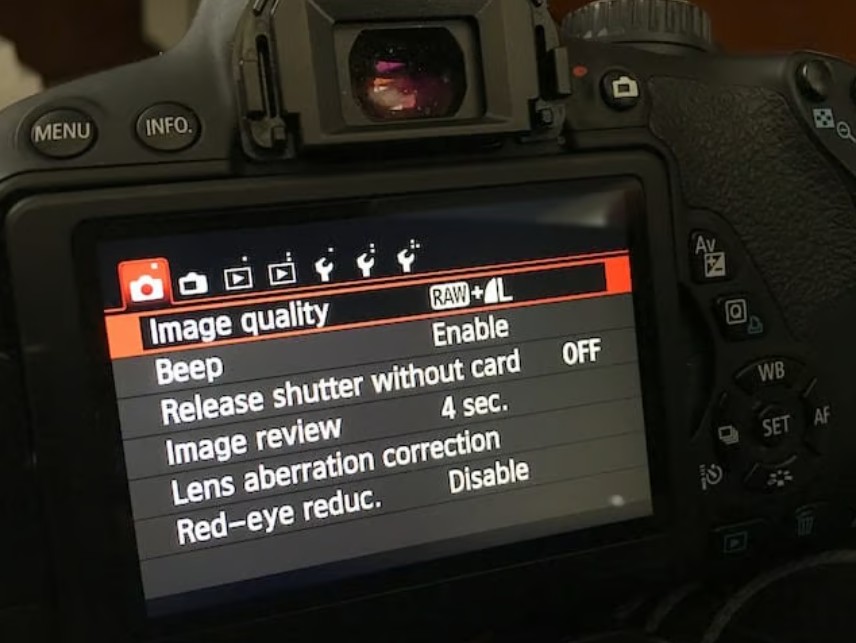
In these cases, the RAW format becomes the better choice. Unlike JPEG, RAW files store all the light data recorded by the sensor, including details in bright and dark areas that are difficult for the naked eye to perceive.
This offers a huge advantage in post-production. You can easily reduce highlights to restore overexposed details or increase shadows to brighten dark areas without compromising image quality.
6. Use ND Filters and Post-Processing to Optimize Images
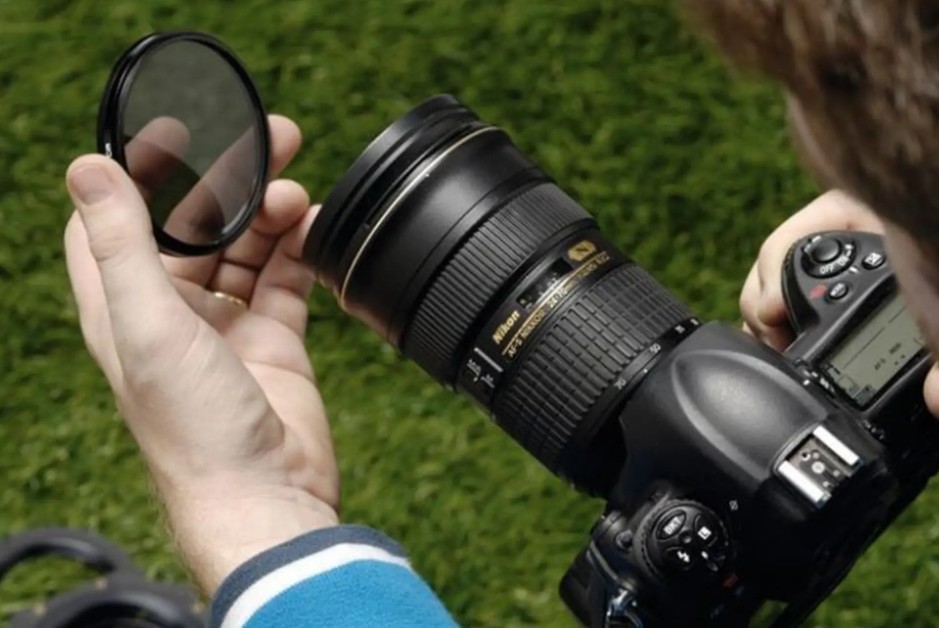
Neutral Density (ND) filters are essential accessories for outdoor photography, especially in bright light conditions. The main function of an ND filter is to reduce the amount of light entering the lens without altering the color or contrast of the image.
Thanks to ND filters, you have more flexibility in choosing parameters. For example, you can still use a large aperture to create a beautiful bokeh effect even when shooting at midday, or reduce the shutter speed to create a motion blur effect without worrying about overexposure.
There are many types of ND filters with different light reduction levels, from ND2, ND8 to ND1000. Depending on the lighting conditions and shooting purpose, you can choose the appropriate type to achieve optimal results.
After the shooting process is complete, post-processing is a crucial step in perfecting the image. Software like Adobe Lightroom offers extremely detailed control over lighting.
You can reduce highlights to restore detail in bright areas, adjust whites to balance the overall effect, and increase shadows to clarify dark areas. Additionally, fine-tuning the white balance helps to make colors more accurate, avoiding color casts caused by harsh sunlight.
An important point is that you shouldn't over-recover the image. If the bright areas are completely overexposed (data is lost), trying to fix them in post-processing won't be effective. Therefore, post-processing should be considered the optimal step, not a substitute for shooting correctly from the start.
Taking outdoor photos without overexposure isn't too difficult if you understand light and know how to control your equipment. Most importantly, practice regularly and observe the light in all conditions. Once you understand how light "works," you'll no longer be passive but can turn it into a powerful creative tool in photography.


VIP Products


Best Selling Products
Upgrade genuine Capture One account
120 USD
Capcut Pro 1 Year
39 USD
Adobe Premiere Pro Account
99 USD
MidJourney Account
29 USD
ChatGPT Plus Account (GPT-4)
16 USD
Upgrade Genuine Office 365
49 USD
Adobe Photoshop Copyright - Full App
120 USD
Plugin Retouch4me
69 USD
Genuine Cheap Canva Pro
39 USD
Autodesk All App Account Copyright
120 USD
Copyright Adobe Lightroom Account
59 USD
Freepik Premium Account
59 USD
Genuine Adobe Illustrator account
99 USD
Windows 10 & 11 Pro Key
36 USD
Upgrade Duolingo Super
29 USD