Best Selling Products

Windows 10 & 11 Pro Key
36 USD

Genuine Adobe Illustrator account
99 USD

Freepik Premium Account
59 USD

Capcut Pro 1 Year
39 USD

Plugin Retouch4me
69 USD

ChatGPT Plus Account (GPT-4)
16 USD

Upgrade genuine Capture One account
120 USD

Copyright Adobe Lightroom Account
59 USD

Autodesk All App Account Copyright
120 USD

Upgrade Duolingo Super
29 USD

Genuine Cheap Canva Pro
39 USD

Upgrade Genuine Office 365
49 USD

MidJourney Account
29 USD

Adobe Premiere Pro Account
99 USD

Adobe Photoshop Copyright - Full App
120 USD
What is Photoshop on a computer? A beginner''s guide.
Nội dung
- 1. What is the Photoshop application on a computer?
- 2. Advantages of using Photoshop on a computer
- 3. Familiarize yourself with the Photoshop interface on your computer.
- 4. Instructions on how to create a new workspace in Photoshop
- Step 1: Open the new file creation window.
- Step 2: Set up the parameters for the workspace.
- 5. How to open image files in Photoshop
- Step 1: Select Open in Photoshop
- Step 2: Select the file you want to edit.
- 6. Basic image editing techniques in Photoshop
- 7. How to export an edited image in Photoshop
- Step 1: Open the Export feature
- Step 2: Select parameters and export image
- 8. Conclusion
Photoshop has long been a familiar name to those who enjoy image editing, graphic design, or frequently create content on their computers. However, for newcomers, the interface, with its numerous toolbars and features, can feel quite overwhelming the first time you open the application. So, what is Photoshop on a computer, what are its advantages, and how do you get started using it? In fact, you don''t need to know all the features to get familiar with Photoshop.
1. What is the Photoshop application on a computer?
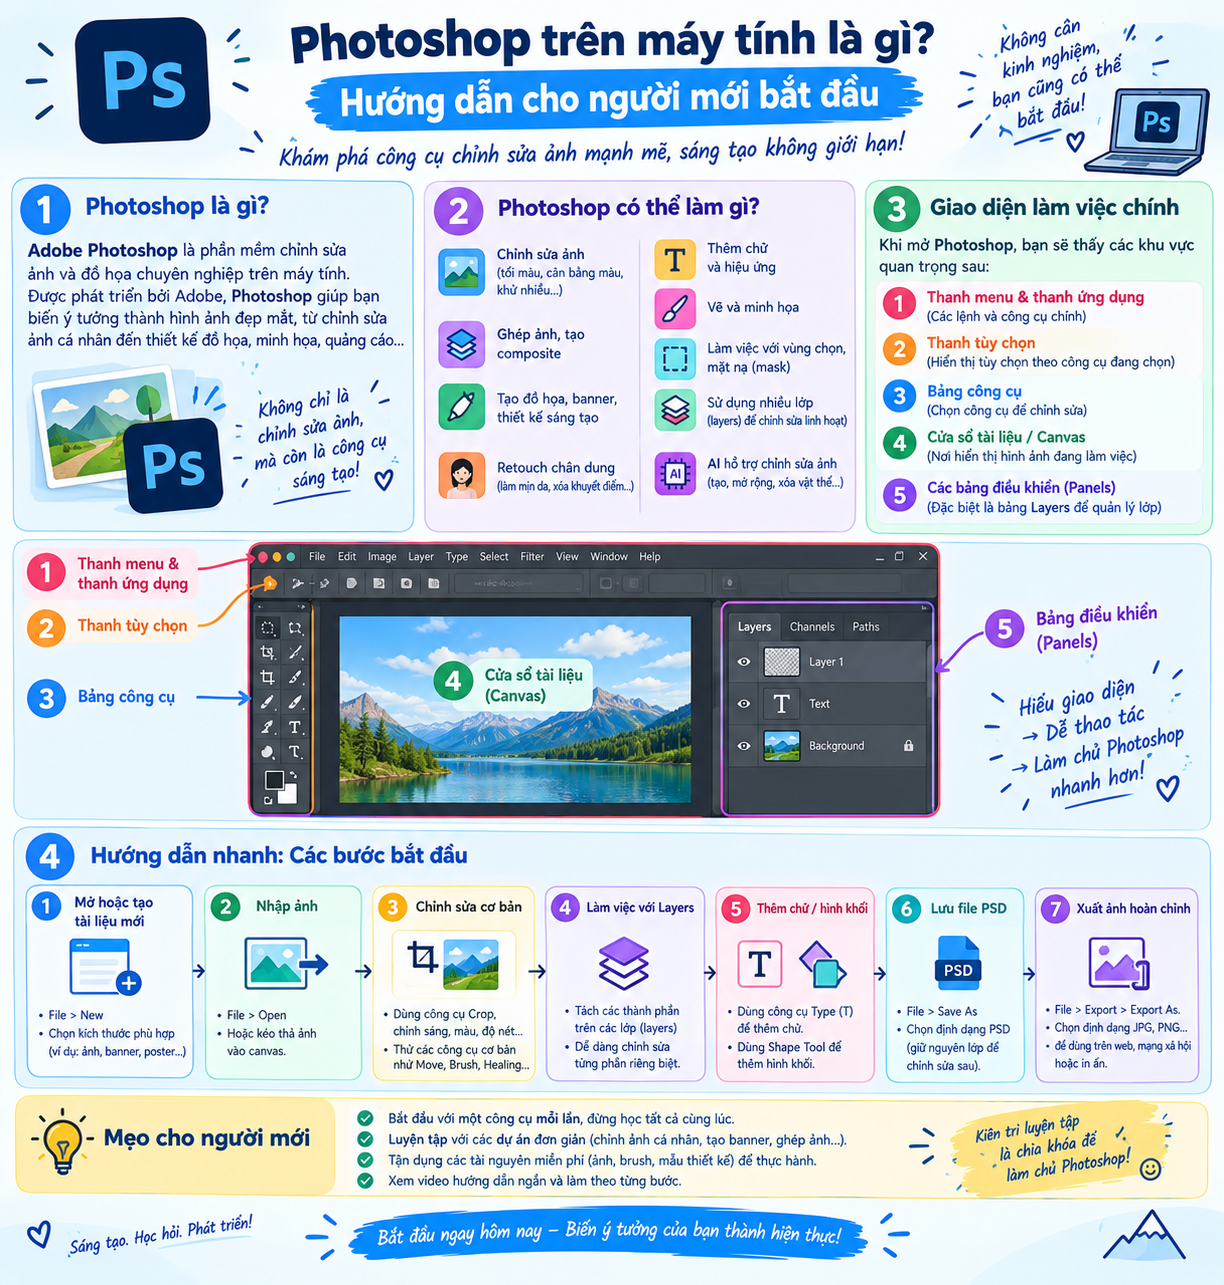
Photoshop is image editing and design software developed by Adobe, widely used in many fields such as graphic design, photography, media, marketing, and content creation. The software provides a rich system of tools allowing users to edit images, crop objects, change colors, add text, process details, or create entirely new designs.
The appeal of Photoshop lies in its highly flexible image processing capabilities. You can start with an existing image and transform it according to your ideas, or create a new product from a blank workspace. For beginners, familiarizing yourself with each basic tool group will make learning Photoshop easier, rather than trying to memorize all the features at once.
2. Advantages of using Photoshop on a computer
One of the reasons Photoshop is chosen by many is its diverse system of image editing tools. From simple operations like cropping and resizing images to more complex tasks like background removal, image merging, or color adjustment, everything can be done in a single workspace. Besides its editing capabilities, Photoshop also supports many file formats and provides export options to suit various needs. The interface is organized into clear sections, making it easier for users to find tools and adjust parameters once they become familiar with the software.
Some notable advantages of using Photoshop on a computer include:
-
Diverse editing tools: Supports cutting, merging, color correction, detail removal, resizing, and many other operations.
-
Numerous filters and effects: Help add color, style, and personality to your images.
-
Supports multiple formats: Can work with various image file types depending on the intended use.
-
Flexible design space: Users can create new images or edit existing ones directly.
-
Supports working with multiple layers: Layers help separate individual components for editing without affecting the overall design.
-
High level of creativity: Able to combine images, text, colors, effects, and many other elements to create unique products.
3. Familiarize yourself with the Photoshop interface on your computer.
When you first open Photoshop, you'll see many icons on the screen. Don't rush to learn each tool immediately. First, familiarize yourself with the important areas such as the menu bar at the top, the toolbar on the left, the image display area in the center, and the control panel on the right. During use, you'll frequently work with items like File , Edit , Image , Layer , and Filter . The toolbar on the left contains commonly used editing tools, while the area on the right usually displays Layers, colors, and various control panels. Understanding the function of each area will make finding the right tool much faster.
For beginners, some tools to familiarize yourself with first include:
-
Move Tool: Moves objects within the design area.
-
Crop Tool: Crop and adjust the image frame.
-
Brush Tool: Draw or color directly.
-
Eraser Tool: Removes a portion of an image.
-
Text Tool: Add text content.
-
Selection Tool: Select an area or object to edit.
-
Zoom Tool: Zoom in or out of the image while working.
You don't need to learn all the tools at once. Start with the features that directly serve your needs. With regular practice, you'll gradually remember the location and usage of the tools more naturally.
Buy a licensed copy of Photoshop at a low price.
4. Instructions on how to create a new workspace in Photoshop
To begin a completely new design, you need to create a workspace with the appropriate dimensions. This is a crucial first step because the size and resolution will affect the design process and the quality of the final product. If you want to design a social media image, banner, or a specific graphic product, you should determine the required dimensions before creating the file. If you only want to experiment with Photoshop tools, you can use any size to get familiar with it.
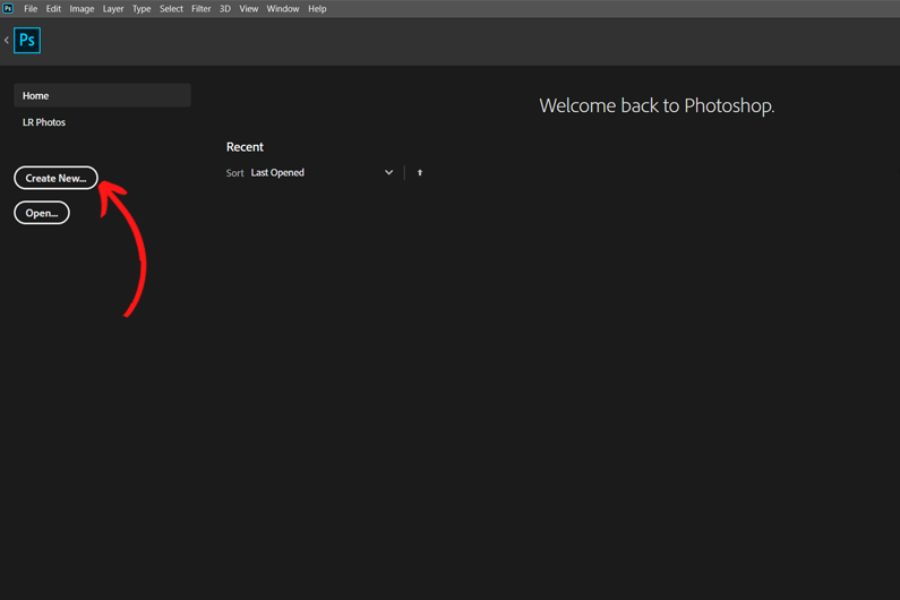
Step 1: Open the new file creation window.
Launch Photoshop on your computer , then select Create New... on the start screen. You can also use the keyboard shortcut Ctrl + N to quickly open the new document creation window. Here, Photoshop will display several options related to page size and settings. If you're new to it, you can start with a simple setting and adjust it as you better understand your design needs.
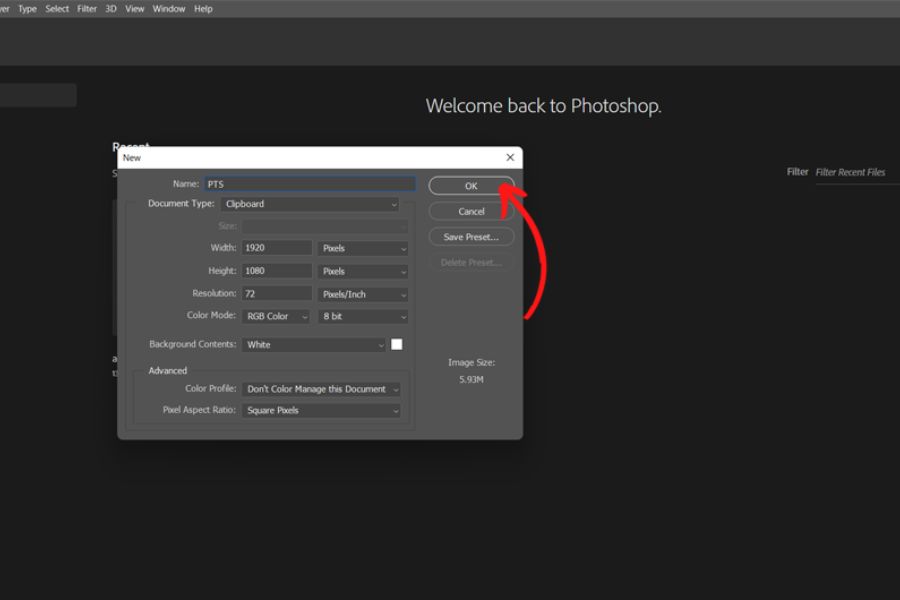
Step 2: Set up the parameters for the workspace.
In the new document creation window, enter parameters such as width, height, and resolution according to your intended use. After reviewing the settings, select Create or OK depending on the version of Photoshop you are using. A helpful tip for beginners is to check the units of measurement before entering dimensions. This helps avoid designing with incorrect proportions or having to readjust the entire layout later.
5. How to open image files in Photoshop
If you already have an image or design file saved on your computer, you don't need to create a new document. Photoshop allows you to directly open an existing file to continue editing. This is also an operation you will use quite frequently when working with images. Before opening the file, determine the correct location where the image is saved on your computer. For design files that are still in progress, prioritize saving them in a suitable format to preserve the elements that need editing, especially the layers.
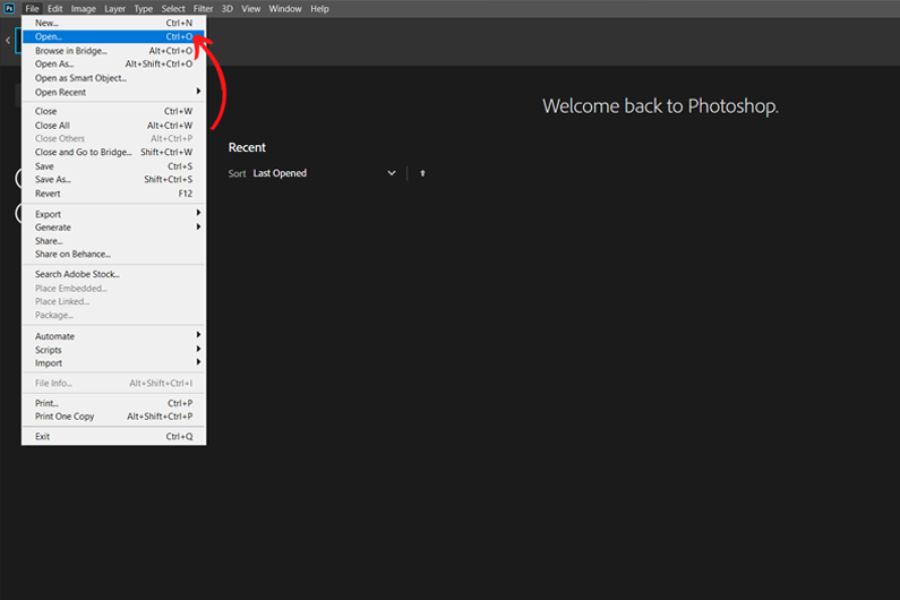
Step 1: Select Open in Photoshop
After opening Photoshop, select File from the menu bar and then select Open . You can also use the keyboard shortcut Ctrl + O to quickly open the file selection window. Another way is to drag the image file directly from a folder on your computer into the Photoshop workspace. This is quite convenient when you are working with many images at once.
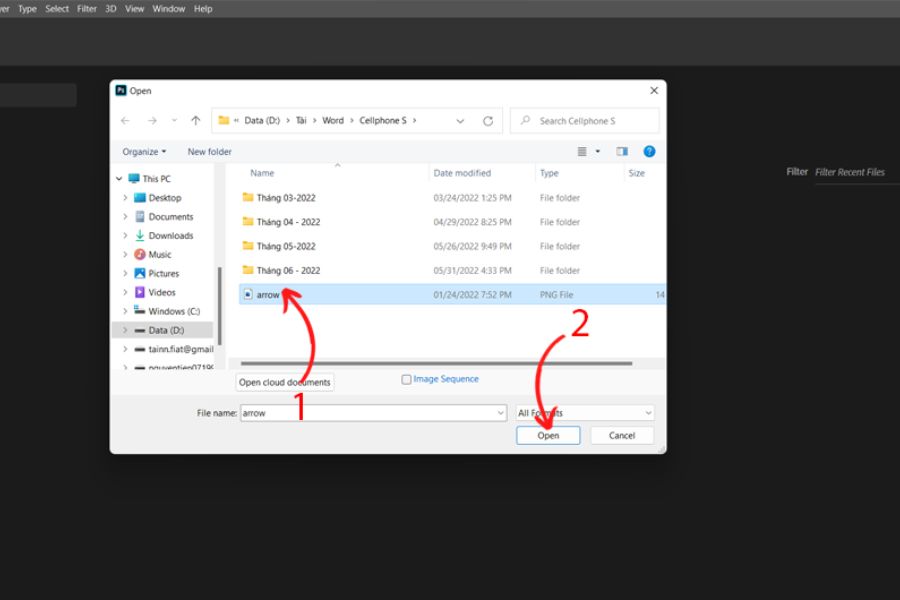
Step 2: Select the file you want to edit.
Navigate to the folder containing the image, select the file you want to use, and click Open . Photoshop will load the image into the workspace so you can begin editing. Once the image is open, observe the Layers panel and image dimensions before proceeding with any further steps. If you only want to test a tool, you can create a copy of the layer beforehand to minimize impact on the original image.
6. Basic image editing techniques in Photoshop
After creating or opening the file, you can begin making your first edits. For beginners, prioritize simple operations such as cropping, resizing, adding text, adjusting colors, or removing an unwanted detail. Photoshop offers many ways to perform the same task. So, don't feel pressured if you don't remember the tools right away. The most important thing is to understand what you want to change, then find the appropriate tool to do it.
A basic editing process can begin as follows:
-
Crop the image: Select the Crop Tool and drag the frame to the desired area.
-
Moving images: Use the Move Tool to change the position of an object or layer.
-
To add text: Select the Text Tool, click on the area where you want to place the text, and enter your content.
-
Color adjustment: Use color or brightness adjustment tools to change the appearance of the image.
-
Remove details: You can use the Eraser tool or other suitable selection and editing tools.
-
Create effects: Explore the Filter group to experiment with the available effects.
-
Working with Layers: Separate images, text, and other elements into individual layers for easier editing.
One thing beginners should remember is the use of layers . Instead of editing a single image directly, you can create multiple layers for each element. For example, the background image on one layer, the text on another, and decorative details on a separate layer. This makes it easy to change or delete an element without having to redesign the entire project. Additionally, get into the habit of saving files during your work. For designs that require later editing, keep the original file so you can easily go back and change layers, text, or effects. Saving regularly also reduces the risk of losing your work if Photoshop or your computer malfunctions.
Buy a licensed copy of Photoshop at a low price.
7. How to export an edited image in Photoshop
Once you've finalized your image, the last step is to export the finished product. Photoshop offers many file export options, so you can adjust the format, size, and quality according to your needs. For example, images for social media often need a balance between quality and file size for faster uploads. For beginners, carefully check the image before exporting. Review the layout, text content, colors, and important details. If you want to keep a working copy for later editing, you should save an additional working version before exporting the final image.
Step 1: Open the Export feature
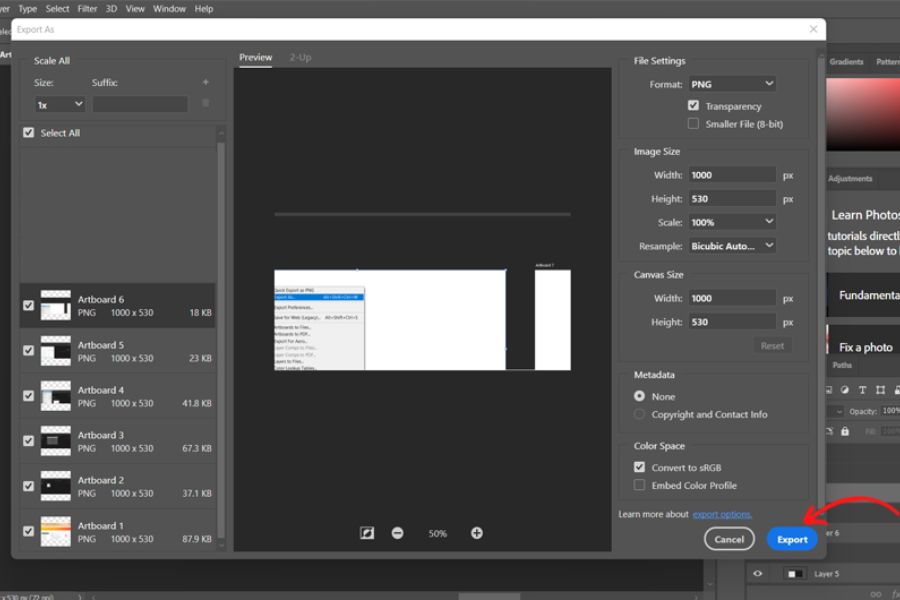
On the Photoshop menu bar, select File , then find Export and select Export As... Depending on the Photoshop version, the location or names of some options may differ slightly. The export window will display settings related to format and size. This is where you choose the parameters that best suit where you want to use the image.
Step 2: Select parameters and export image
In the Export As window , select the image format, size, and quality parameters according to your needs. After reviewing, click Export and choose a folder to save it to on your computer. If the image needs to be posted to a website or social media, you can prioritize a common format and check the file size before saving. Meanwhile, if you need to continue editing the design, keep the original Photoshop file instead of just saving the exported image. For beginners, mastering the process of creating, opening, editing, and exporting images will give you a good foundation to start exploring Photoshop. After that, you can continue learning more about Layers, Masks, the Pen Tool, color correction, background removal, and advanced techniques to improve your design skills.
8. Conclusion
Photoshop on a computer is a powerful tool for image editing and graphic design, but beginners don't necessarily need to learn all its features right away. Breaking down the process into basic operations like creating a workspace, opening files, editing, and exporting images will help you quickly become familiar with the interface. Once you've mastered the foundational tools, you can start exploring layers, filters, selection tools, and color correction features to create more professional-looking products. Most importantly, practice regularly with real images, because the more you work with them, the easier it will be to remember the tools and develop your own working style in Photoshop.





















VIP Products








Best Selling Products
Windows 10 & 11 Pro Key
36 USD
Genuine Adobe Illustrator account
99 USD
Freepik Premium Account
59 USD
Capcut Pro 1 Year
39 USD
Plugin Retouch4me
69 USD
ChatGPT Plus Account (GPT-4)
16 USD
Upgrade genuine Capture One account
120 USD
Copyright Adobe Lightroom Account
59 USD
Autodesk All App Account Copyright
120 USD
Upgrade Duolingo Super
29 USD
Genuine Cheap Canva Pro
39 USD
Upgrade Genuine Office 365
49 USD
MidJourney Account
29 USD
Adobe Premiere Pro Account
99 USD
Adobe Photoshop Copyright - Full App
120 USD