Best Selling Products

Plugin Retouch4me
69 USD

Windows 10 & 11 Pro Key
36 USD

Upgrade genuine Capture One account
120 USD

Upgrade Genuine Office 365
49 USD

Genuine Adobe Illustrator account
99 USD

Copyright Adobe Lightroom Account
59 USD

Upgrade Duolingo Super
29 USD

ChatGPT Plus Account (GPT-4)
16 USD

MidJourney Account
29 USD

Autodesk All App Account Copyright
120 USD

Adobe Premiere Pro Account
99 USD

Capcut Pro 1 Year
39 USD

Freepik Premium Account
59 USD

Genuine Cheap Canva Pro
39 USD

Adobe Photoshop Copyright - Full App
120 USD
Guidelines for Designing Action Movie Posters in Photoshop
Nội dung
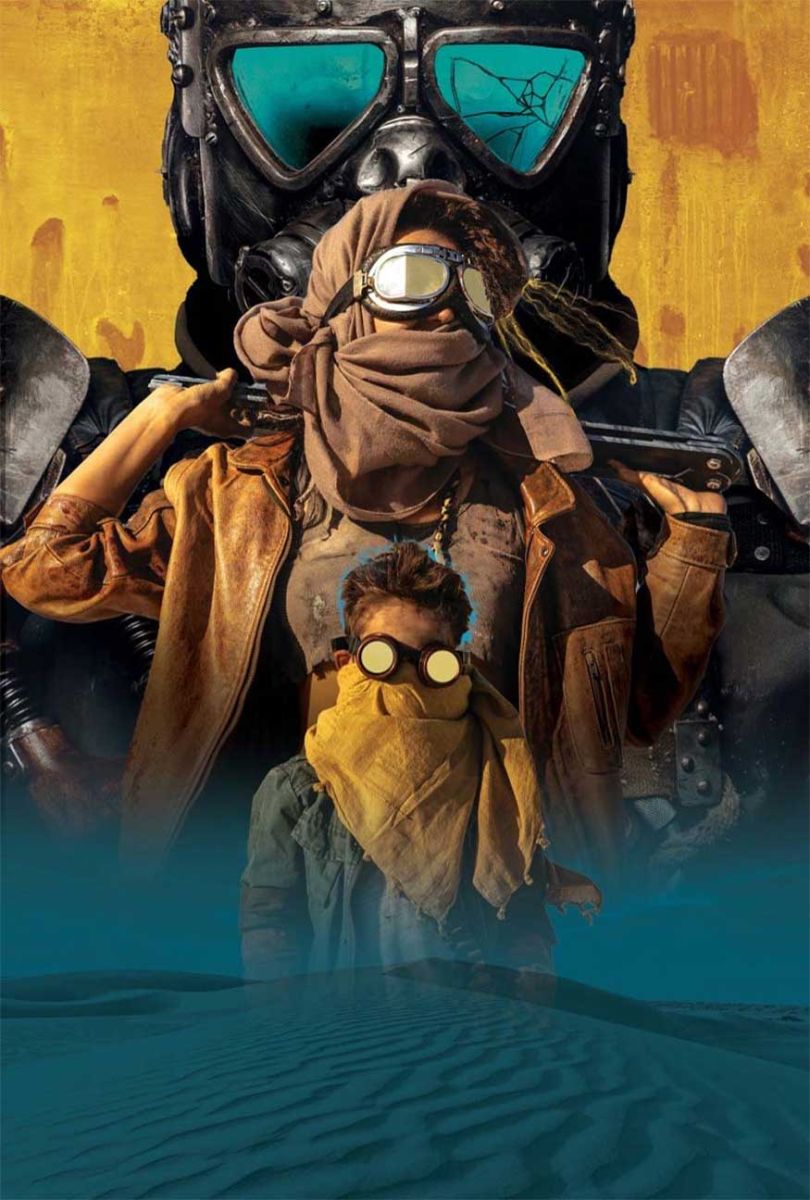
If you are interested in how to create Action Movie Posters in Photoshop, you absolutely should not miss the following content that SaDesign brings. In this article, we will guide you through detailed instructions to create the most impressive and attractive posters!

If you are interested in how to create Action Movie Posters in Photoshop, you absolutely should not miss the following content that SaDesign brings. In this article, we will guide you through detailed instructions to create the most impressive and attractive posters!
1. How to create an action movie poster in Photoshop.
- Step 1: First, you need to create a new 27 x 40 inch canvas.

- Step 2: If the design is printed on paper, design it in CMYK color mode. If it's just for the web, RGB is better for the web and other electronic uses.
For the instructions below we will use CMYK.
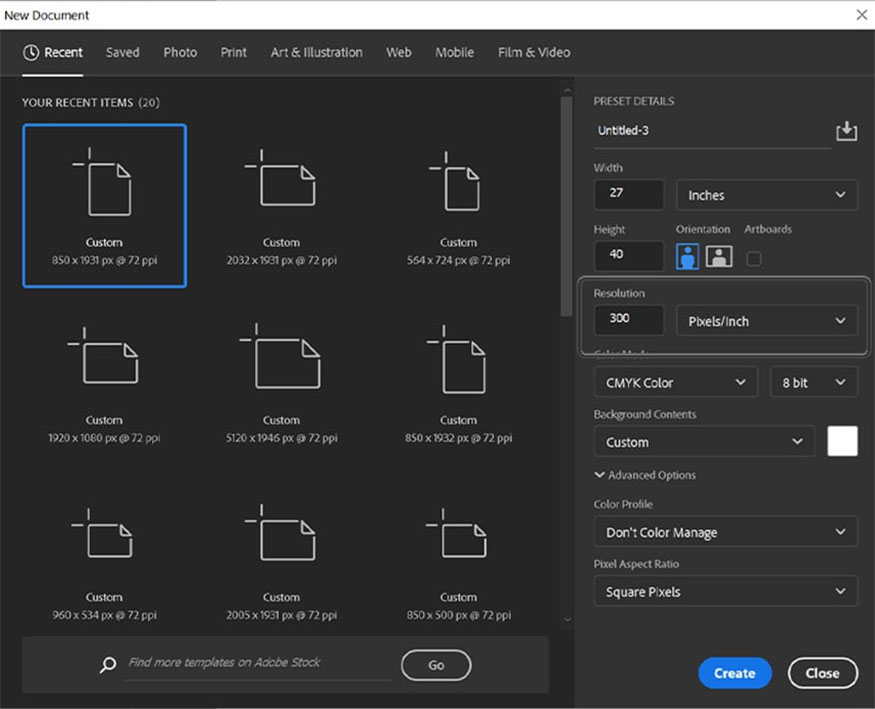
- Step 3: If printing, set DPI or Resolution to 300. This will ensure your photo is printed beautifully and sharp. For web images, the default is 72.

2. How to create an action movie poster design layout
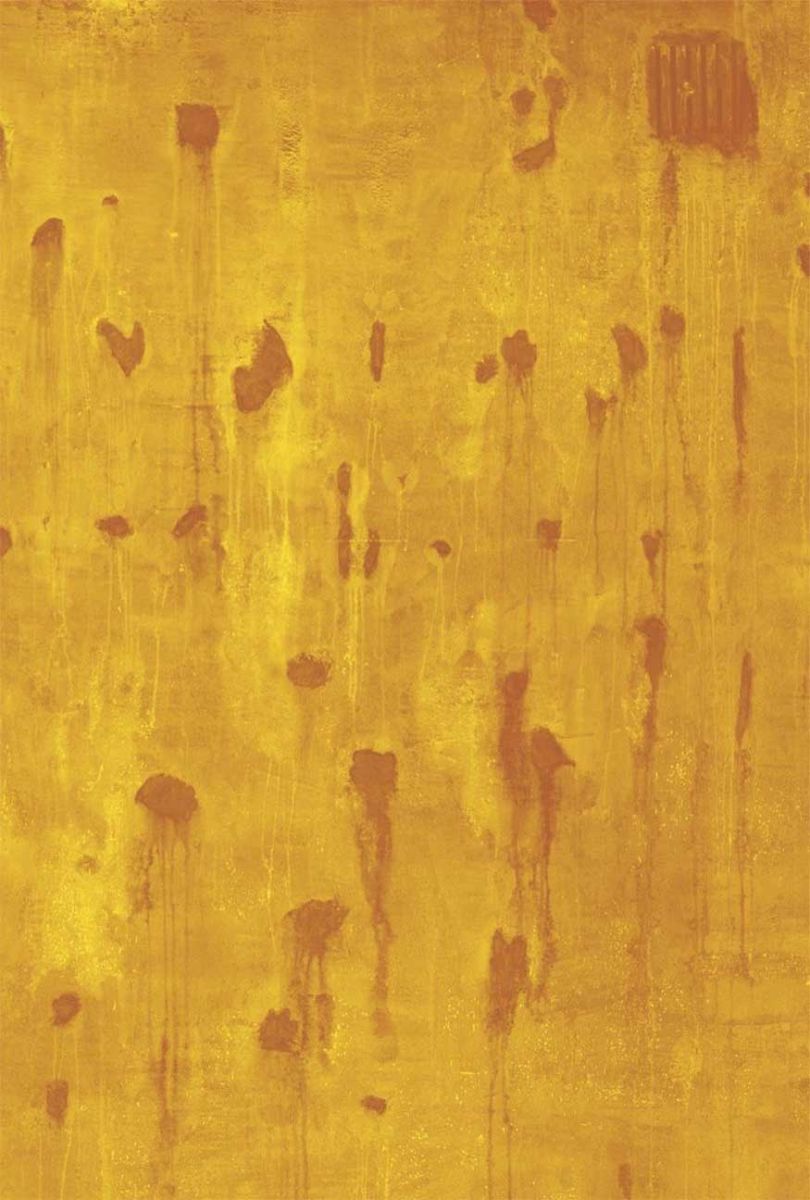
- Step 1: Create a Color Fill layer and fill it with the yellow color code #d3a033.

- Step 2: Use images of concrete walls with rusty textures and place them on top of the Color Fill layer. Please enlarge the image to show only the texture of the wall. Turn the texture into black and white, you can use the Hue/Saturation tool to do it.
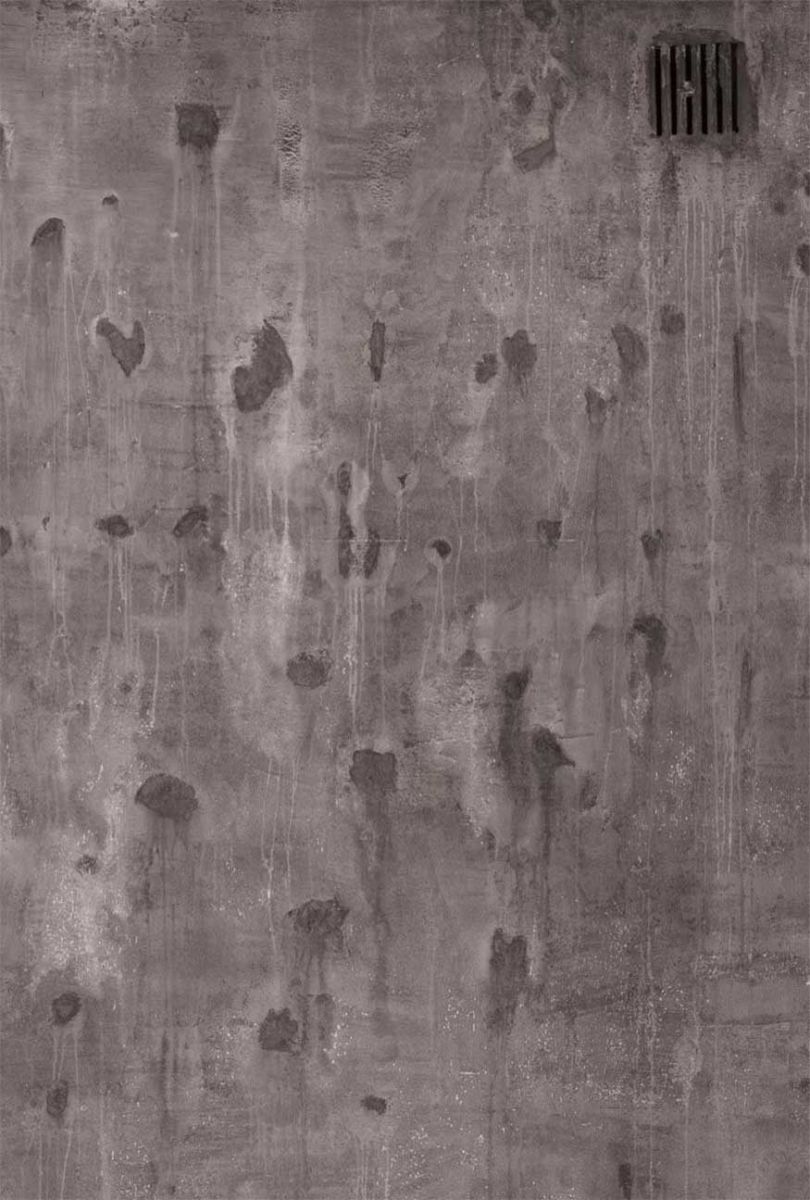
- Step 3: Set the texture's layer mode to Overlay. Duplicate the textures to make them more vibrant. Then group these 2 Color Fill layers and name the group "Background".
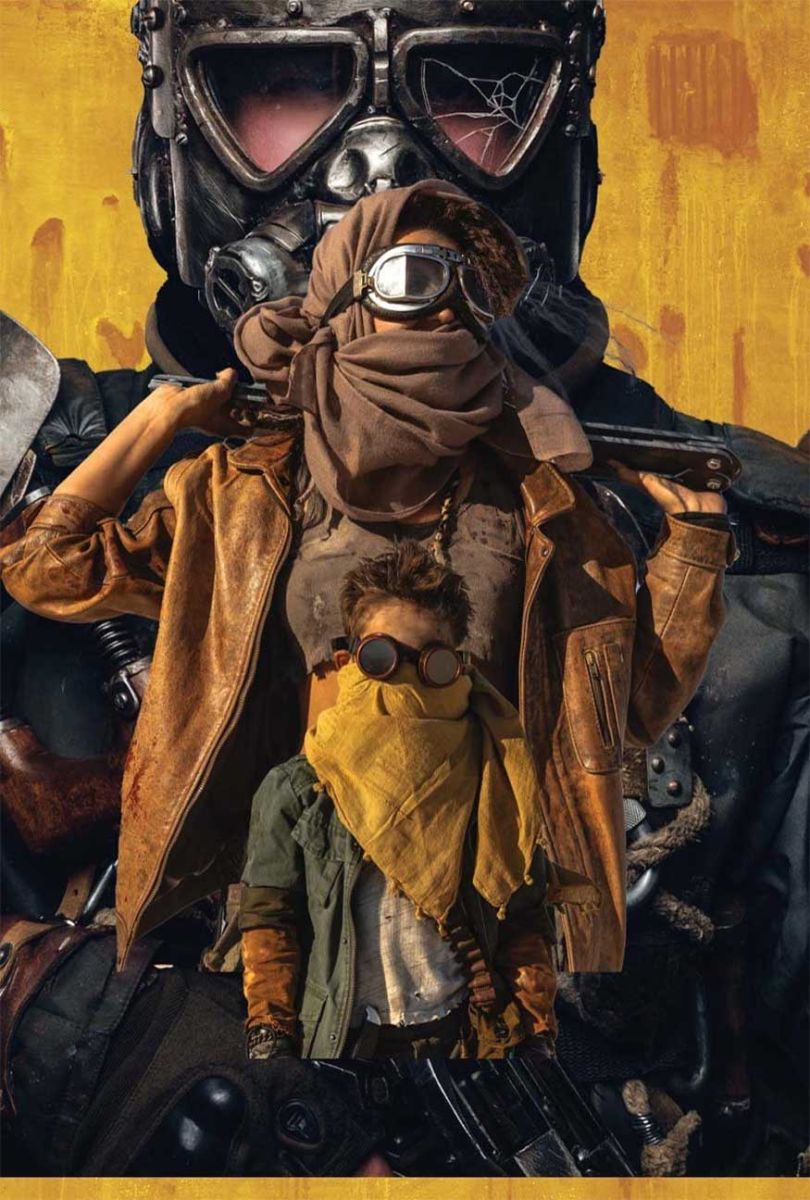
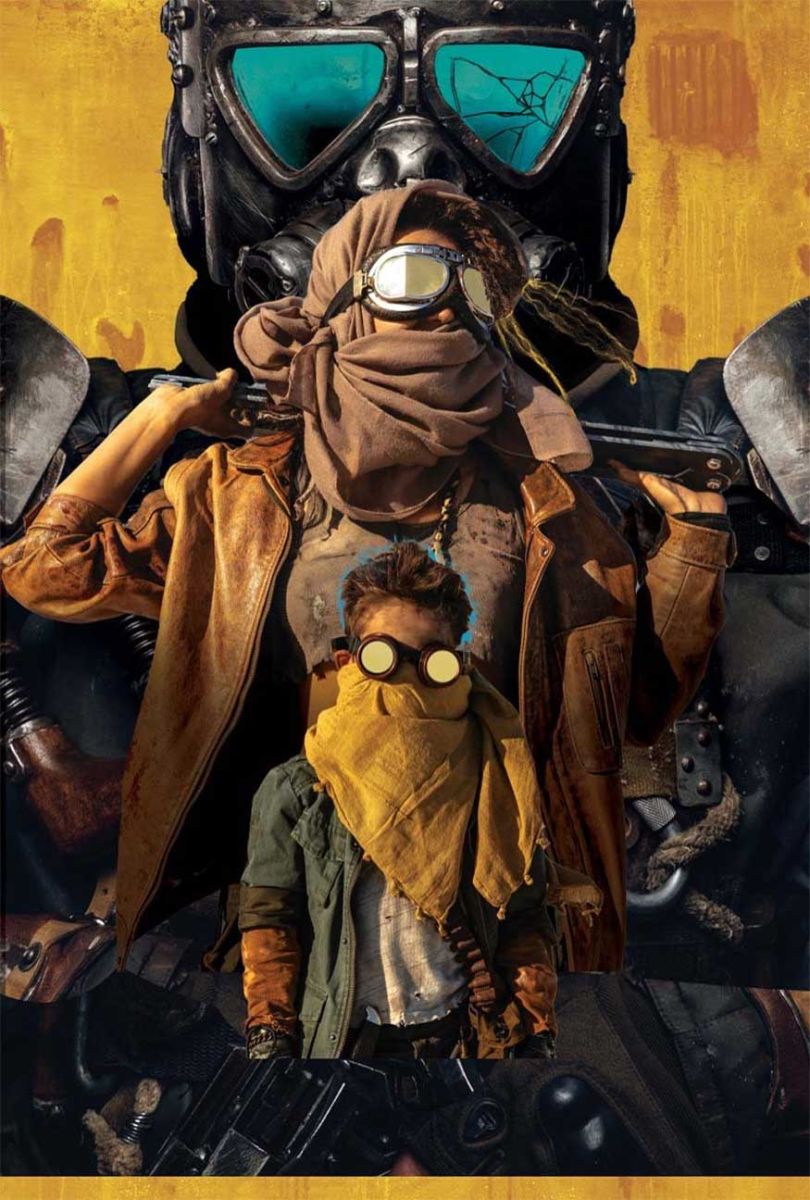
- Step 4: Take the 3 main objects and extract them from their background using your usual method. To make the image more rough, we use the Select Subject tool. If you need something more precise, you can use the Pen Tool and Refine Edge.
You can set 1 or 2 topics, but you should not set 3 topics. Right-click and switch to Smart Object mode on all your objects so you can resize as you go without worrying about losing quality or blurring.
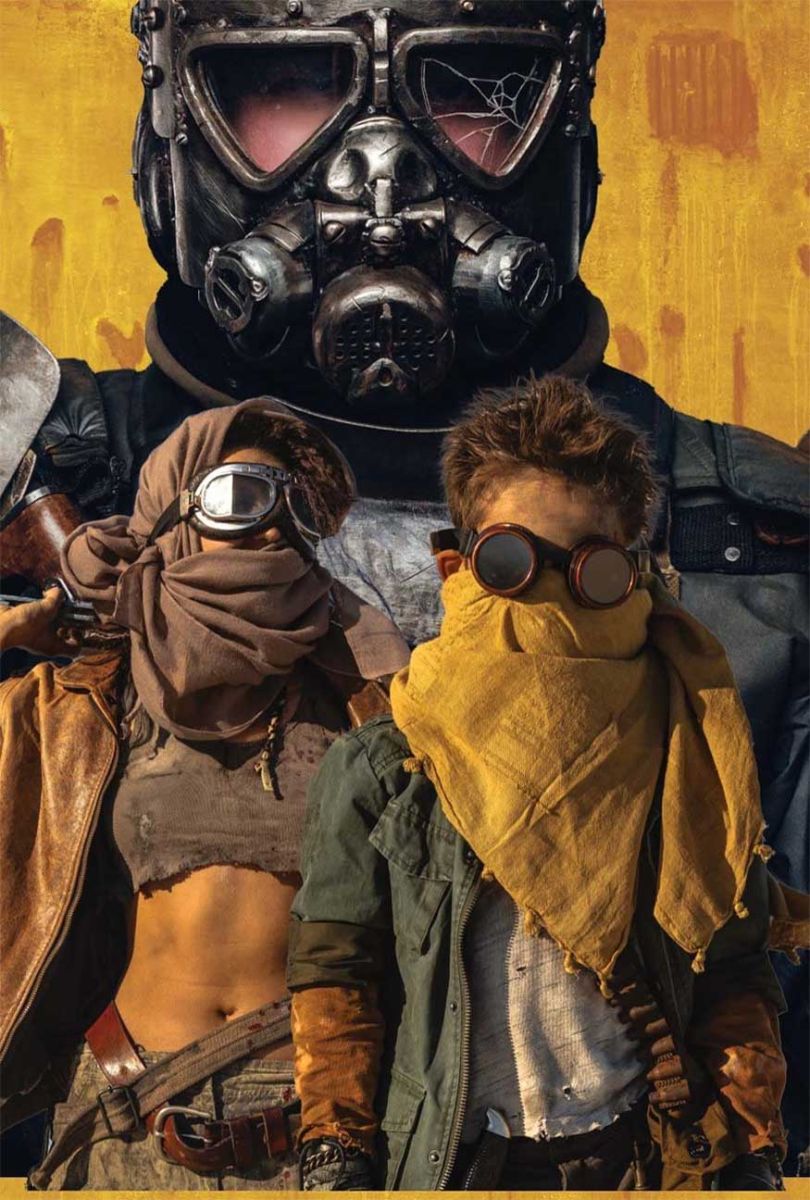
- Step 5: Arrange the topics in order and size:
- On the poster, the villain must be the biggest topic, so they should be placed high up, looming above the others to show they are a threat.
- If you only introduce main topics, they should be the biggest topics.
- With supporting characters, let their size according to their importance to the story.
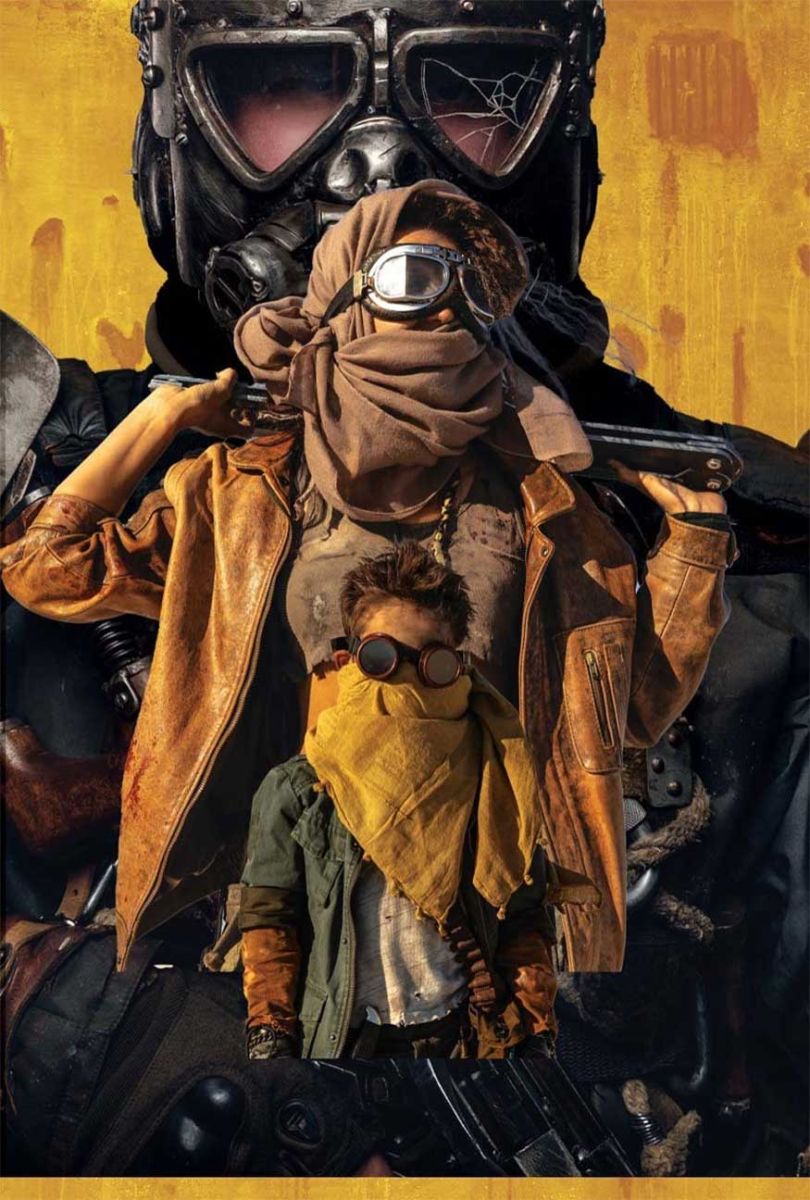
- Step 6: Next, darken and adjust the contrast of all three objects using the clipped Brightness/Contrast adjustment layer.
You can use a Layer Mask to mask out any areas too dark or contrasty.
+ Settings for the masked character:
- Brightness: -91
- Contrast: -37
- Layer Mask: Cover the edges of the mask, leaving the inside of the mask white.
+ Settings for woman image:
- Brightness: 18
- Contrast: 34
- Layer mask: none
+ Settings for kid image:
-
Brightness: 0
-
Contrast: 28
-
Layer Mask: none.
- Step 7: Create a new layer on the woman, then set that layer to Multiply. Create the shadow on the lower half of her body using a dark brown color with color code #201512.
You can perform this action on any topic that needs separation to stand out among other topics. In this case, this action helps prevent the woman and the image of the child from blending together.

- Step 8: For the subject's hair, create and cut a new layer into both the woman's and child's layers.
Use a hard round brush with color code blue #0099c3 on the edges of the child's hair.
Use the color code yellow #f7b62c on the edges of the woman's hair.
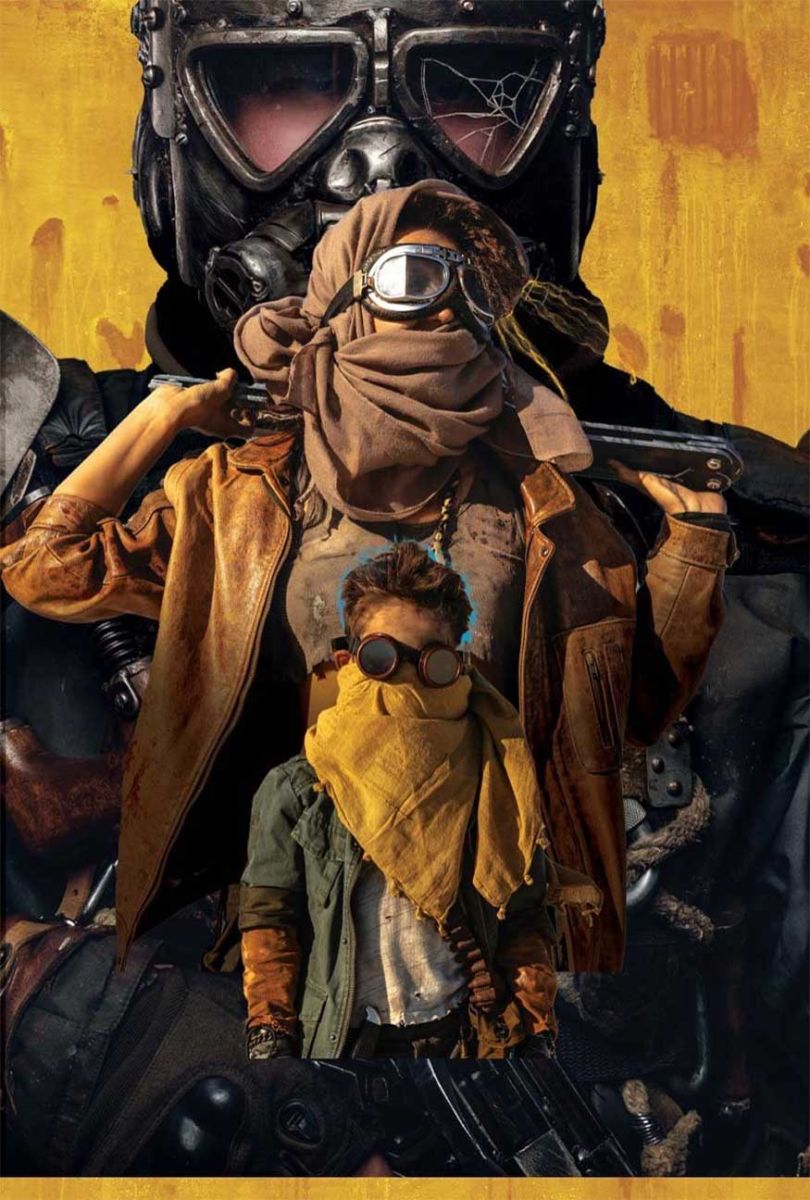
- Step 9: Create and clip the new layer to both the woman and child's layers, then set it to Lighten. Paint in the glasses with a light yellow color code #ffdb51 by using the hard round Brush tool.
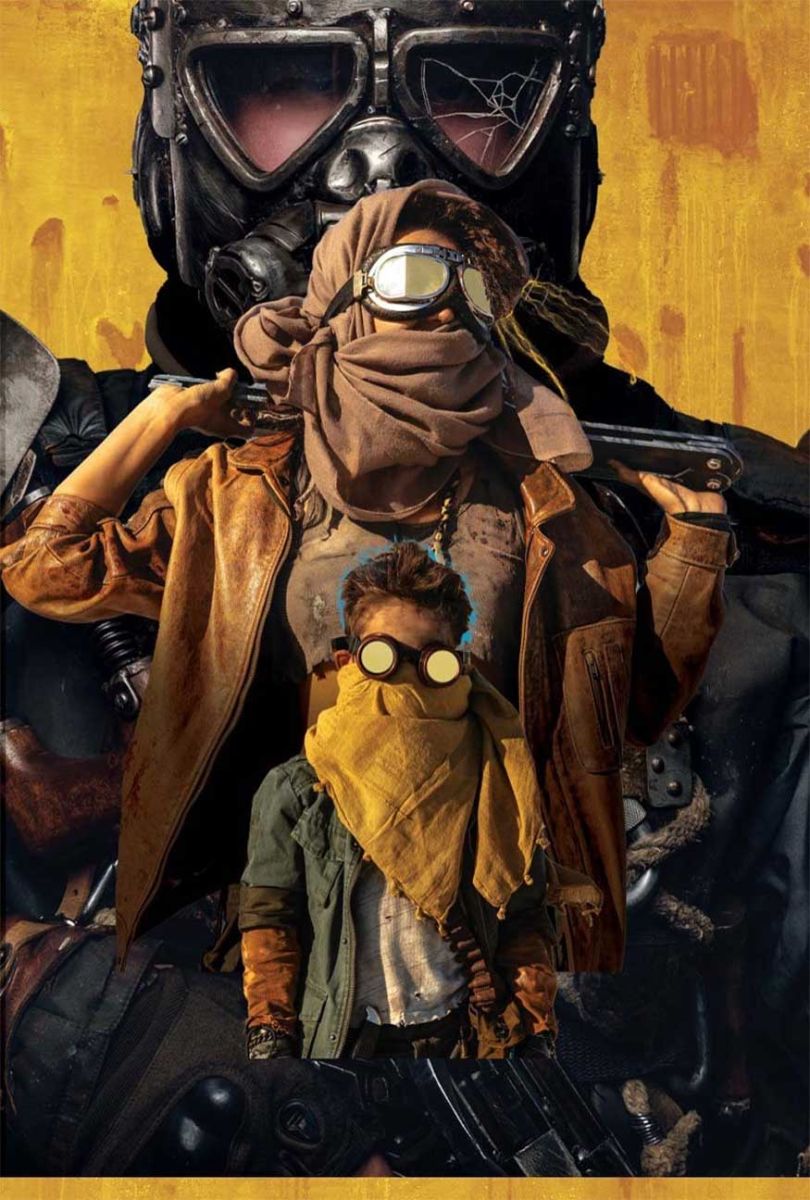
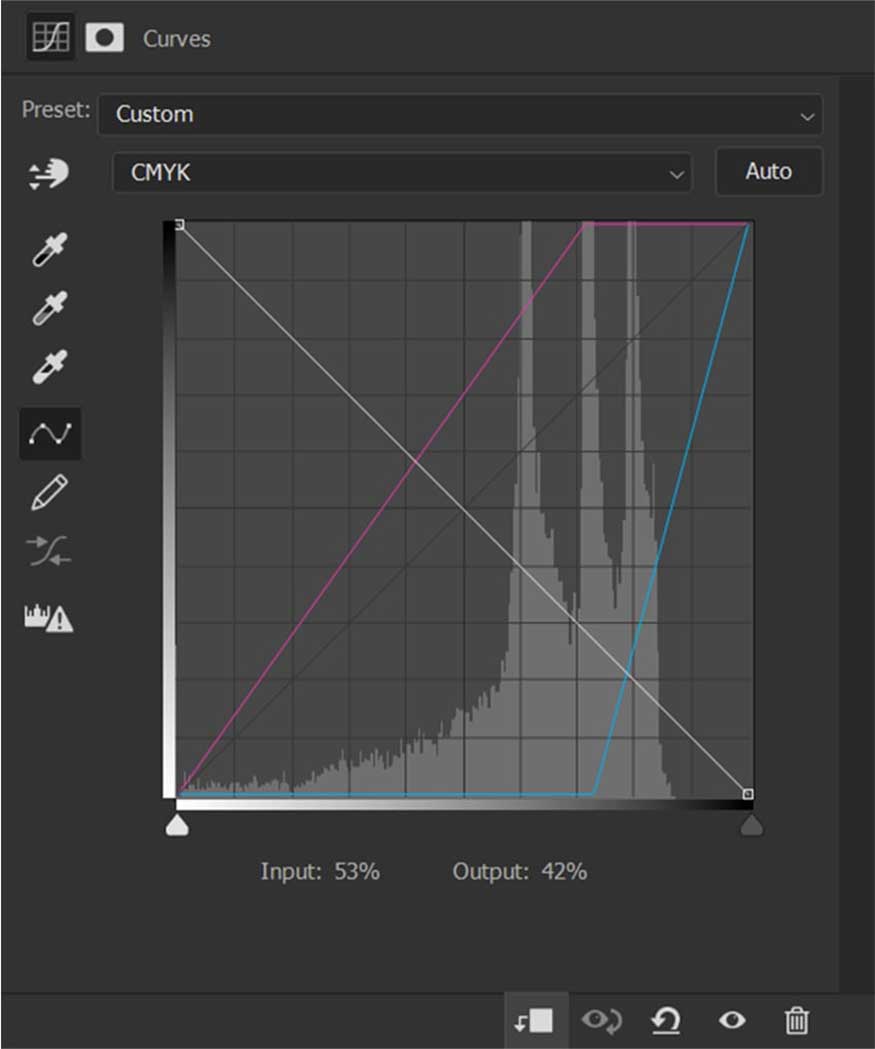
- Step 10: Finish the objects by giving the bad guy some reflections with blue glasses with the Curves layer. This is a CMYK color profile, but if you work with RGB, it will be different.
Basically, we just want to make it clear that the child and the woman are on the same “team” and the man is not. This is demonstrated by glasses of different colors.
Make sure each topic is in its own group, named after the topic within. As the instructions below are "Women", "Children" and "Men".
- Step 11: If your objects are skewed, make them symmetrical. In this example, we copy and paste the man's shoulder pad from the left to the right.
3. How to use Clipping Masks in Photoshop
- Step 1: Create a new layer between the "Women" and "Children" groups. Using a large soft round Brush, paint color code blue #003943 all over the canvas as you can see below. Name this layer "Fade".

- Step 2: Crop the sand dune images into the blue gradient by dragging and dropping the sand dune images onto the canvas, placing them above the gradient, holding Alt and then move the mouse between the two layers.
When you see the box and arrow icon appear, click it. The dune layer will cut into the gradient layer. Set the dune layer to Opacity 50%.
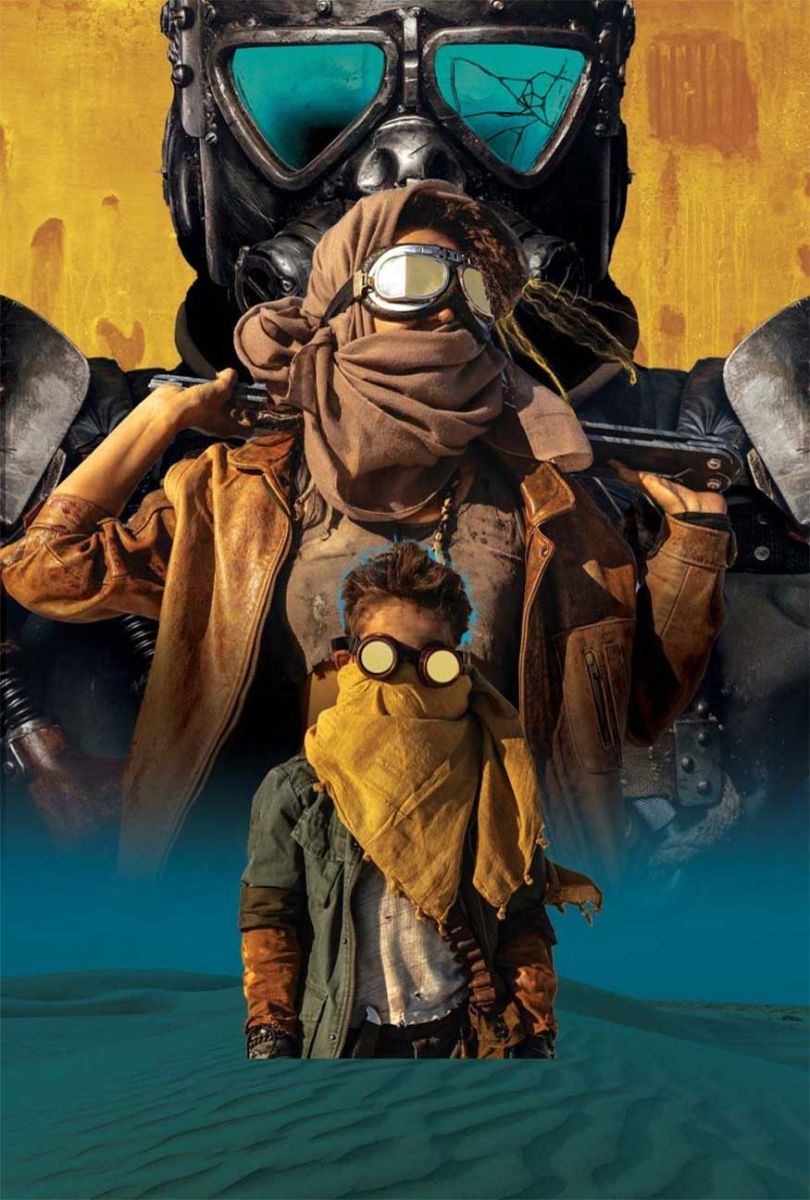
- Step 3: Adjust the dunes using Hue/Saturation and Brightness/Contrast adjustment layers.
Set Hue/Saturation:
-
Hue: 0
-
Saturation: -100
Set Brightness/Contrast:
-
Brightness: -90
-
Contrast: 100
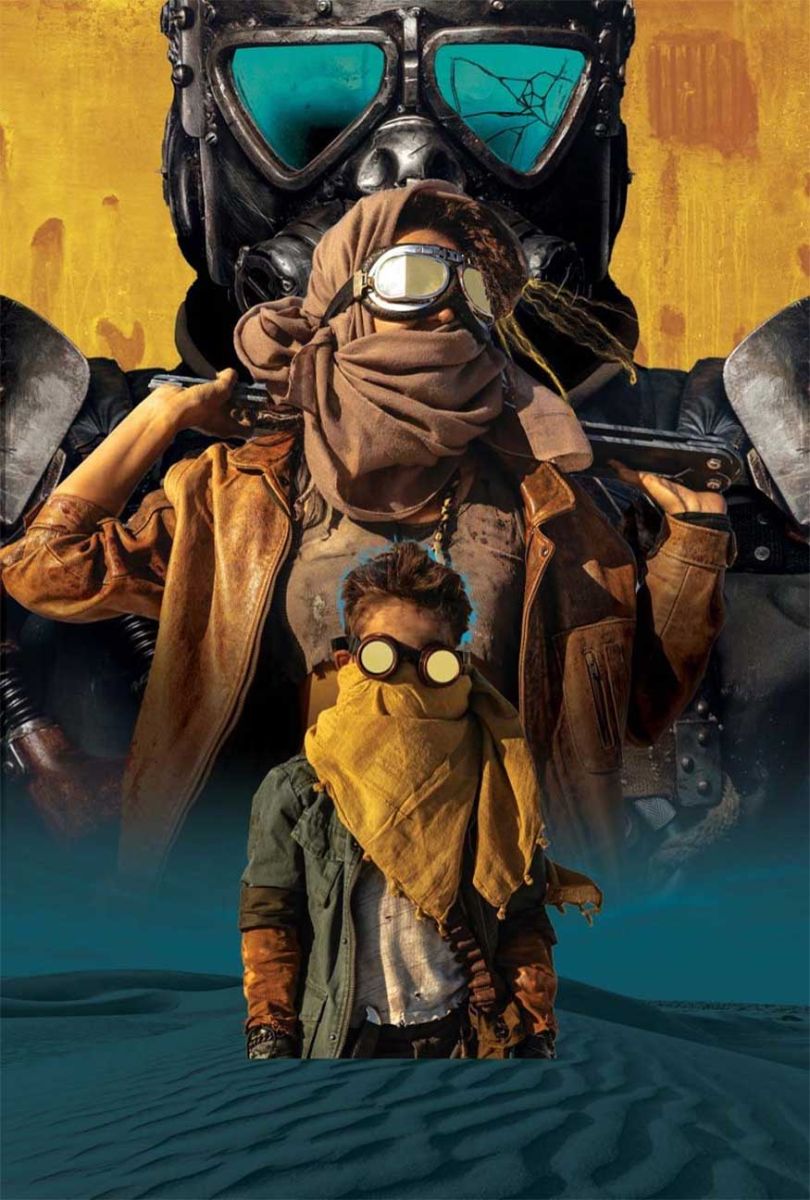
- Step 4: Finish by creating a New Layer above the "Child" group. Repeat the above two steps on the new layer to hide the bottom edge of the child image. Call them the second "Fade" layer.
4. How to create a typography for an action movie poster design
- Step 1: With the typography part, we will start with the title of the movie. The title has 2 words so we'll split the title into 2, put each word on its own layer and use the font Furiosa.
The first word, "Dust" is placed above the "Woman" group and the first "Fade" layer.
The word "Town" will be placed above the second "Fade" layer.
We used the color code #c29c2e as the background fill.

- Step 2: Copy and paste the same rusty background texture from the background group, keep them in Overlay mode and cut them to both from the title.
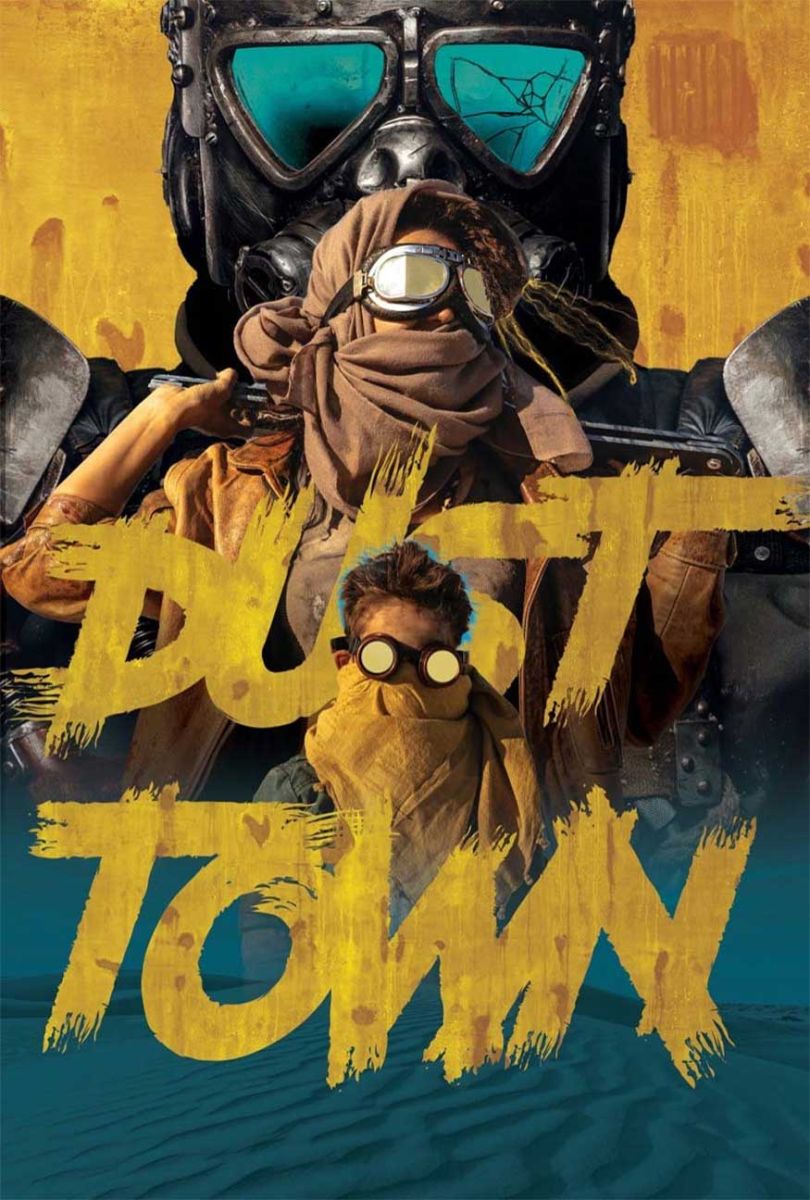
- Step 3: Create and clip a new layer to both title words, set it to Overlay. Use a soft round Brush to paint white in the center of each word and black around the edges, creating a radial gradient effect.
Group each word into its own group and name it accordingly. Like this example, “Dust” and “Town”.

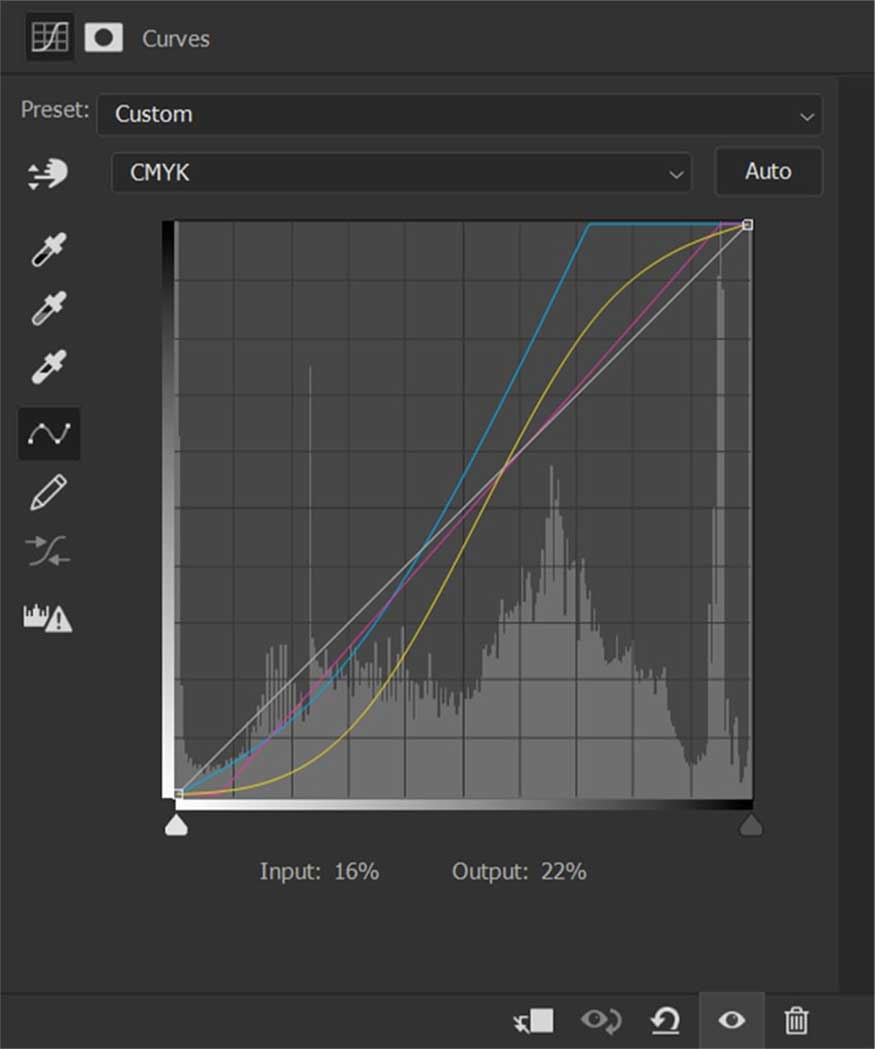
5. How to create color for an action movie poster
- Step 1: Finally, we have a color layer consisting of four adjustment layers. Orange and blue are good for action movie posters because it has high contrast and attracts attention.
First, create a Curves adjustment layer, with the Cyan curve pulled into the shadow. Magenta color should only be pulled slightly into the shadows and removed slightly from the highlights. Then create an S-curve in the yellow part.
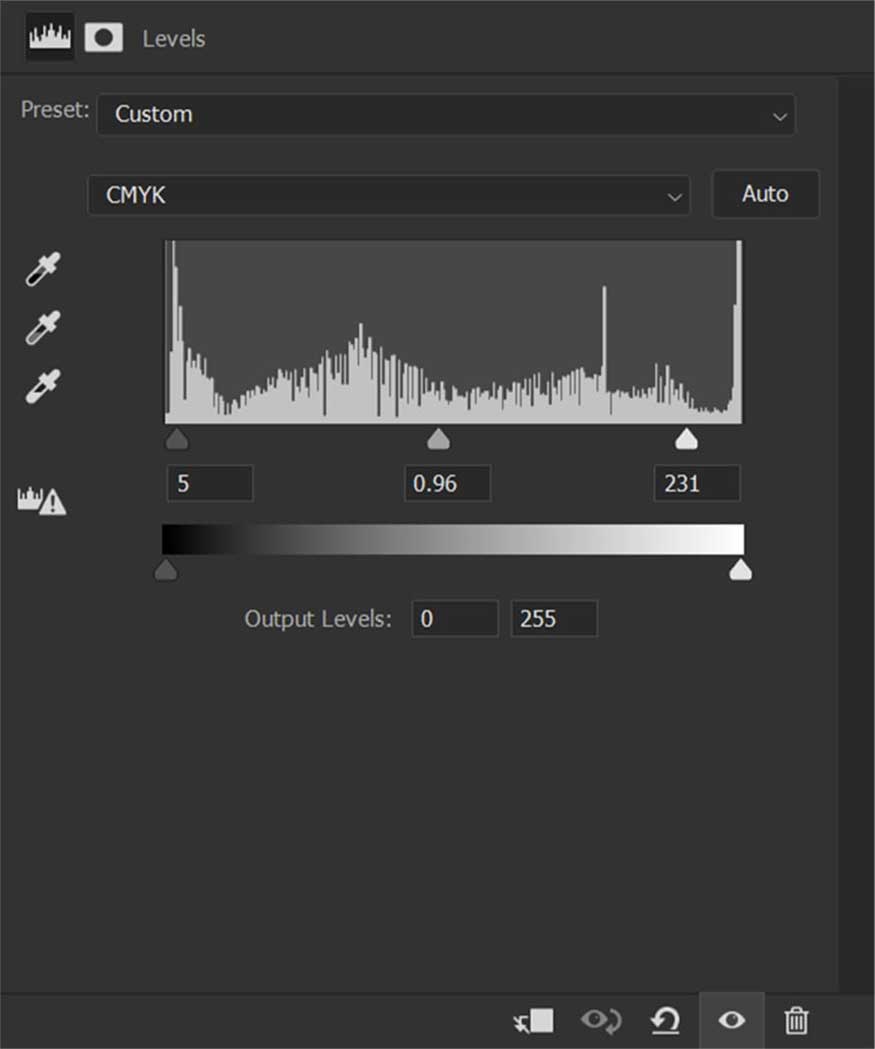
- Step 2: Use the Levels adjustment layer to increase the contrast by adjusting the transforms, dragging the highlights inward.
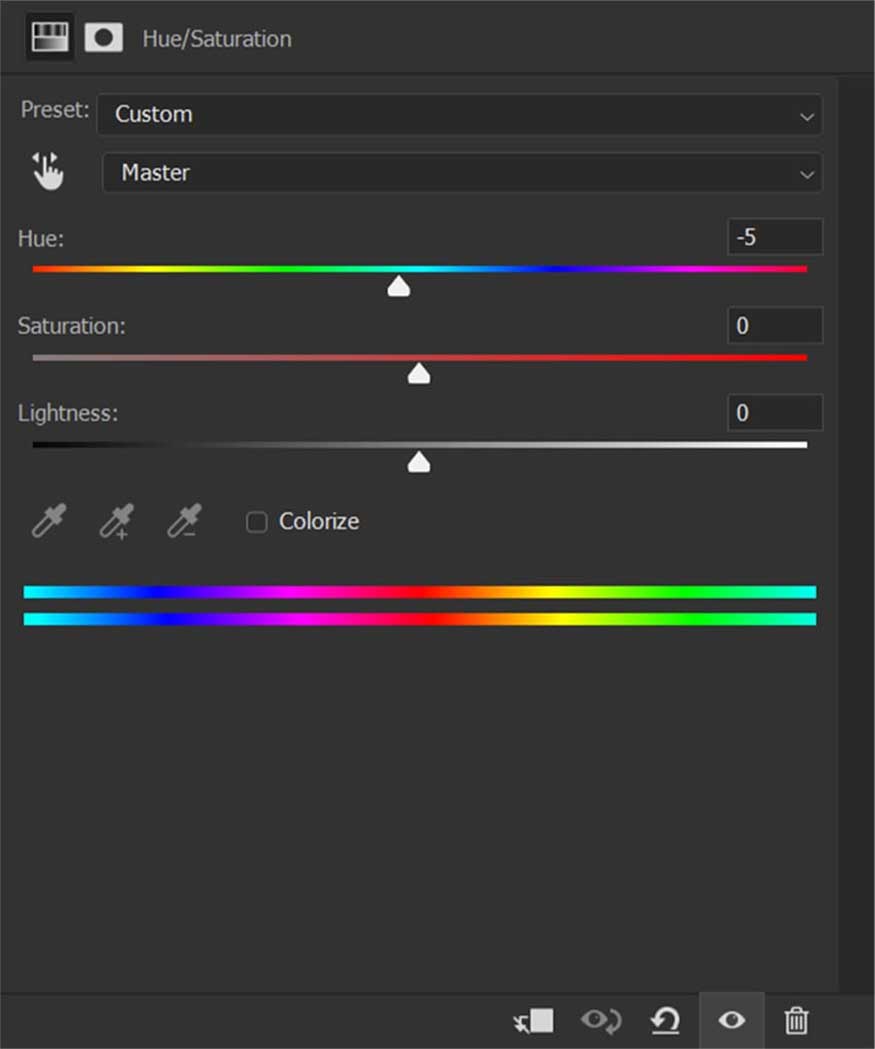
- Step 3: Add a Hue/Saturation layer to slightly shift the color to a warmer and bluer orange.
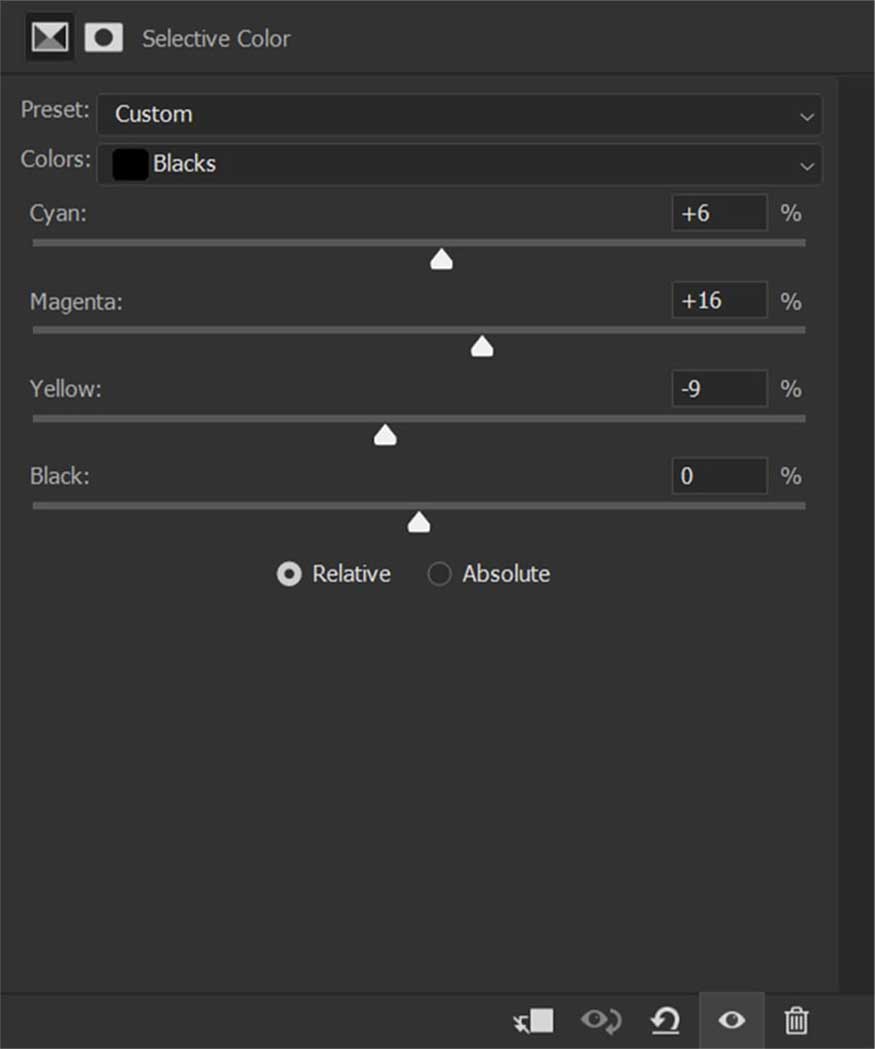
- Step 4: Finally, we select Selective Color focusing on black people. Add some Cyan and Magenta color and remove just a little bit of the yellow. This will make the shadow a nice cool blue instead of green.
If the color layer is too bright, group all the adjustment layers together and reduce the group's opacity. Set the Opacity to 70%.
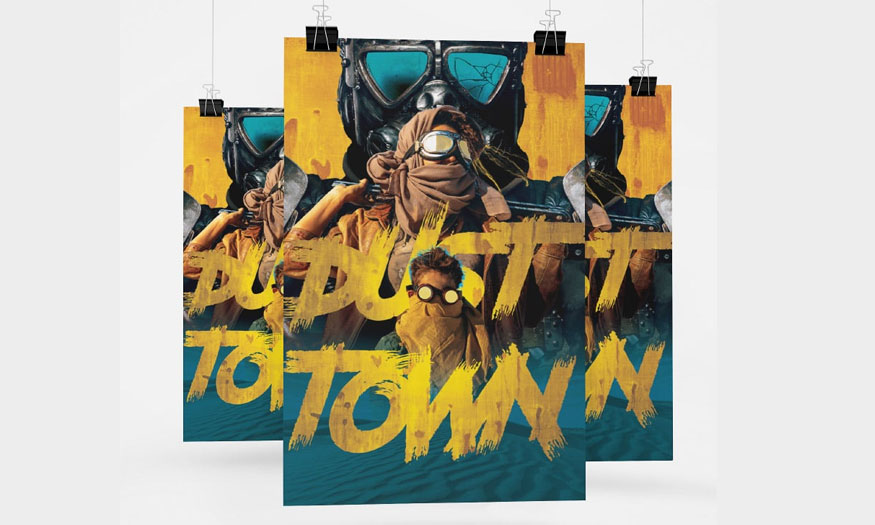
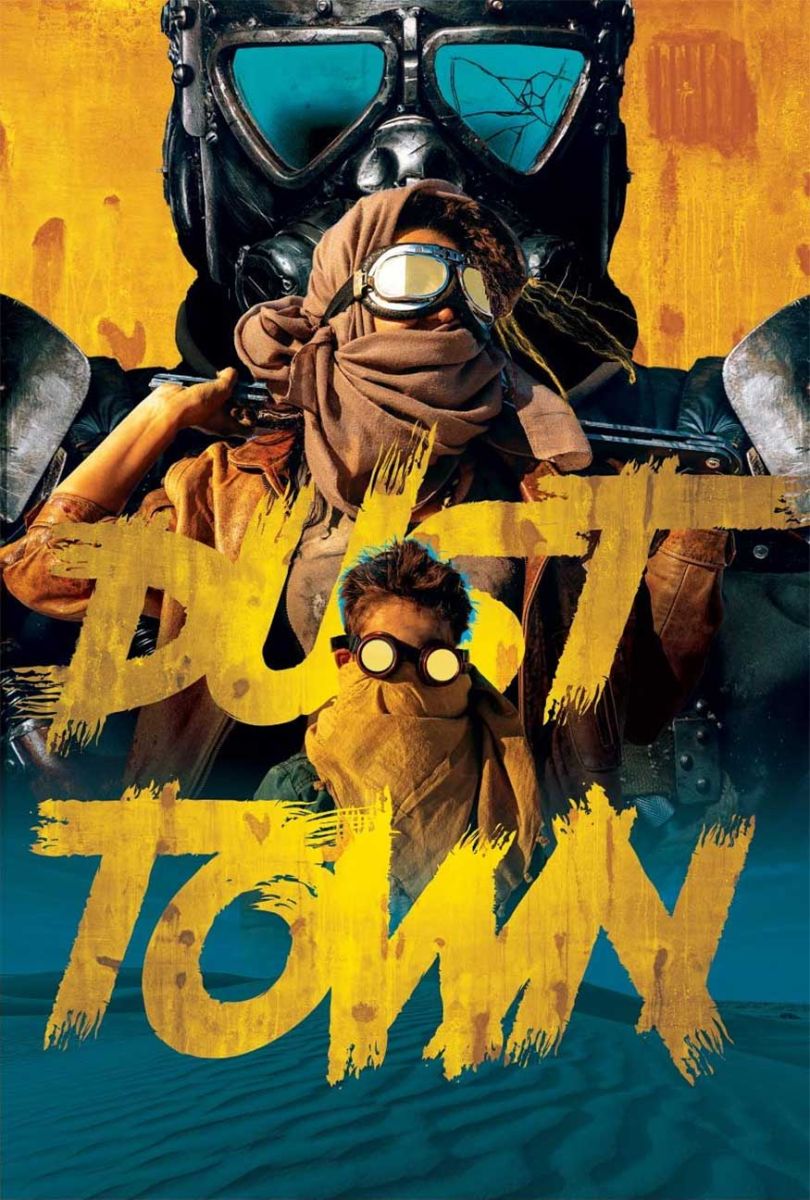
This is the result:
Above are complete instructions on how to create an Action Movie Poster in Photoshop. Try applying it to your design and you will see surprising results.


VIP Products


Best Selling Products
Plugin Retouch4me
69 USD
Windows 10 & 11 Pro Key
36 USD
Upgrade genuine Capture One account
120 USD
Upgrade Genuine Office 365
49 USD
Genuine Adobe Illustrator account
99 USD
Copyright Adobe Lightroom Account
59 USD
Upgrade Duolingo Super
29 USD
ChatGPT Plus Account (GPT-4)
16 USD
MidJourney Account
29 USD
Autodesk All App Account Copyright
120 USD
Adobe Premiere Pro Account
99 USD
Capcut Pro 1 Year
39 USD
Freepik Premium Account
59 USD
Genuine Cheap Canva Pro
39 USD
Adobe Photoshop Copyright - Full App
120 USD