Best Selling Products

Genuine Cheap Canva Pro
39 USD

Plugin Retouch4me
69 USD

ChatGPT Plus Account (GPT-4)
16 USD

Upgrade Duolingo Super
29 USD

Freepik Premium Account
59 USD

Capcut Pro 1 Year
39 USD

Windows 10 & 11 Pro Key
36 USD

Autodesk All App Account Copyright
120 USD

Copyright Adobe Lightroom Account
59 USD

Upgrade genuine Capture One account
120 USD

Adobe Premiere Pro Account
99 USD

Adobe Photoshop Copyright - Full App
120 USD

Genuine Adobe Illustrator account
99 USD

MidJourney Account
29 USD

Upgrade Genuine Office 365
49 USD
Methods for producing cloud effects in Photoshop
Nội dung
You can completely transform clouds into different shapes and fonts with just tools in Photoshop. This effect will make your design more unique and impressive. Join SaDesign to learn about how to create cloud effects in Photoshop through the sharing below.

You can completely transform clouds into different shapes and fonts with just tools in Photoshop. This effect will make your design more unique and impressive. Join SaDesign to learn about how to create cloud effects in Photoshop through the sharing below.

To be able to create a cloud effect in Photoshop, we will need to go through many steps with a combination of many tools.
1. Create a cloud background
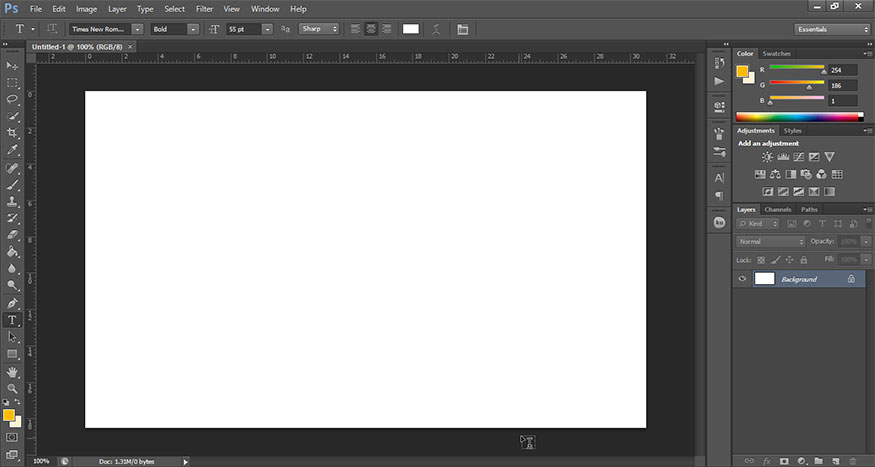
Step 1: First, create a new document with the appropriate size.
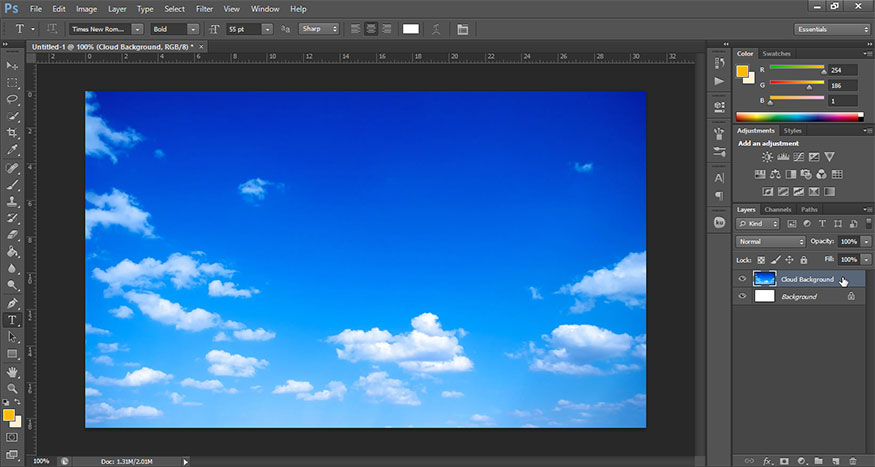
Step 2: Create a new layer, then add the sky image. Choose blue sky background images with a few clouds in the center because we will create a cloud effect in Photoshop there. Let's name this layer “Cloud Background”.
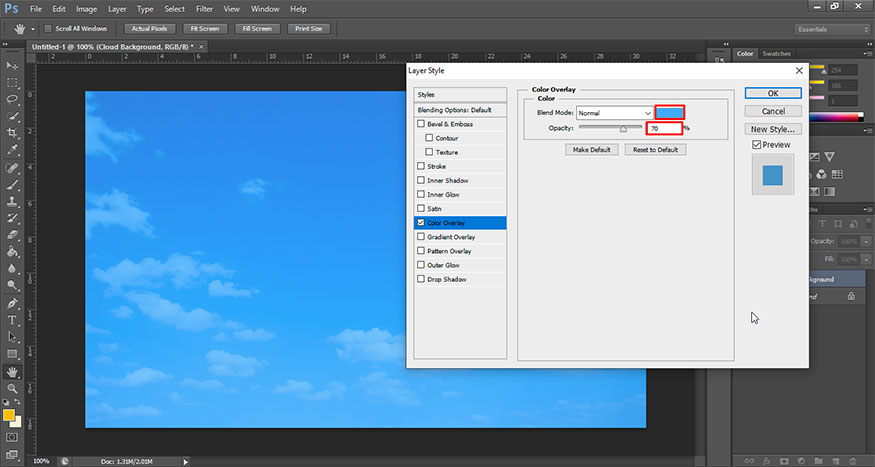
Step 3: Double click on Cloud Background to open the Layer Style dialog box. Please choose Color Overlay. Set Opacity to 70% and choose color code #3dacfa.
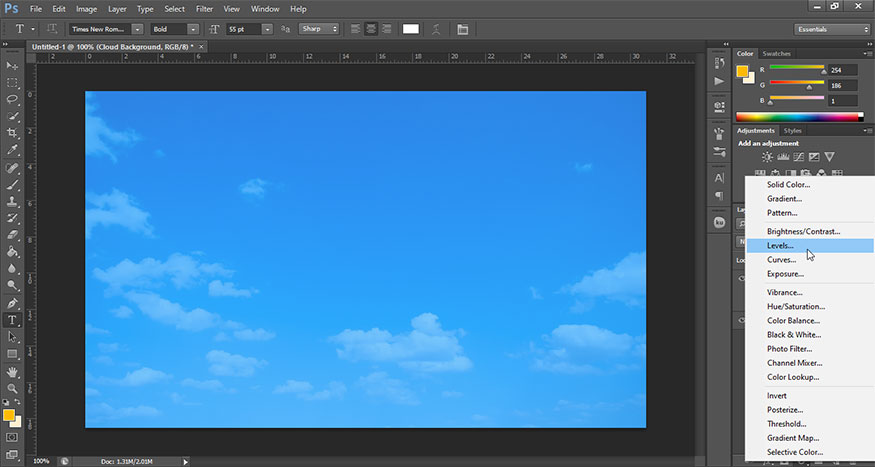
Step 4: To make the background brighter, select "Create new fill or adjust layers" (the divided circle icon in the bottom corner of the layers panel). Then, select Level.
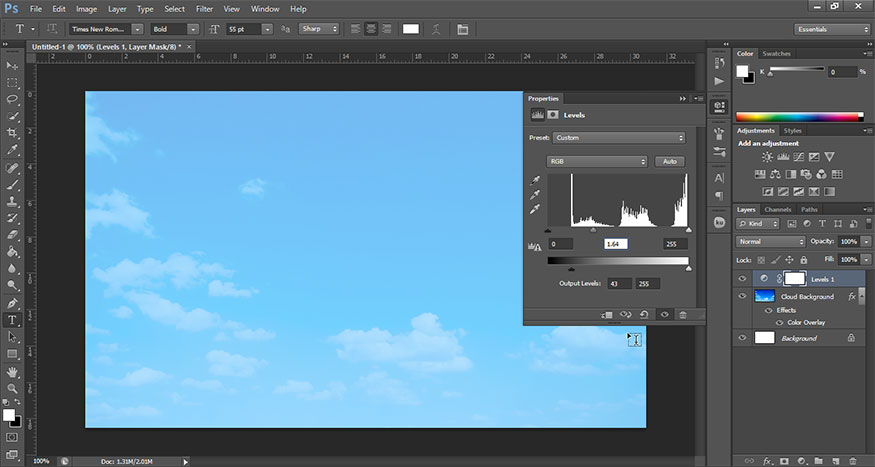
In the Level panel, adjust the midtone and shadow parameters in the output a bit to make the image brighter. Customize to best suit your photo.
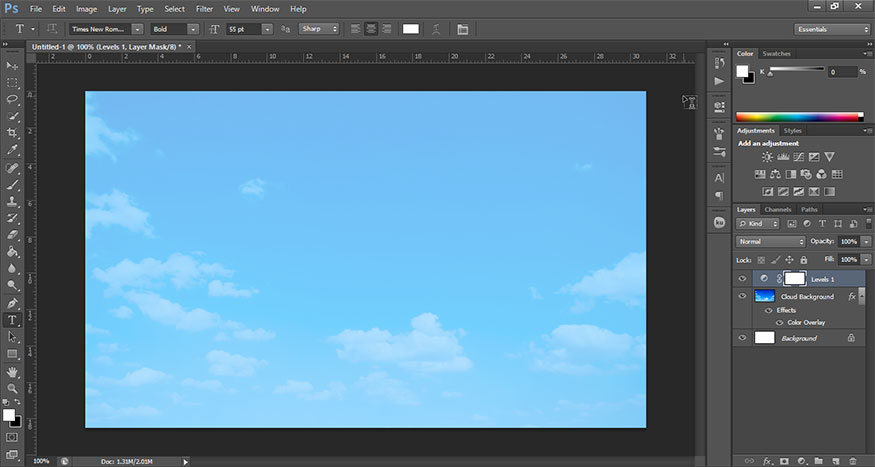
Now, we will obtain a cloud background as shown.
2. Create a cloud brush
To create a cloud effect in Photoshop, we need to create a cloud brush with Soft Round Brush through the following steps:
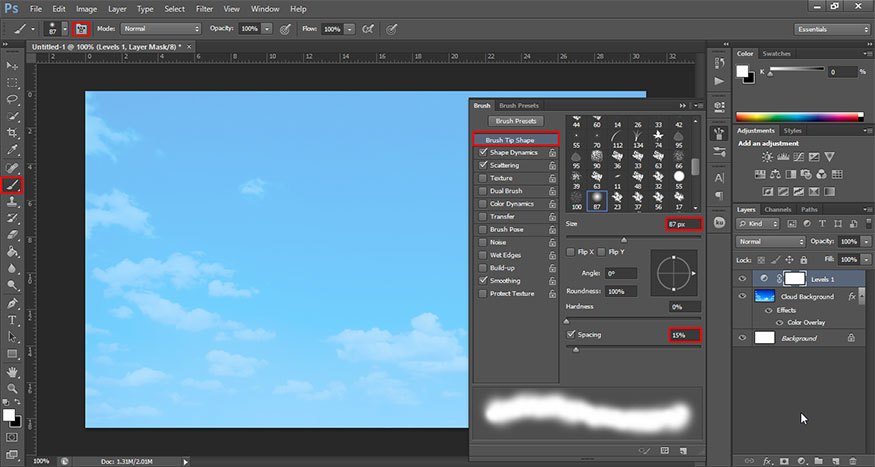
Step 1: On the toolbar, select Brush Tool. Open the Brush panel, select Soft Round Brush from the brush list.
On the Brush panel, click Brush Tip Shape and set the parameters as shown.
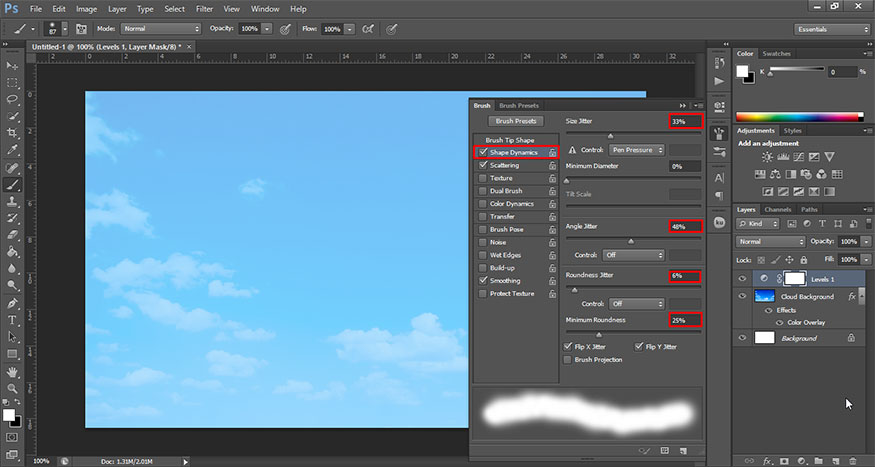
Still in the Brush panel, click on Shape Dynamics and then set the Size Jitter, Angle Jitter, Roundness Jitter and Minimin Roundness parameters as shown.
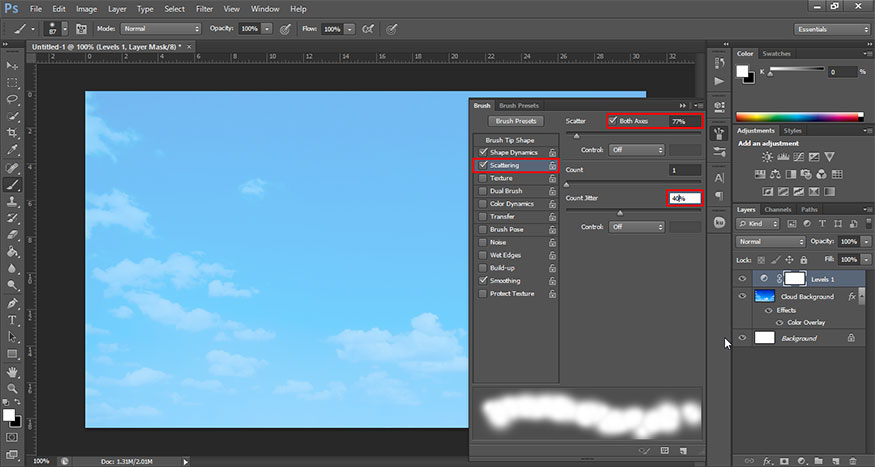
Continue to select Scattering and set the parameters Scatter, Count Jitter and check Both Axes as shown.
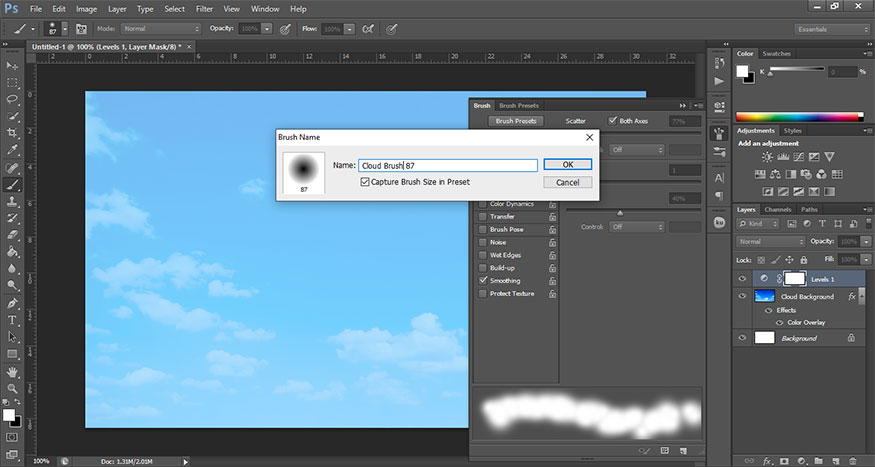
Step 2: To save this new brush, select the top right corner menu of the brush panel and select New Brush Preset.
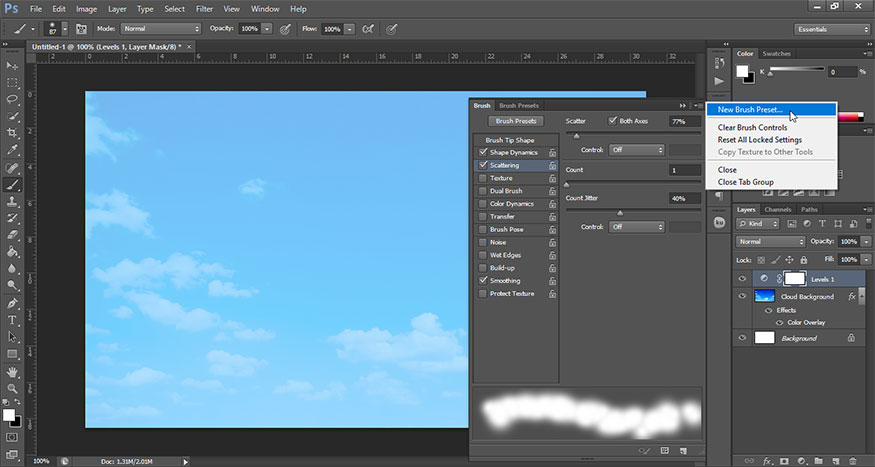
Name this new brush “Clouds brush” and click OK.
3. Create cloud text
Next, we will create a text-shaped cloud, follow these steps:
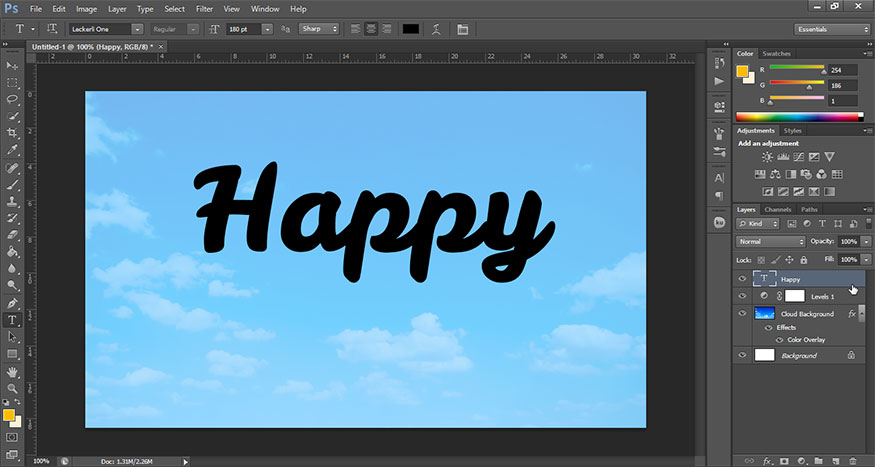
Step 1: Add a new layer and then write the text that needs to create a cloud effect in Photoshop. Fill the text with color code #000000.
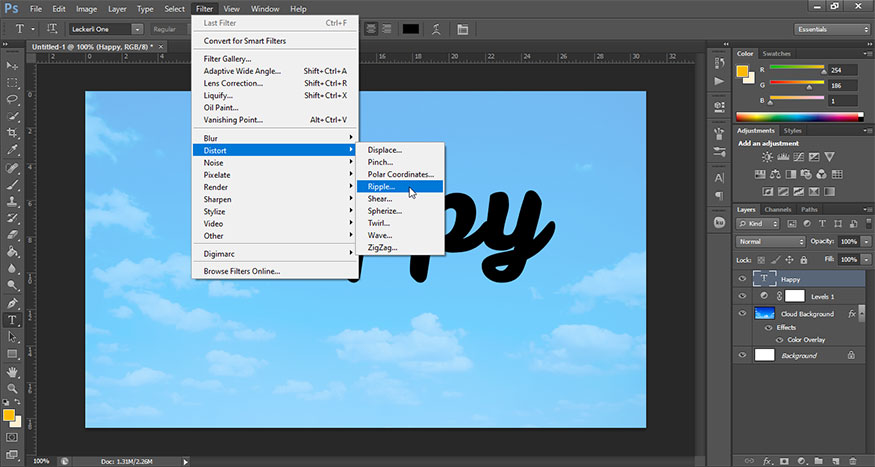
Step 2: On the menu bar, go to Filter => Distort => Ripple.
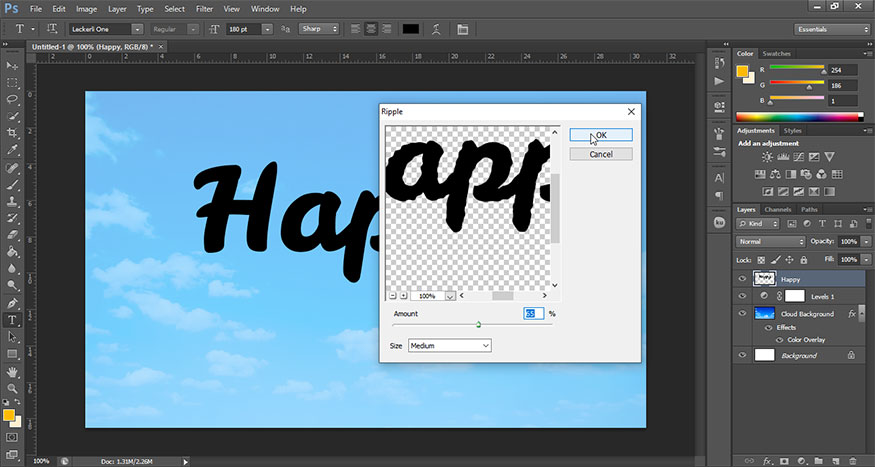
In the Ripple, set Amount about 50 - 75%, click OK.
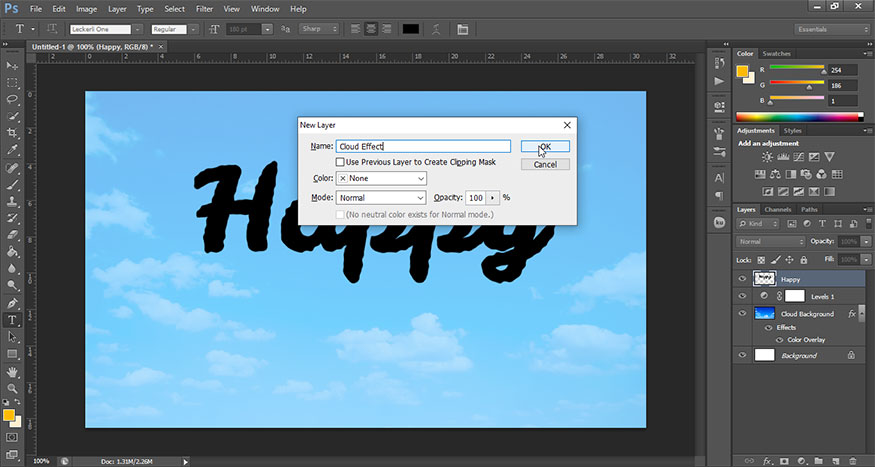
Step 3: Press Shift+Ctrl+N to create a new layer. Name this layer “Cloud Effect”.
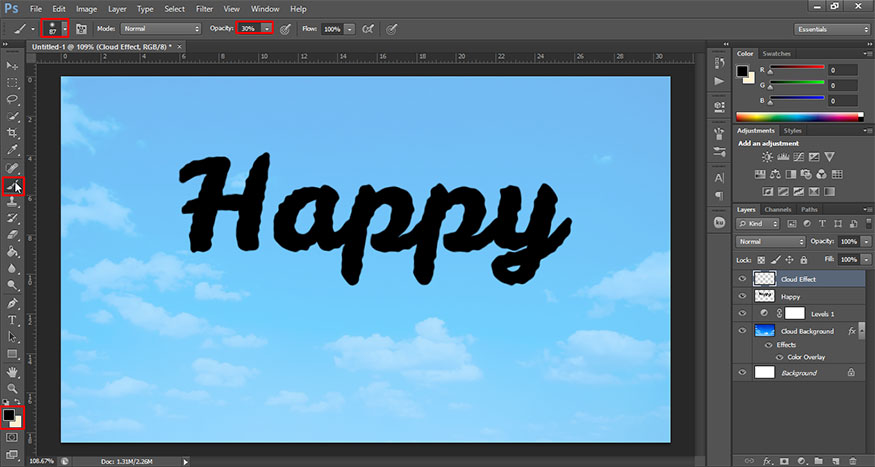
On the toolbar, select Brush, then select the newly created Clouds brush to add a cloud effect in Photoshop around the text.
Set the brush color to #000000, set a different Opacity (about 30%) and then paint over the same area multiple times.
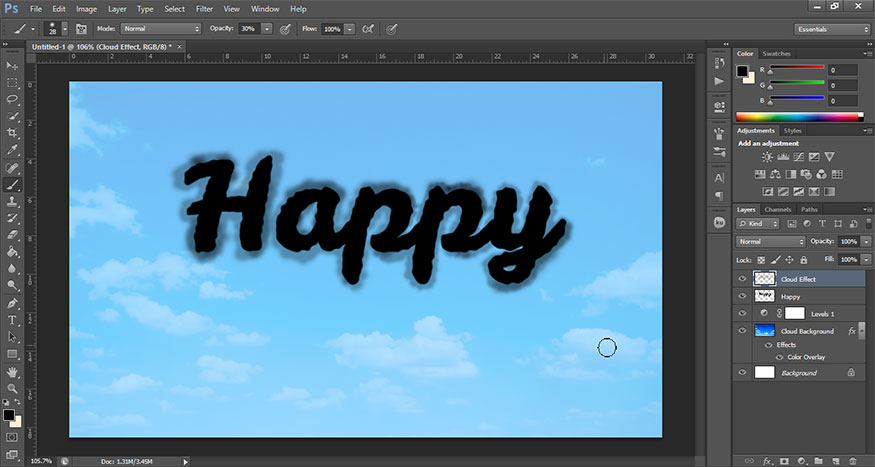
Minimize the brush and use it to paint around the edges of the text. We will get the result as shown.
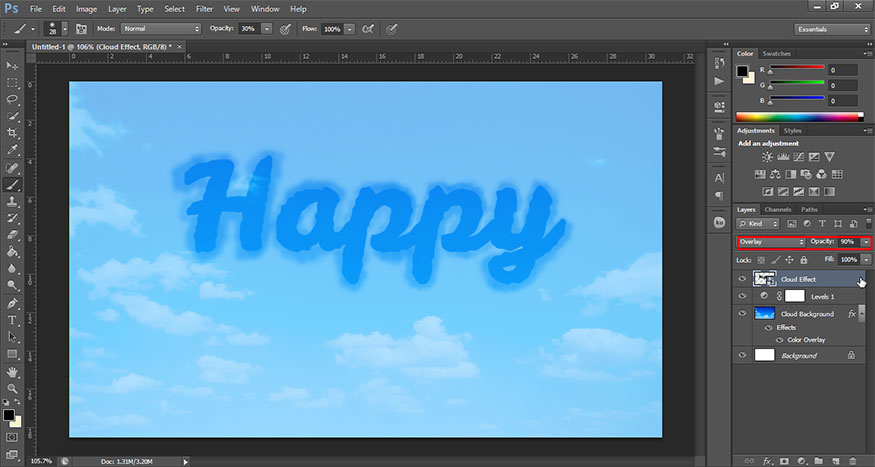
Step 4: Select the Happy text layer and the Cloud effect layer. Then right-click and select Convert to Smart Object.
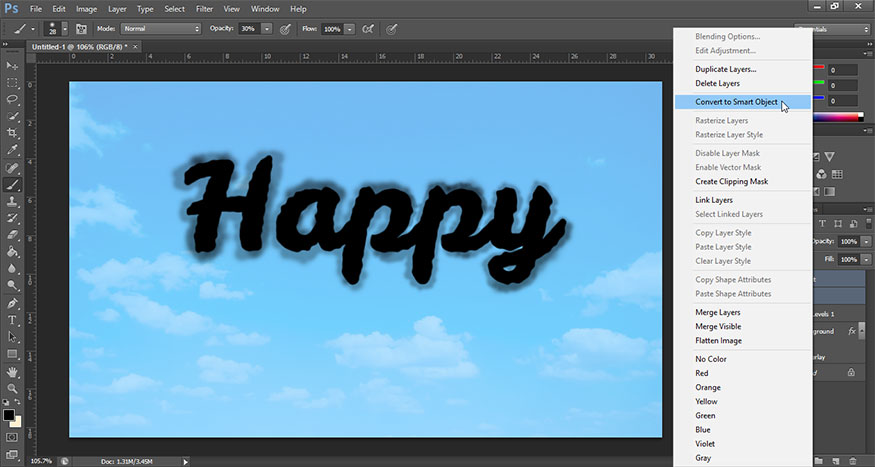
Set the blend mode of this smart object Cloud effect to Overlay and Opacity to 90%.
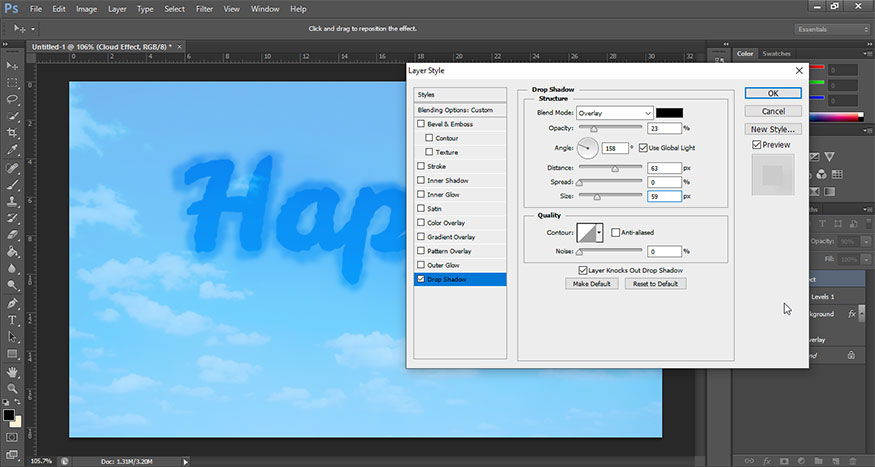
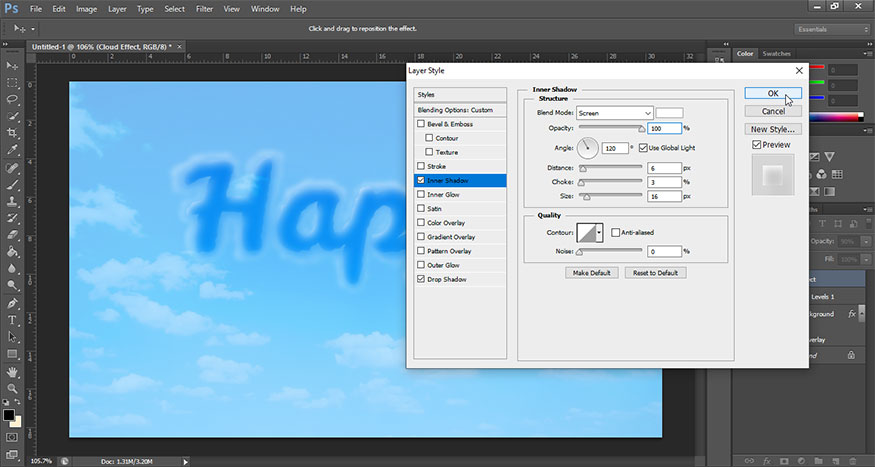
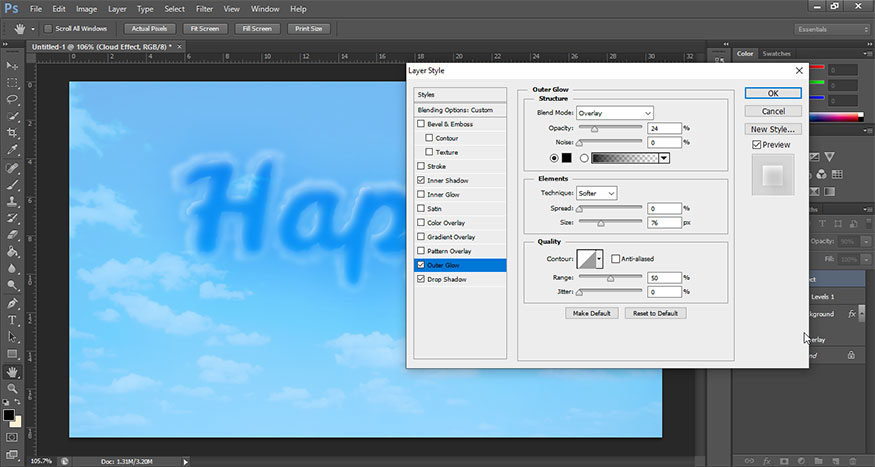
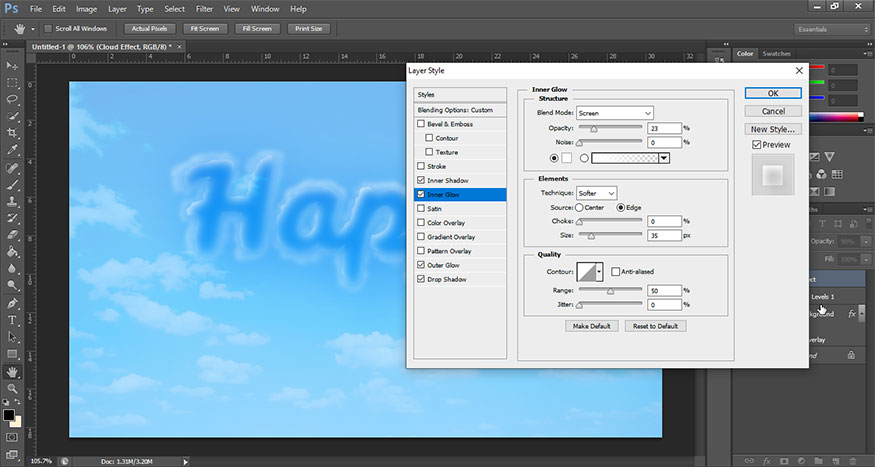
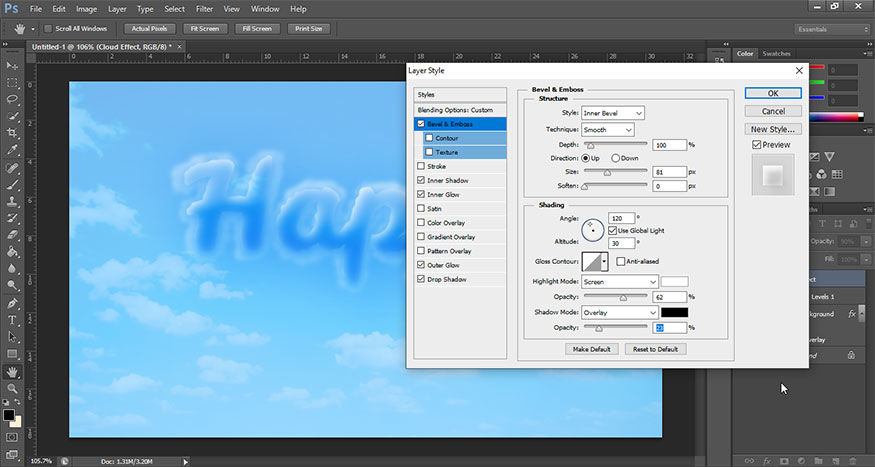
Step 5: Double click on the smart object Cloud effect to open the Layer style. Then add the Drop Shadow, Inner Shadow, Outer Glow, Inner Glow, Bevel and Emboss and Satin parameters as shown below.
Drop Shadow
Inner Shadow
Outer Glow
Inner Glow
Bevel and Emboss
Satin

4. Create cloud texture
Step 1: Create a new layer and name it “Cloud”. Make its background color #ffffff.
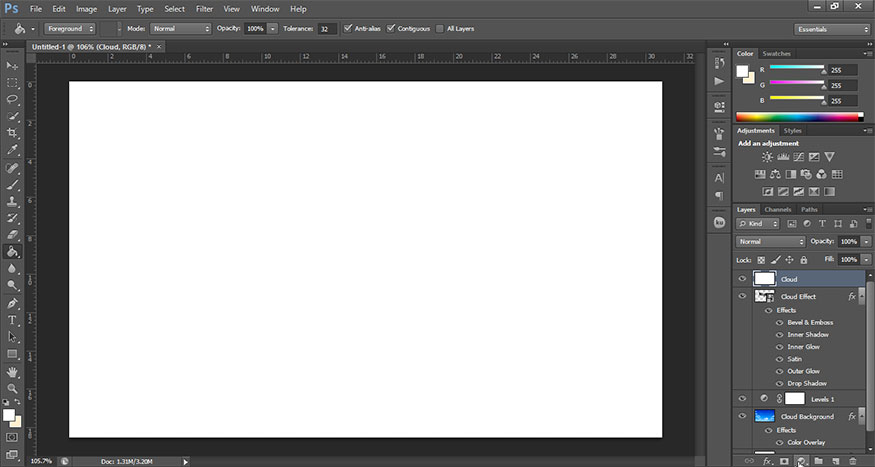
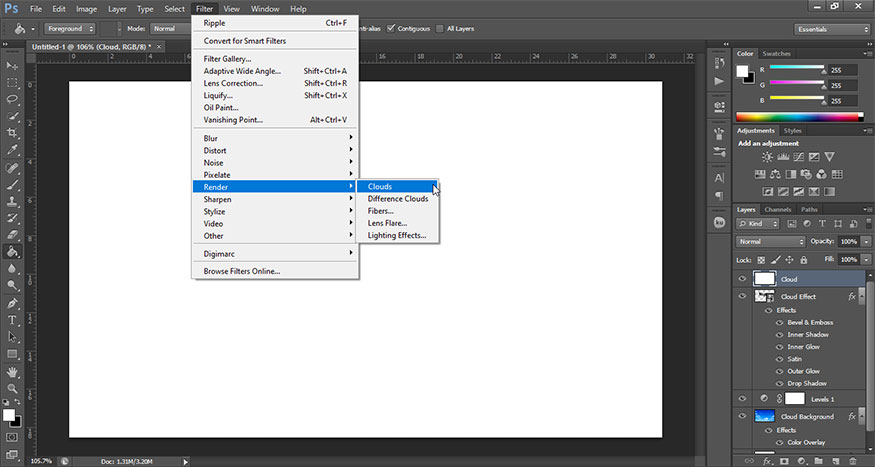
Step 2: Set Foreground Color to color code #ffffff and Background Color to color code #000000. Create cloud texture by selecting Filter => Render => Clouds.
Step 3: Press Ctrl+J to duplicate the Cloud layer and then hide the newly copied layer.
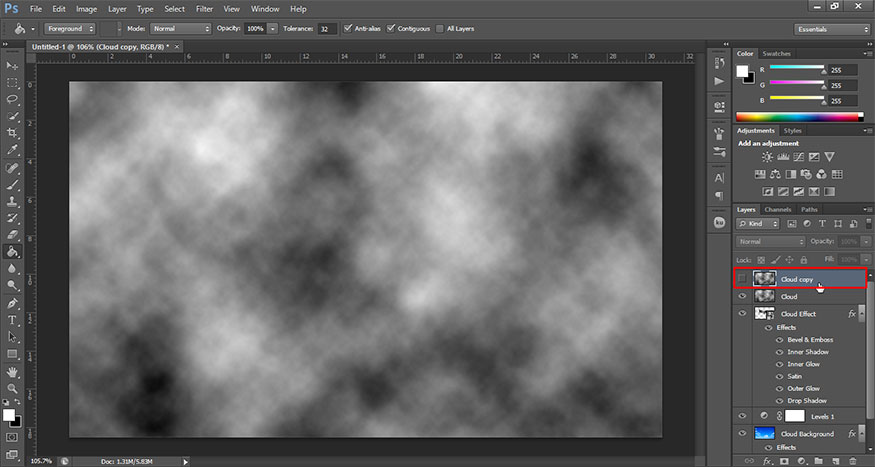
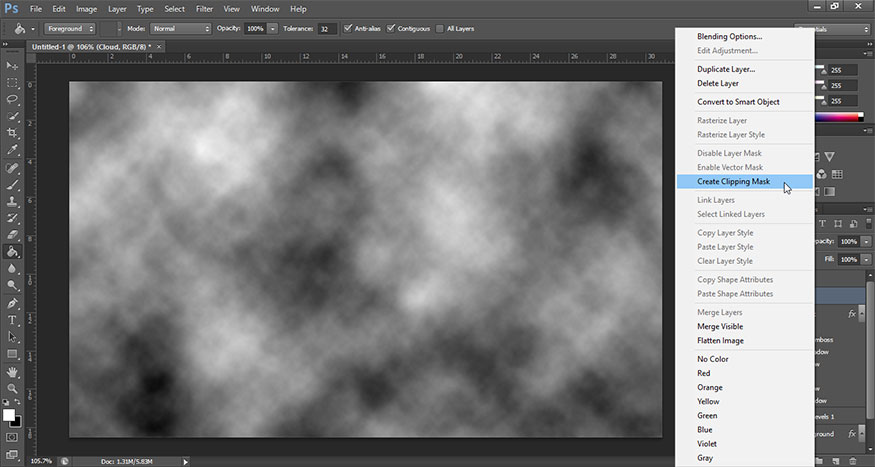
Right click on the Cloud layer and choose Create Clipping Mask. Set Cloud's blend mode to Lighter Color.
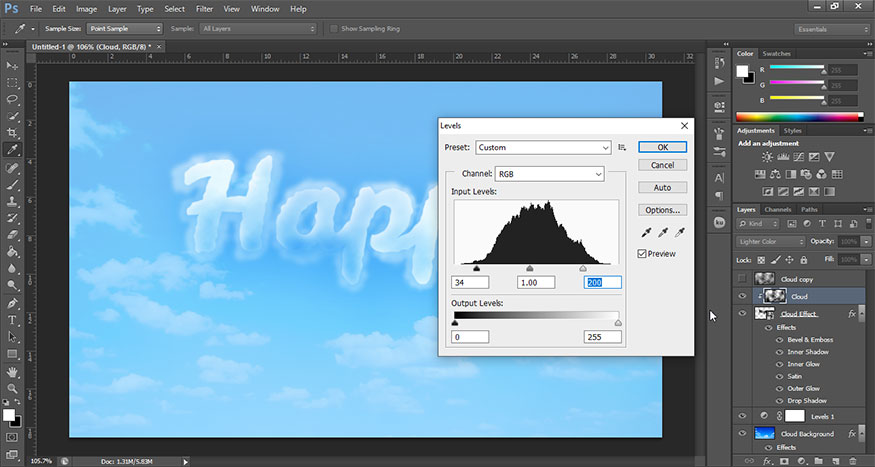
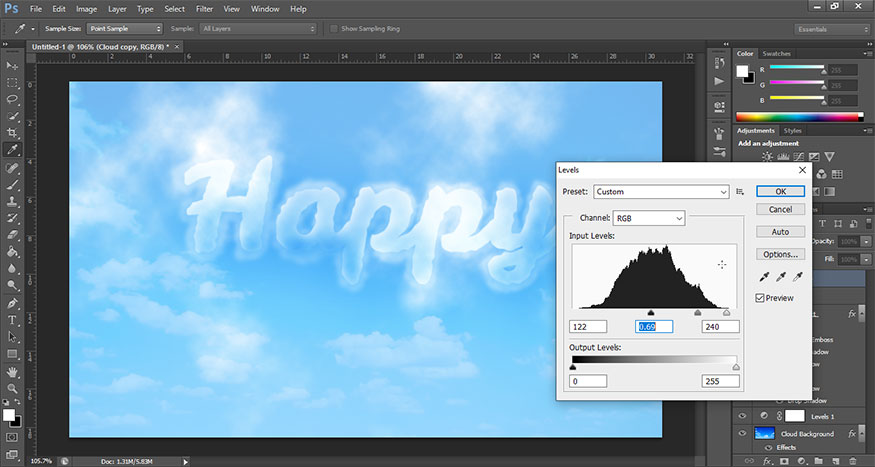
Step 4: On the menu bar, select Image => Adjustments => Levels and customize to your liking then click OK.
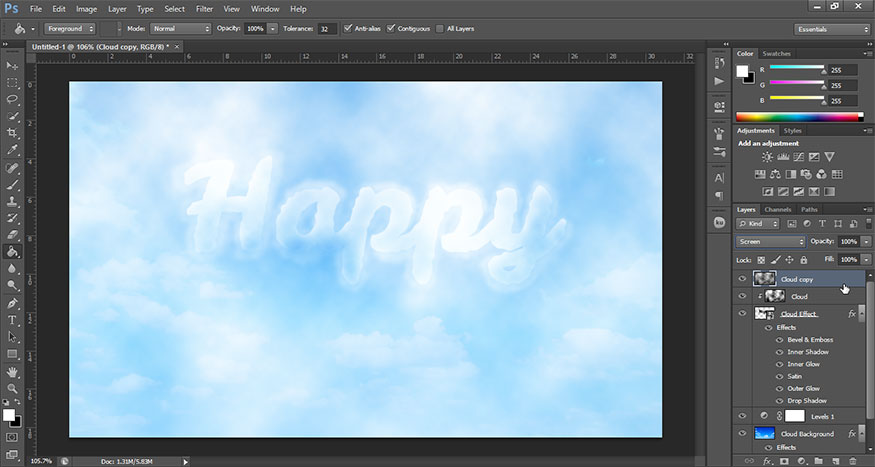
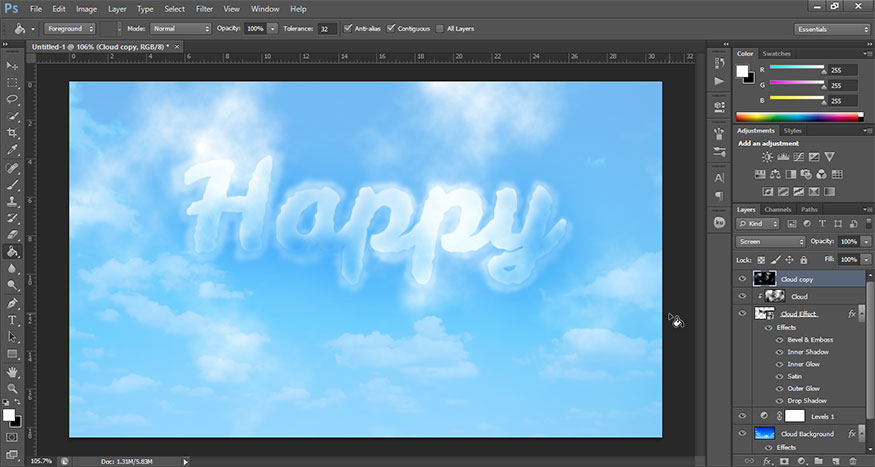
Step 5: Open the Cloud copy layer then set the blend mode to Screen. The result we get is as shown.
Step 6: To adjust the contrast of the Cloud copy layer. Go to Image => Adjustments => Levels. Then adjust the appropriate parameters.
So, we have basically created a cloud effect in Photoshop.
5. Customize contrast and sharpness
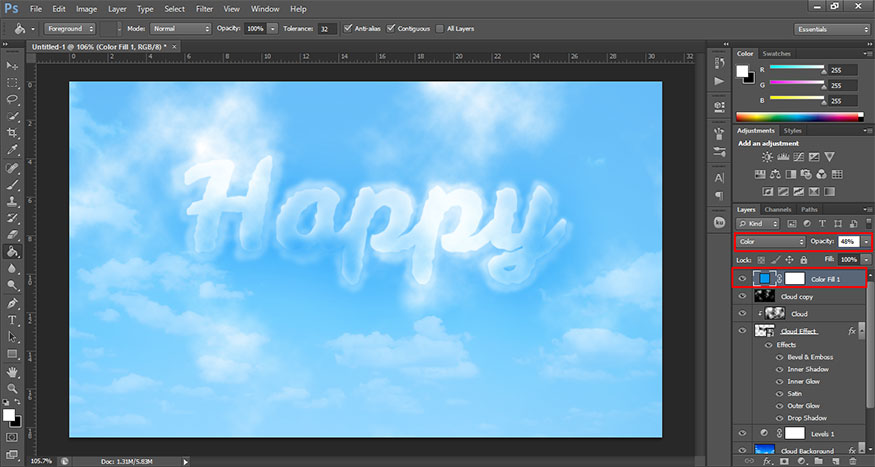
Step 1: In the bottom corner of the layers panel, select Create new fill or Adjustment layer. Select Solid Color…
Then, select color as #0096ec. Set the blend mode to Color, set the Opacity to 48%.
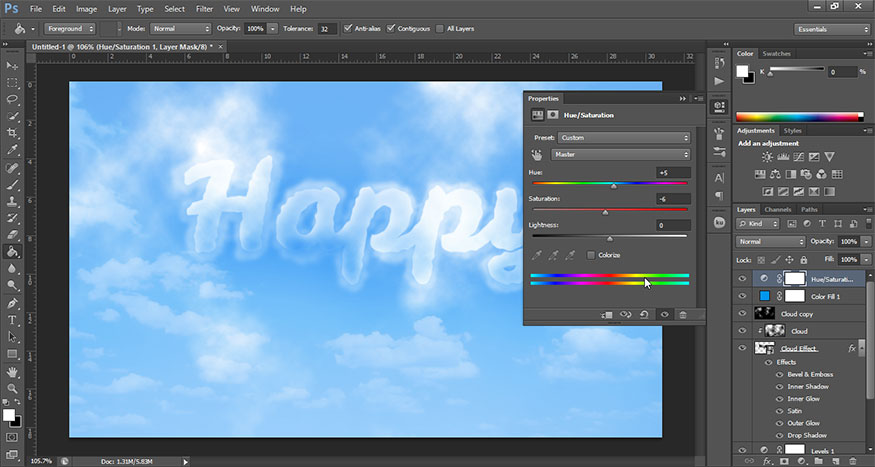
Step 2: Still choose Create new fill or Adjustment layer and select Hue/Saturation if you want to change the blue tone, reduce color saturation, etc. Adjust the appropriate parameters until you are satisfied.
Step 3: To increase contrast, select Create new fill or Adjustment layer then select Level, adjust appropriate parameters.

Step 4: To perfect your photo, you can add a sharpening effect. Press Shift+Ctrl+Alt+E to create a copy of all merged visible layers. On this newly created layer, select Filter => Other => High Pass.

In the High Pass dialog box, set the Radius to 2 pixels and then click OK.
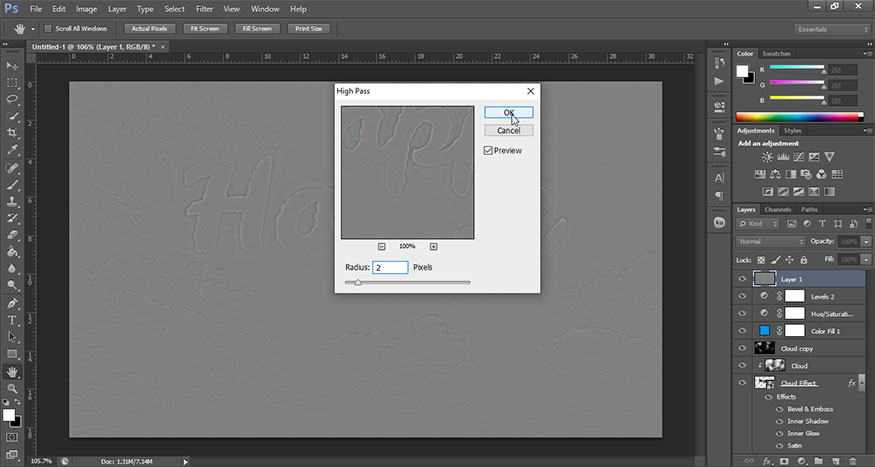
Step 5: Set this layer's blend mode to Overlay. At this point we will get the results as shown.
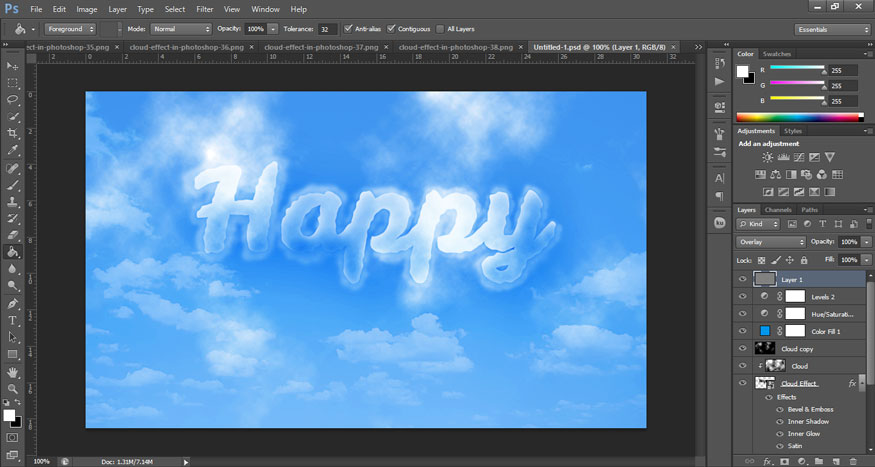
So you have completed how to create a cloud effect in Photoshop. There are quite a few steps but not complicated, try it to see surprising results.


VIP Products


Best Selling Products
Genuine Cheap Canva Pro
39 USD
Plugin Retouch4me
69 USD
ChatGPT Plus Account (GPT-4)
16 USD
Upgrade Duolingo Super
29 USD
Freepik Premium Account
59 USD
Capcut Pro 1 Year
39 USD
Windows 10 & 11 Pro Key
36 USD
Autodesk All App Account Copyright
120 USD
Copyright Adobe Lightroom Account
59 USD
Upgrade genuine Capture One account
120 USD
Adobe Premiere Pro Account
99 USD
Adobe Photoshop Copyright - Full App
120 USD
Genuine Adobe Illustrator account
99 USD
MidJourney Account
29 USD
Upgrade Genuine Office 365
49 USD