Best Selling Products

Freepik Premium Account
59 USD

Upgrade Duolingo Super
29 USD

Adobe Photoshop Copyright - Full App
120 USD

Plugin Retouch4me
69 USD

Windows 10 & 11 Pro Key
36 USD

Upgrade genuine Capture One account
120 USD

Upgrade Genuine Office 365
49 USD

Autodesk All App Account Copyright
120 USD

ChatGPT Plus Account (GPT-4)
16 USD

Capcut Pro 1 Year
39 USD

Genuine Adobe Illustrator account
99 USD

Adobe Premiere Pro Account
99 USD

MidJourney Account
29 USD

Copyright Adobe Lightroom Account
59 USD

Genuine Cheap Canva Pro
39 USD
How to achieve a double exposure text effect using Photoshop
Double exposure effect is the overlap, the combination of 2 or more exposure levels, it will make your design more impressive. You can absolutely create a double exposure text effect in Photoshop by combining many different tools. Let's see how to do it with SaDesign through the sharing below.
Double exposure effect is the overlap, the combination of 2 or more exposure levels, it will make your design more impressive. You can absolutely create a double exposure text effect in Photoshop by combining many different tools. Let's see how to do it with SaDesign through the sharing below.
.jpg)
To get double exposure text effect in Photoshop, first we need to have the text.
Step 1: Create a new document in Photoshop sized 1500 x 1000 px and fill the Background color with white.
Create a text using the Type Tool, making the text size quite large to display details better.
Set the Size to 360 pt and Tracking to 100. But you can use any other value you like.
.jpg)
Step 2: Download the image Branches 3 to your device. This is an image of the tree canopy with the background removed, which will be an exposure layer of the text. Then, load up on the text layer and resize it if needed.
.jpg)
Step 3: Press Ctrl and click on the text layer thumbnail to create a selection.
.jpg)
Step 4: Select the Rectangular Marquee Tool and click the Intersect with Selection icon on the Options bar. Then, click and drag to select the first letter and release. Now, only the first letter is selected.
.jpg)
Step 5: With the layer selected, click the Add layer mask icon at the bottom of the Layers panel.
.jpg)
Step 6: Place a new copy of the tree branch image, then repeat the same steps for each remaining letter. Each letter should have its own masked layer.
.jpg)
Step 7: Now, we will make the original text layer invisible by clicking on the eye icon next to it.
.jpg)
Step 8: Click the link icon between the layer thumbnails and the mask to unlink them.
Press Ctrl+T to enter Free Transform Mode. Move, rotate, and resize the branch inside its letter until you find everything looks best.
Press Enter to accept the changes.
.jpg)
Step 9: Repeat that for the remaining letters and don't forget to re-link the thumbnails when you're done. Put all the branch layers into one group and call it “Text”.
.jpg)
Step 10: Click the Create new fill or adjustment layer icon at the bottom of the Layers panel and choose Gradient Map.
.jpg)
Step 11: Click the Clip to layer icon and click the gradient fill box to create the gradient used.
To create a Gradient, you need to click below the gradient bar to add Color Stops, and when you click on each Color Stop, you can change its Color and Location values. Here are the Color Stop values used from left to right:
-
#282828 - 0%
-
#5c5353 - 25%
-
#877a7a - 50%
-
#ada3a3 - 75%
-
#f1eded - 100%
.jpg)
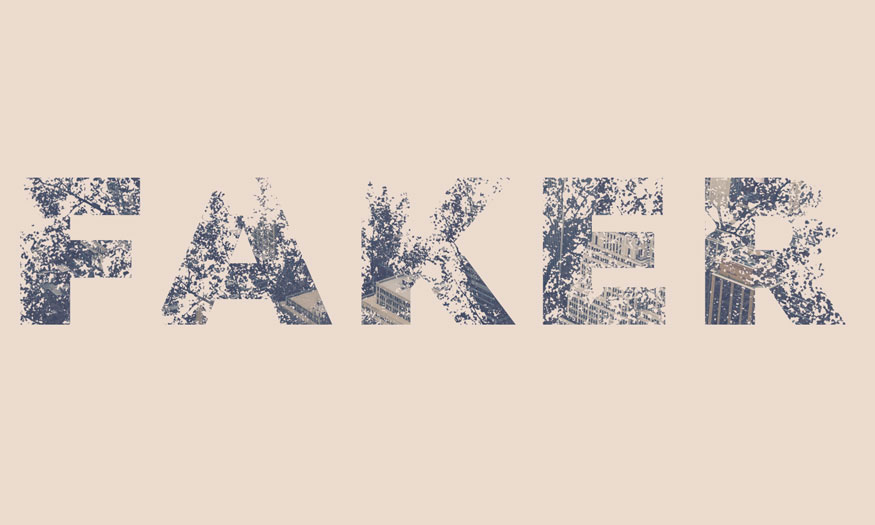
Step 12: Download the New York Building image to your device. Place it on top of all the layers, resize it if necessary, and change the layer's Blend Mode to Lighten.
Press Ctrl and click on the text layer thumbnail to create a selection and click the Add layer mask icon to mask the building image.
This will finish off the double exposure effect, but we'll add a few more color adjustment layers to enhance the final result.
.jpg)
Step 13: Add another Gradient Map layer on top of all the layers and create a gradient by using the colors #48406e on the left, #76747e on the center and #fbc690 on the right.
Then, reduce the layer's Opacity to about 35%.
.jpg)
Step 14: Add a Levels adjustment layer on top of all layers and adjust the setting of each channels as shown below:
.jpg)
We’ve got the result:
.jpg)
So, you have created double exposure text effect in Photoshop. It's not difficult to do, you can change the settings to get different results.
- Create a simple fur text effects in Photoshop
- Create cloud text effects in Photoshop


VIP Products


Best Selling Products
Freepik Premium Account
59 USD
Upgrade Duolingo Super
29 USD
Adobe Photoshop Copyright - Full App
120 USD
Plugin Retouch4me
69 USD
Windows 10 & 11 Pro Key
36 USD
Upgrade genuine Capture One account
120 USD
Upgrade Genuine Office 365
49 USD
Autodesk All App Account Copyright
120 USD
ChatGPT Plus Account (GPT-4)
16 USD
Capcut Pro 1 Year
39 USD
Genuine Adobe Illustrator account
99 USD
Adobe Premiere Pro Account
99 USD
MidJourney Account
29 USD
Copyright Adobe Lightroom Account
59 USD
Genuine Cheap Canva Pro
39 USD