Best Selling Products

Copyright Adobe Lightroom Account
59 USD

Genuine Cheap Canva Pro
39 USD

Upgrade genuine Capture One account
120 USD

Freepik Premium Account
59 USD

Adobe Photoshop Copyright - Full App
120 USD

Adobe Premiere Pro Account
99 USD

Genuine Adobe Illustrator account
99 USD

Upgrade Duolingo Super
29 USD

Autodesk All App Account Copyright
120 USD

Plugin Retouch4me
69 USD

Windows 10 & 11 Pro Key
36 USD

ChatGPT Plus Account (GPT-4)
16 USD

Capcut Pro 1 Year
39 USD

MidJourney Account
29 USD

Upgrade Genuine Office 365
49 USD
Steps to Create a Wicked Movie Logo in Photoshop
Nội dung
- 1. How to create a new Photoshop document
- 2. How to create text in the movie Wicked
- 3. How to create a metal border
- 4. How to create Wicked green border
- 5. How to create 3D text in Photoshop
- 6. How to create shadows in photoshop
- 7. How to change 3D text color in Photoshop
- 8. How to recolor the Wicked outline
- 9. How to mask 3D text effect in Photoshop
Wicked movie logo is a unique combination of black, metallic or vivid green 3D text. The article below SaDesign will share with readers how to create a beautiful and impressive Wicked movie logo in Photoshop.
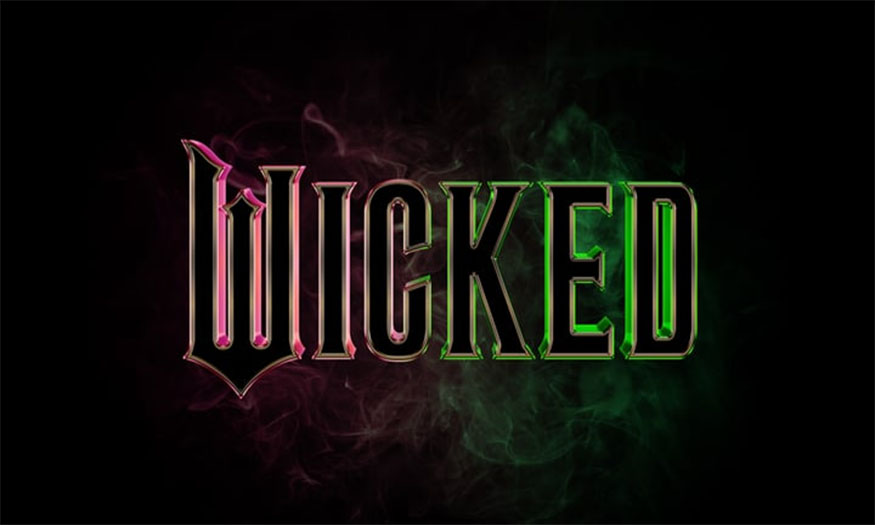
Wicked movie logo is a unique combination of black, metallic or vivid green 3D text. The article below SaDesign will share with readers how to create a beautiful and impressive Wicked movie logo in Photoshop.
![]()
1. How to create a new Photoshop document
First, start Photoshop and select the file, then choose "New" to open a blank document. Enter the icon of the film Wicked as the file name, then set the size to the bottom of the display, select Pixels as the unit, and choose RGB as the color mode. Select a white background for this document and click 'Create'.
![]()
2. How to create text in the movie Wicked
Step 1: Start selecting the Wicked movie logo with the text. Then using the Horizontal Type Tool (T), click your text and capitalize the word “WICKED”. In this article, SaDesign is using the Helison font, which will resemble the original Wicked font.
Set the following settings:
- Font size : 494 points
- Vertical scale: 140%
- Horizontal ratio: 80%
- Black
The letter W is not the letter we need, so you can completely leave it out. SaDesign recommends writing each letter separately so that you get a layer for each letter in the layers panel.
![]()
Step 2: For the letter W, make three copies of the letter I and arrange them as shown below. We'll go back and make it look like the original Wicked logo.
![]()
Step 3: Start distorting the letters to create a better effect. Select the letter I in the Layers panel, right-click on it then choose Convert to Shape from the menu. Thus, the text will turn into a shape with anchor points that you can edit with the Direct Selection Tool (A). Select the top and bottom corner points and move them apart to lengthen the serifs.
Besides, make the letter a little wider by selecting and moving only half of it with the Direct Selection Tool (A).
Next, select Convert to Shape layer letter C. Round the specified areas by adding some additional points using the Add Anchor Point Tool, then adjust the handles. Also make the letters a little wider.
![]()
Step 4: Follow the steps above to deform the letter K. Move the corner points of each leg apart to make the serifs more pointed. Then, select only the point highlighted in red using the Direct Selection Tool (A) and move it up.
For the letter E, select the points highlighted in green, then move them to the left to lengthen the serifs. Also, make its 3 legs longer by dragging the selection past their endpoints and moving them to the right with the Direct Selection Tool (A).
![]()
Step 5: Continue with the letter D. Make the serifs sharper, then make the inner hole thinner by moving the anchor points with the Direct Selection Tool (A).
![]()
Step 6: Continue creating the letter W. Convert to Shape 3 copies of the letter I then stretch the serifs as you did before. Make this adjustment for all 3 shapes. Next, make the first and third shapes longer and the middle shape shorter by dragging the selection past their top points via the Direct Selection Tool and then moving them.
The initial W is quite irregular, so we need to deform the first shape and the middle shape more. Use the Add Anchor Point Tool (A) to add additional points and use the Direct Selection Tool (A) to move these points. At the same time, you need to adjust the handles until the shapes look as close to the originals as possible.
![]()
Step 7: Continue drawing a shape using the Pen Tool (P) as shown in the image below. At this point, you can still adjust the letters because they are animated shapes. Once you're done, select all the letter layers present in the Layers panel. Then right-click and select Convert to Smart Object from the menu. Name the layer “Wicked Base”.
![]()
3. How to create a metal border
Next, we will start creating a metal border for the wicked movie logo in photoshop. Step 1: Duplicate the Wicked base layer and name it “Wickedline”. Double-click this layer to open the Layer Style window and apply the Stroke using the settings shown below. Then select OK.
Set Fill to 0%. Now, if you wet the Wicked base layer, you will see a text outline appear.
![]()
Step 2: Double click on the Wicked border layer to open the Layer Style window and apply Gradient Overlay, Color Overlay and Bevel & Emboss styles to get the metallic border.
![]()
This is the Gradient Overlay settings:
![]()
This is the Color Overlay và Bevel & Emboss settings:
![]()
4. How to create Wicked green border
Step 1 : If you look at the Wicked movie poster, you can see that the original logo had a thin green border. So now, we will create this blue border using the following steps.
First, duplicate the Wicked base layer and then apply the Stroke and Bevel & Emboss layer styles using the settings shown below.
![]()
Step 2: Next, duplicate the Wicked base copy layer you made in the steps above. Open the Layer Style window and in Bevel & Emboss, change the Direction to Up along with setting the Highlight Mode and Shadow Mode. Don’t change the Stroke settings.
Once done, select these two layers and group them. Name the group “Green Outline”.
![]()
5. How to create 3D text in Photoshop
Step 1: To create 3D text, Photoshop has a whole 3D menu but unfortunately it has been discontinued. However, we can still create a 3D text effect using the steps below.
Duplicate the Wicked base layer and move it to the bottom of the Layers panel. Name it “Extrusion”. In the Layer Style window, apply Color Overlay using light gray then select OK. This layer will not be visible but it will help us create realistic 3D action.
![]()
Step 2: Open the Actions window by selecting Window => Actions. Select Create New Set at the bottom and enter 3D Extrusion as the name. Then continue to select OK.
Next, click Create new action at the bottom of the window (+ sign) and enter Wicked 3D as the name of this action. Make sure Set is mounted for 3D Extrusion and you can also attach function keys if you want. Select Record.
![]()
Step 3: You are now in recording mode, indicated by the red circle at the bottom of the Actions window. Select the gray Extrusion layer you created earlier, then right-click on this layer, select Duplicate from the menu. The new layer will automatically be named “Extrusion copy”.
Then, go to Edit and select Free Transform (Ctrl+T) and enter 99.90% in the width box and 99.9% in the height box in the options panel (Window => Options). Click the Commit Transform icon or press Enter.
You can see that the Duplicate and Transform operations have been recorded in the Actions panel and now you can click Stop Record at the bottom of the panel.
![]()
Step 4: While the Extrusion Copy and Wicked 3D Action layers are selected, continue pressing Play Selection at the bottom of the Actions panel about 30 times. Each time you press Play, a new layer will be created and you will see the 3D Extrusion increasing. Once you're done, select and group all the extrusion layers together and name the group “3D”.
![]()
Step 5: To create a bright green 3D text effect, double-click fnhosm 3D and apply the layer styles Gradient Overlay, Inner Glow and Bevel & Emboss.
![]()
This is Gradient Overlay settings:
![]()
This is Inner Glow và Bevel & Emboss settings:
![]()
6. How to create shadows in photoshop
To improve the final look of your Wicked logo, you can add shadows at the ends of the letters. Select the entire text effect in the Layers panel, right-click, and choose Duplicate from the menu to make copies of everything.
Next, choose Convert to Smart Object, and a new layer will be created and you will name it “Wicked text effect copy”. You don't need this layer, just Ctrl-click this layer thumbnail to get a selection around the entire Wicked text.
Select the Brush Tool (B), set the color to black and choose a small brush size around 20px - 30px. Click New Layer at the bottom of the Layers panel and name it “Bottom Shading”. Start painting inside this layer with the Brush Tool (B) on the green outline at the bottom of each letter. Choosing this activity will help you avoid drawing on the background.
Once you're done, select Select => Deselect (Ctrl-D), then you can delete the Wicked text effect copy layer. Reduce the Opacity of the Bottom Shading Layer to about 50% or as desired.
![]()
7. How to change 3D text color in Photoshop
The new 2-tone logo will be more beautiful and fresh, so you need to find a way to change its color. Select and duplicate the 3D group you have in the Layers panel. Rename the new group “3D pink”, and you can also rename the original group 3D Green so everything lines up well in the Layers panel.
To change the color of the 3D Extrusion from blue to pink, double-click the fx icon to open the Layer Style window and change some settings.
![]()
Change Gradient Overlay settings:
![]()
This is Inner Glow và Bevel & Emboss settings:
![]()
8. How to recolor the Wicked outline
Step 1: Duplicate the Green Outline group and rename it “Pink Outline”. The new Pink Outline group will contain two layers, Wicked base Copy and Wicked base Copy 2, exactly like the original Green Outline. We change the effect settings for the 2 layers according to the following steps:
![]()
Step 2: Open the Layer Style window for the Wicked Base Copy layer and change the Stroke and Bevel & Emboss settings as shown below:
![]()
Step 3: Continue to open the Layer Style window for the Wicked base copy 2 layer and change the Stroke and Bevel & Emboss settings as below:
![]()
9. How to mask 3D text effect in Photoshop
Step 1: First, select the 3D pink group and click the Mask icon at the bottom of the Layers panel. Grab the Brush Tool (B) and use it to paint on the right side of the “Wicked” text. Completely cover the letters D, E and K and only cover half of the letter C.
-
Brush Type: Soft Round
-
Brush Size: 180-200 px
-
Brush Opacity: 100%
-
Brush Color: black
![]()
Step 2: Repeat the previous steps for the 3D Green group. This time, use the brush to paint on the left side of the “Wicked” text. Completely cover the letters W and I, only cover half of the letter C.
![]()
Step 3: Now continue masking the green and pink borders around the text. Create a mask for the Pink Outline group and paint with a brush on the right half exactly as you did in the steps above. Use the same brush settings.
Once done, create a mask for the Green Outline group and use a brush to paint on the left half to make it invisible.
So, you have successfully created the Wicked movie logo in Photoshop. Hopefully the above sharing from Sadesign will help readers gain more experience in editing movie logos.
- How to design a classic movie poster in Photoshop
- Guidelines for Designing Action Movie Posters in Photoshop
- How to create a movie poster inspired by Star War using Photoshop


VIP Products


Best Selling Products
Copyright Adobe Lightroom Account
59 USD
Genuine Cheap Canva Pro
39 USD
Upgrade genuine Capture One account
120 USD
Freepik Premium Account
59 USD
Adobe Photoshop Copyright - Full App
120 USD
Adobe Premiere Pro Account
99 USD
Genuine Adobe Illustrator account
99 USD
Upgrade Duolingo Super
29 USD
Autodesk All App Account Copyright
120 USD
Plugin Retouch4me
69 USD
Windows 10 & 11 Pro Key
36 USD
ChatGPT Plus Account (GPT-4)
16 USD
Capcut Pro 1 Year
39 USD
MidJourney Account
29 USD
Upgrade Genuine Office 365
49 USD