Best Selling Products

Copyright Adobe Lightroom Account
59 USD

Adobe Photoshop Copyright - Full App
120 USD

Genuine Adobe Illustrator account
99 USD

Capcut Pro 1 Year
39 USD

Upgrade Duolingo Super
29 USD

Adobe Premiere Pro Account
99 USD

Windows 10 & 11 Pro Key
36 USD

Genuine Cheap Canva Pro
39 USD

Freepik Premium Account
59 USD

Upgrade Genuine Office 365
49 USD

Plugin Retouch4me
69 USD

MidJourney Account
29 USD

ChatGPT Plus Account (GPT-4)
16 USD

Autodesk All App Account Copyright
120 USD

Upgrade genuine Capture One account
120 USD
What is Matte Painting in Photoshop?
Nội dung
- 1. What is Matte Painting in Photoshop?
- 2. Modern-day Matte Painting
- 3. Planning a Matte Painting
- 3.1. Sketching
- 3.2. Instructions
- 4. How to choose an image for a Matte Painting
- 4.1. 3D Content
- 4.2. Extracting images
- 4.3. Generative Fill
- 5. How to judge suitability in Matte Painting
- 6. Adjusting values
- 7. How to Add Final Details to Matte Painting
- 8. Blur the path
Matte Painting is often used a lot in science fiction and fantasy movies. If you are interested in this topic, let's find out with SaDesign what Matte Painting is in Photoshop in the following article.
Matte Painting is often used a lot in science fiction and fantasy movies. If you are interested in this topic, let's find out with SaDesign what Matte Painting is in Photoshop in the following article.

1. What is Matte Painting in Photoshop?
This is a technique that has been around for a long time. Initially, Matte Painting was a surreal background used in photography and film. This technique allows filmmakers to create cityscapes and landscapes in a variety of methods.
Sometimes, the background is done by painting directly onto a glass, and this glass will be placed on the front of the camera. In addition, they are also used as practical backdrops on film sets with the purpose of expanding the scene or landscape.
The use of Matte Painting backdrops is used a lot in fantasy or science fiction movies.
2. Modern-day Matte Painting
In modern times, Matte Painting serves the same purpose but tends to be digital and a combination of 3D, CGI, animation, photo and hand-drawn elements. This creates a newer technique called photo editing or photo processing. Applying traditional painting techniques and photo textures to add realism.
With the rise of Photoshop, creating matte paintings for ideas and digital art is becoming more popular than just the film industry.
3. Planning a Matte Painting
Begins by planning a Matte Painting with sketches to guide composition and value.
3.1. Sketching
When creating a sketch, you should Zoom your canvas smaller or make sure Navigator is turned on by going to Window => Navigator.
Sketch to guide the shape, composition and overall value of the painting, so you don't need to focus too much on the details. Zooming out will help you see the big picture.

3.2. Instructions
In this step you need to build a composition for the painting, divide your landscape painting into three parts:
Step 1: View => Guide => New Guide Layout.
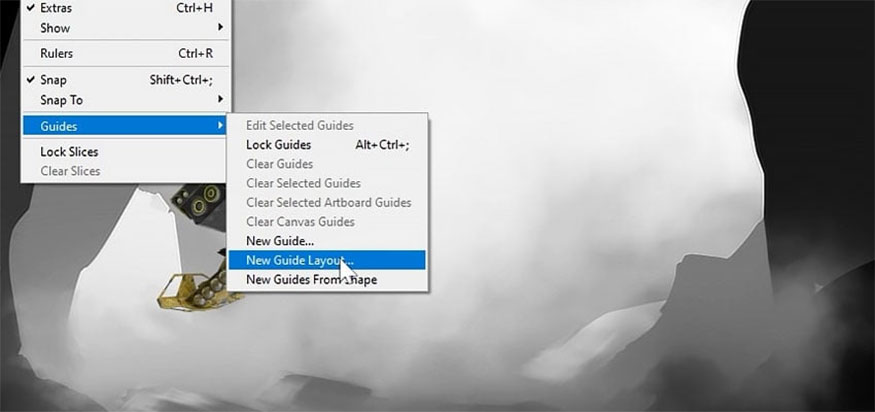
Step 2: Select the Center option in the Preset list. Next, change the number 2 in Column and Row to 3, your Canvas will immediately be divided into three parts.
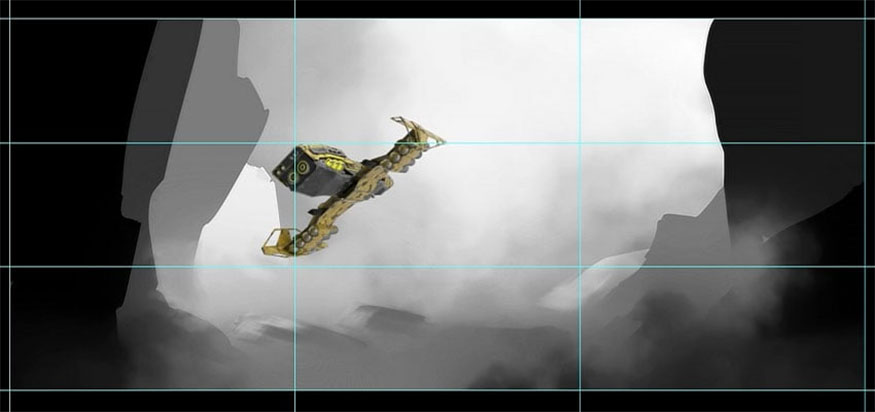
Step 3: Turn your instructions on and off by using Control/Command-; .
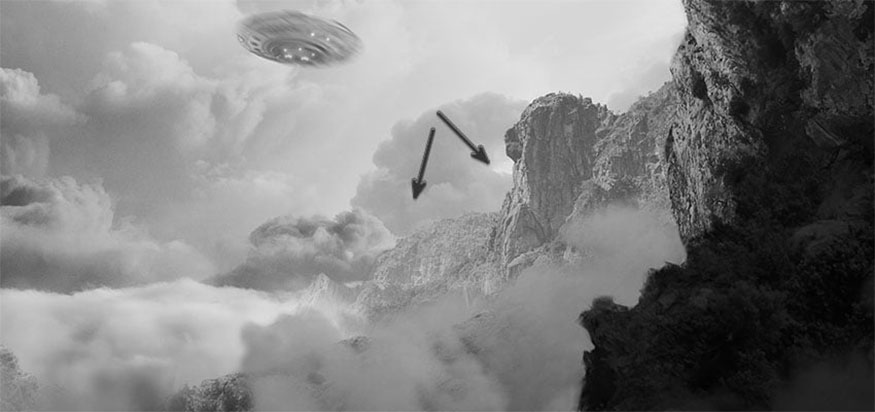
4. How to choose an image for a Matte Painting
Once you've set up your sketch and rough guide, the next step is to try to gather lots of high-resolution textures. Since there will likely be a lot of trial and error when creating a matte painting, preparing a large number of images of trees, rocks, mountains, and sky will make things easier.
4.1. 3D Content
3D Sculpting is an important skill in Matte Painting. If you want to pursue matte painting, you should consider a tool like Blender or Cinema 4D.
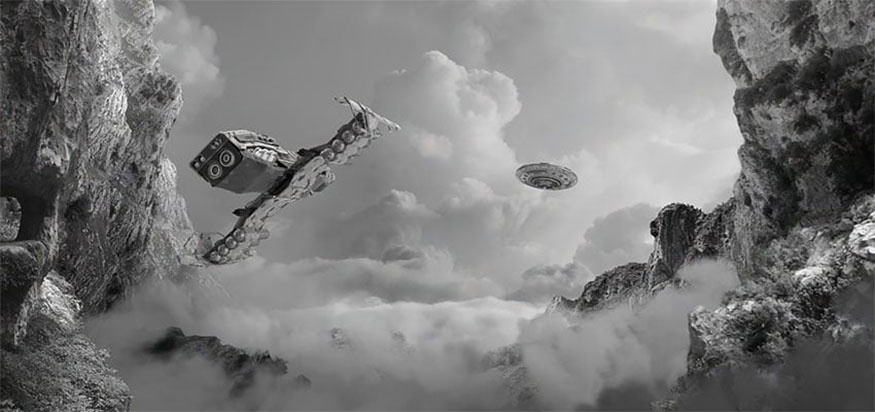
In this example, we will use a spaceship and a series of clouds. Download the image as PNG.

4.2. Extracting images
For initial extractions, you can use the following tools:
-
Lasso Tool
-
Quick Selection Tool
-
Object Selection Tool
Then perform the following steps:
Step 1: Select a part of this cliff using the Object Selection Tool and add a Layer Mask.
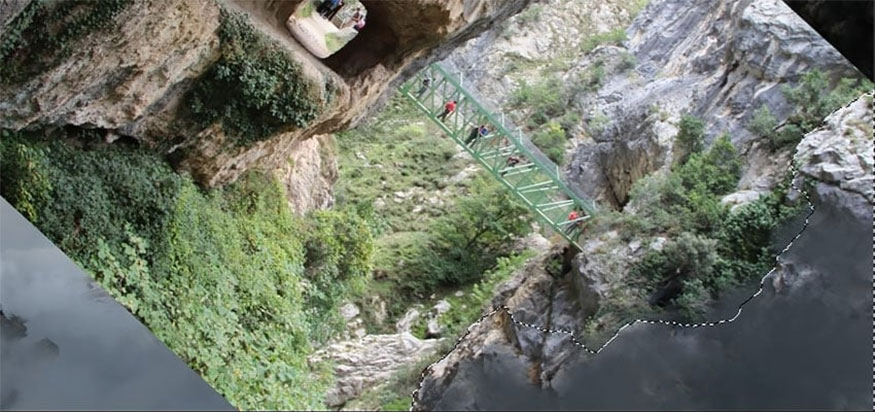
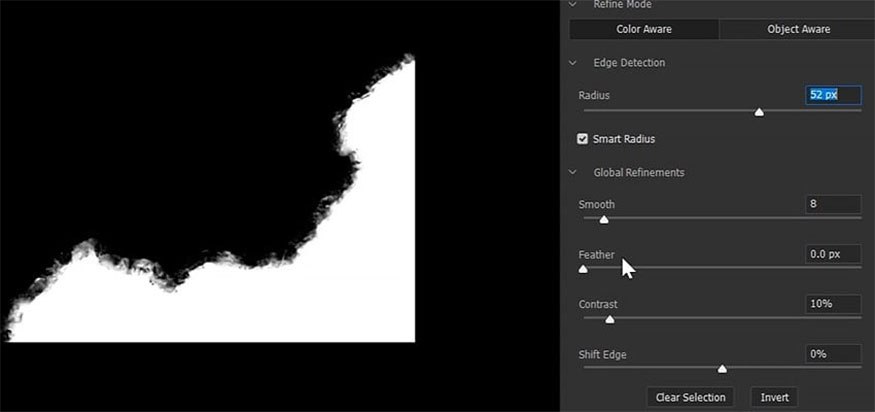
Step 2: Now, go to Select and Mask right in the options bar above. Turn Smart Radius on and increase the Radius until the edges of the stone texture look more natural.
If needed, we can further refine the mask using Global Refinements.
Step 3: We can make the necessary adjustments using Brush. The Brush tool has a texture that matches the mask surface.
4.3. Generative Fill
You should not use Generative Fill to create objects or images. Instead, you can use it to mix the two parts together.
Step 1: Use the Lasso tool to select an area that does not blend in the surroundings.
Step 2: Now, in the Context bar, press Generate without a prompt, Photoshop will try to blend the areas together.
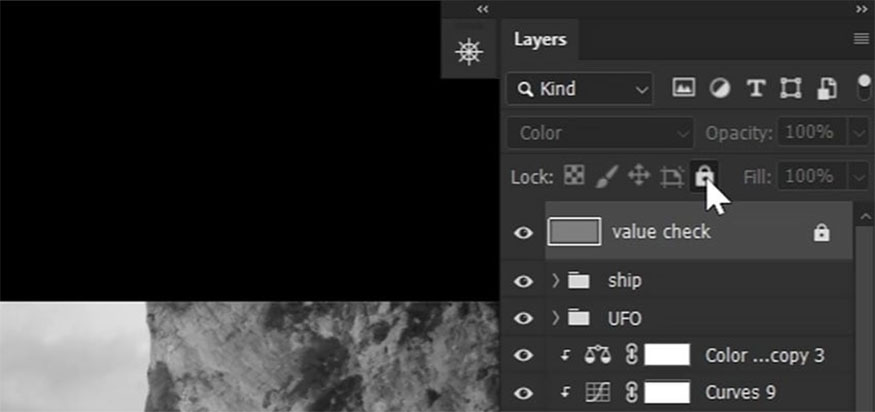
5. How to judge suitability in Matte Painting
Value is how light or dark something is, regardless of color. Let's create a Value Check layer while drawing and compositing:
Step 1: Create a new layer at the top of the layer stack, then go to Edit => Fill => 50% Gray.
Change the layer mode to Color to give a black and white view of the image so that we can see and adjust our values more easily.
Step 2: You can turn it on and off as we move Lock layers to avoid accidentally selecting them.
6. Adjusting values
Now you can see your values more easily, let's take a quick look at adjusting values. First make sure that the "Check Values" layer is enabled when adjusting values.
Step 1: Create and clip a Curves adjustment layer to the frontmost stone face. Lower the right point on the curve to darken it.
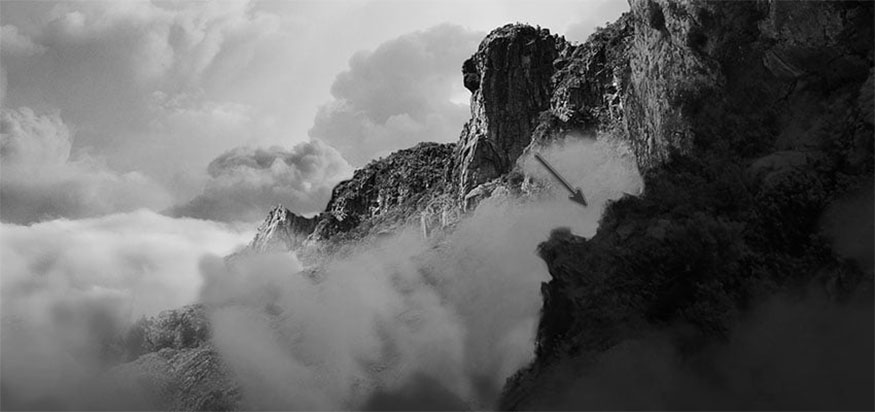
Step 2: Do the same for the rock behind it, but this time darken it a bit.

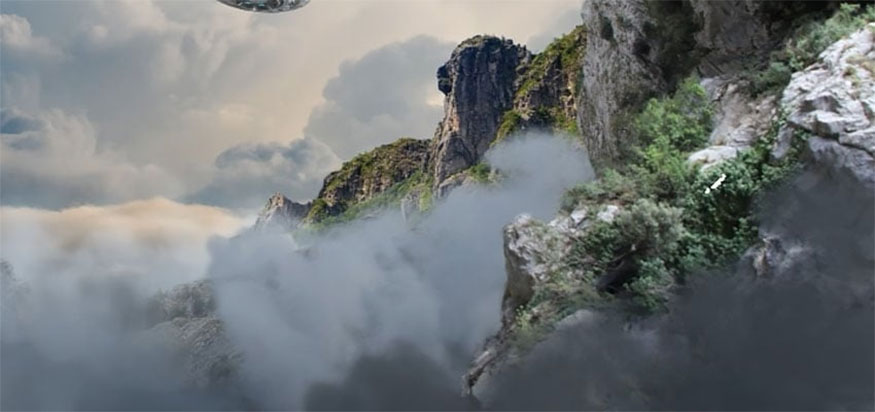
Step 3: For the mountains in the distance, you highlight the shadows. This will be the point affected by the fog. Far away objects tend to be lighter and have less contrast. Understanding fog is an important part of a successful matte painting rather than just creating a flat Curves layer.
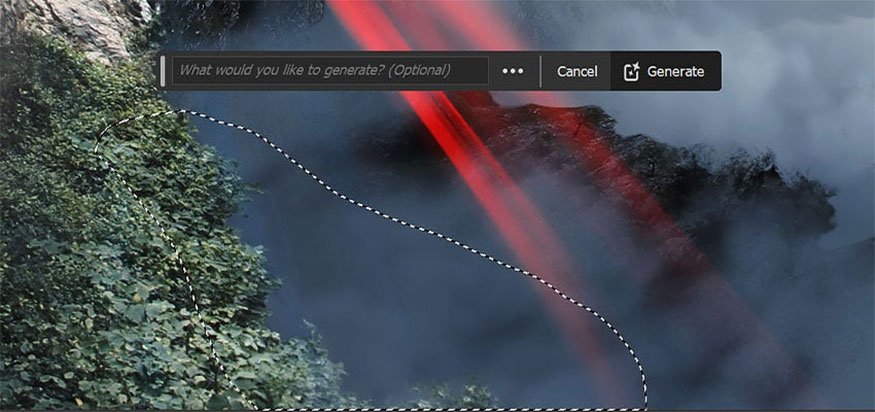
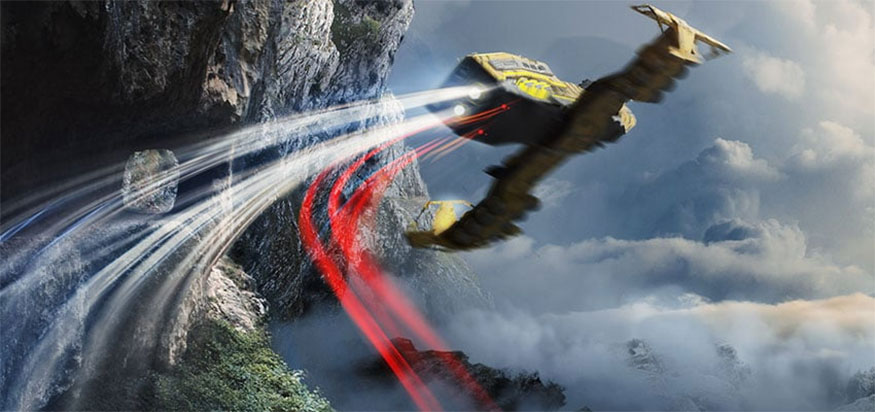
7. How to Add Final Details to Matte Painting
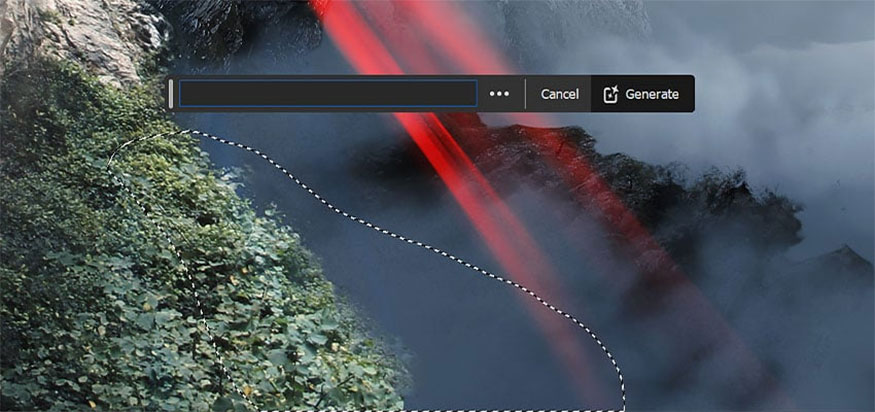
Focus first on the ship tracks, the light streaks that help add instant movement to any object. To add more details, do the following:
Step 1: Take a photo of some light streaks, in this example we will use an exposure image from the highway. Place the image on the canvas and set it to Screen. Use the Transform tool to shape and Warp the lights.
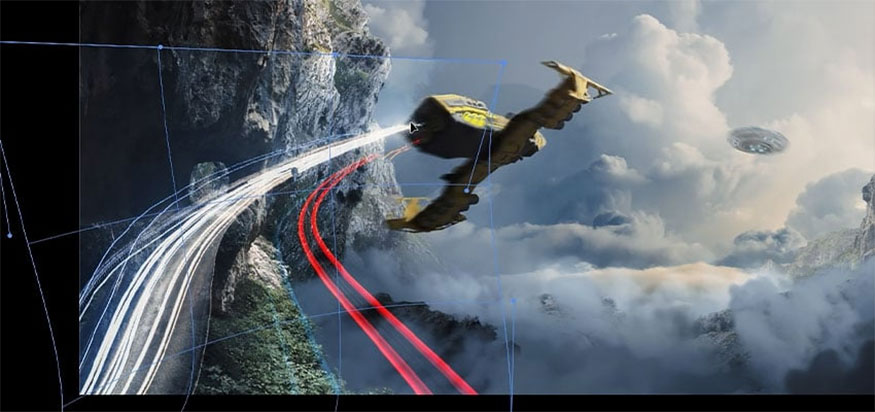
Step 2: Add some blur effects using Filter => Blur Gallery => Path Blur. Create and construct paths to add movement to the light streams. Set Speed at about 80%.
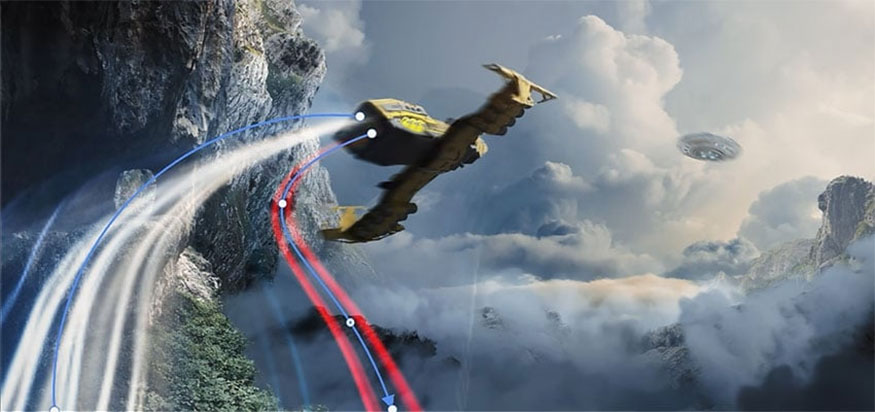
Step 3: Complete the light tails by going to Image => Adjustments => Curves to reduce the shadow of the image to remove any excess background from the lights. Add a Layer Mask and use a soft round black Brush to remove any unwanted areas.
Step 4: Repeat the steps or duplicate the lights to create double light streaks.
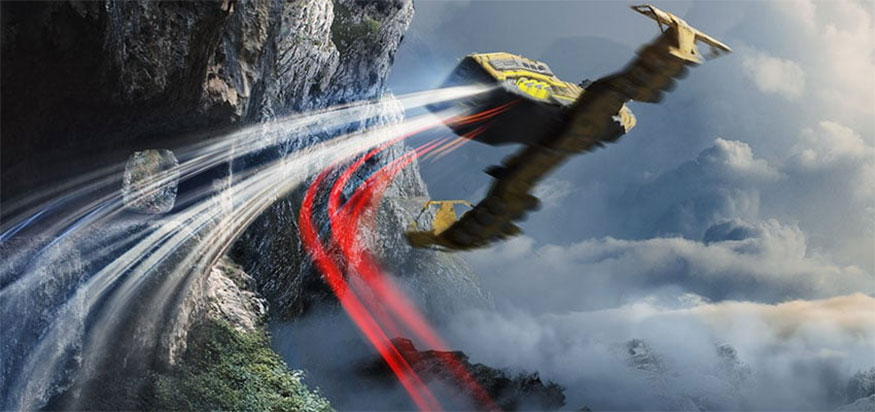
Step 5: Finally, add some dots of light to the back of the ship. Use layers set to Screen, Overlay and Color Dodge to create small and simple lights.
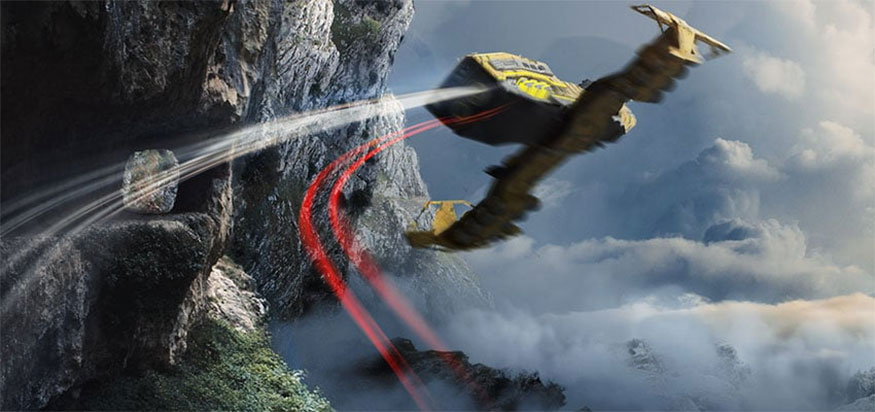
8. Blur the path
In this step, we will use Path Blur to add some motion blur to the ship. You can absolutely use the Motion Blur filter instead. The steps are as follows:
Step 1: Select the ship and right-click and select Smart Object to create a smart filter mask. Go to Filter => Blur Gallery => Path Blur. Place and blend a path to match the ship shape, set speed to 20%.
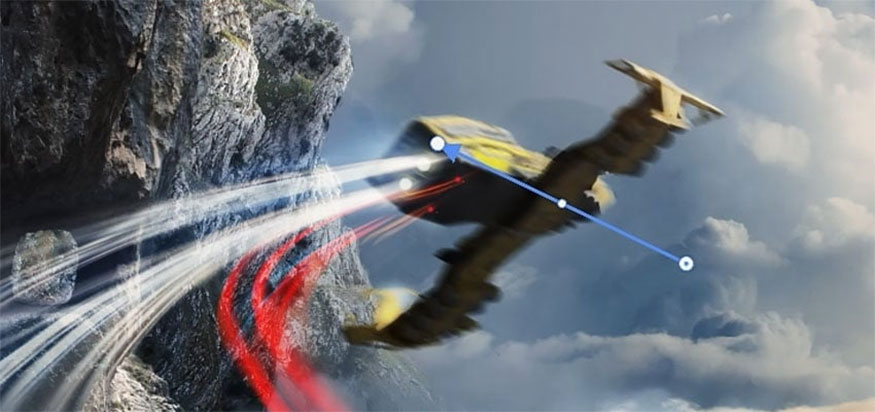
Step 2: Use the default soft round Brush tool and click Smart Filter Mask. You can mask out the middle of the ship and any areas that don't want a Path Blur. Let's focus on the motion effects on the wings and bottom of the ship.
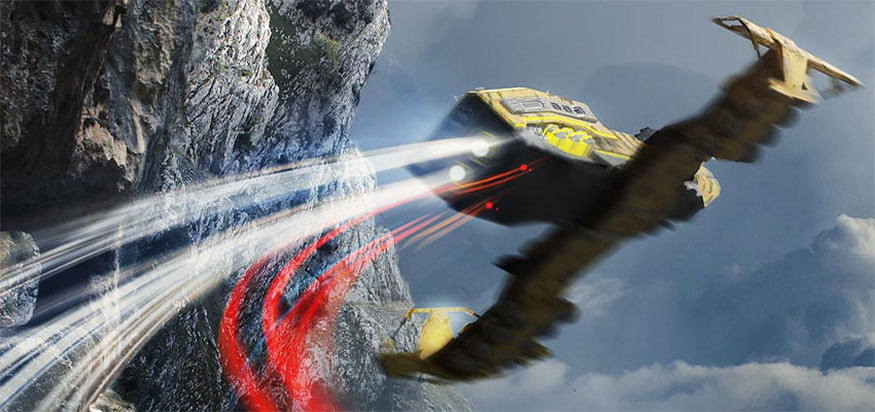
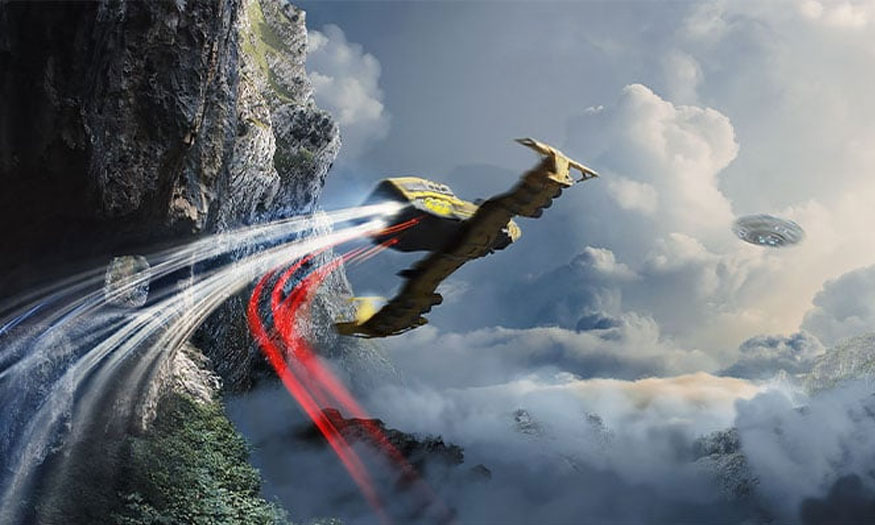
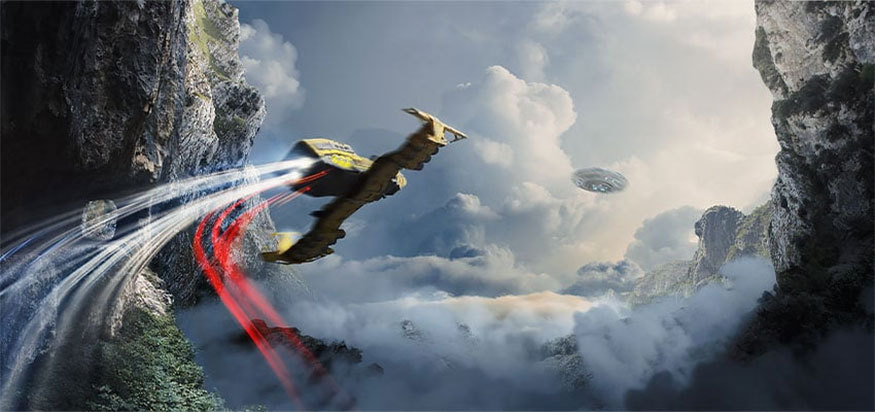
This is the final result:
Matte Painting in Photoshop is an incredibly impressive art form that requires proficiency in many mediums. Hope you successfully apply the instructions that Sadesign provides above!
- Create a very interesting Glitch effect in Photoshop
- How to creat cartoon photo effects in Photoshop


VIP Products


Best Selling Products
Copyright Adobe Lightroom Account
59 USD
Adobe Photoshop Copyright - Full App
120 USD
Genuine Adobe Illustrator account
99 USD
Capcut Pro 1 Year
39 USD
Upgrade Duolingo Super
29 USD
Adobe Premiere Pro Account
99 USD
Windows 10 & 11 Pro Key
36 USD
Genuine Cheap Canva Pro
39 USD
Freepik Premium Account
59 USD
Upgrade Genuine Office 365
49 USD
Plugin Retouch4me
69 USD
MidJourney Account
29 USD
ChatGPT Plus Account (GPT-4)
16 USD
Autodesk All App Account Copyright
120 USD
Upgrade genuine Capture One account
120 USD